Showing posts with label Diaper Changing. Show all posts

Tuesday, July 31, 2012

Travel With Cloth Like A Pro - #beachbash

How To Travel With Cloth Diapers
Summer is in full swing and I’m so excited to be selected as one of the participating bloggers in the Kelly's Closet Blogger Beach Bash. All participating bloggers will be sharing fun summer posts and giving away a $15 gift certificate to Kelly’s Closet in addition to the awesome Beach Bash Prize Package that Kelly's Closet is giving away on their site for a swim diaper, sunscreen, & medium wetbag.  Have you gotten your entries in yet??? Well, I thought long and hard about what I wanted to write about for my Blogger Beach Bash post. What does summer mean to me? More importantly what does summer mean to me when it comes to cloth diapering? After thinking on this awhile it hit me! I’m sure you've realized that we are out of town… A LOT. I think we’ve only been home about two weekends this whole summer. So what does this mean for me? It means that I’m packing up diapers for trips all the time. After a little trial and error I have traveling with diapers down to an art form and I’m here to share with you my diaper traveling tips. Check out my travel packing lists below as well as a few tried and true cloth diapering travel tips that are sure to make your days away from home go a little more smoothly. 


The Weekend Packing List (1-3 nights) 


Disposable Diaper Liners – Linc only poops once a week so I only bring these if it’s getting close to pooping day, but if your wee one poops a lot (and it’s solid enough for liners) then I would highly recommend them so you can avoid stowing away super poopy diapers till you get home or having to swish them while out and about. Don’t bring the whole roll. Just bring what you need and store them in a travel wipes case. 

All-In-Two Diaper Shells – All In Two diapers seem to take up the least space when packing since I can use each shell a few times. I figure that I’ll be using each shell about three times before tossing it in my wet bag. When figuring how many shells to bring I use the following calculation: 

((Avg # of diaper changes in a day + 1)*(# of days you’ll be away)) / 3 = # of Diaper Shells To Pack 

All-In-Two Diaper Inserts – Pack 3 inserts for every diaper shell. Sometimes I’ll throw an extra insert or two in for good measure. 

Nighttime Diapers – This will depend on how heavy of a wetter your child is. I can use an All In Two diaper with two inserts or a fitted diaper with a cover. I pack one nighttime diaper option for each night away. I do not re-use diaper shells or covers used at night due to the amount of pee that gets soaked into them. 

Swim Diaper – I like to pack two just in case Linc poops while in his swim diaper. I want to have a back up. 

Cloth Wipes (single ply) – Like I said. Linc doesn’t poop much so I only use one wiper per change. That means I pack the same number of wipes as diaper inserts plus one just in case. The reason I say single ply is because they take up less space in my suitcase than my double sided wipes. 


Small Wet Bag – I usually bring two small wet bags (one for the drive to my destination and one for the drive home), but you can also get away with one. Just empty the wetbag into your larger wetbag and reuse. Wipe the wet bag out and let dry if needed. 


The Extended Stay Packing List (with washing facilities)


My extended stay with washing facilities packing list is pretty much the same as my weekend trip packing list. I just pack enough shells, inserts, nighttime diapers, & wipes for 3 days and 3 nights. I also pack enough cloth diaper safe detergent for my entire trip along with a measuring scoop and two large wet bags instead of one.  This is based on washing every other day.


The Extended Stay Packing List (without washing facilities) 


My extended stay without washing facilities packing list is a bit different. I still pack everything I do for a weekend trip with a few tweaks to accommodate hand washing EVERY DAY. Instead of All In Two diapers, I use covers and flats. The reason for this is because they are much easier when it comes to hand washing and drying. 


Disposable Diaper Liners – These are especially helpful when it comes to hand washing. The less poop the better. Just pack the quantity you will need while away and put them in a disposable wipes travel container. 

Diaper Covers – When it comes to traveling I find that PUL (no interior liner) is the easiest to clean, the fastest to dry, and takes up the least amount of space in your luggage.  Figuring that I'm going to wash every day, I pack enough diaper covers for two days plus 1 just in case.  I personally like to rotate between two covers each day and have one as a backup.

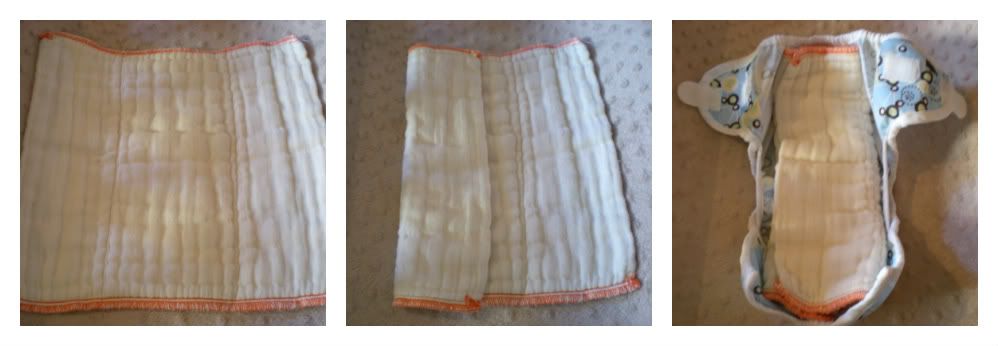
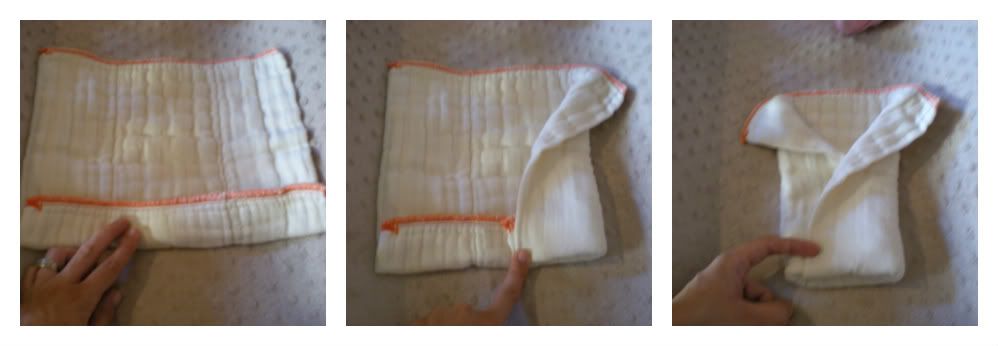
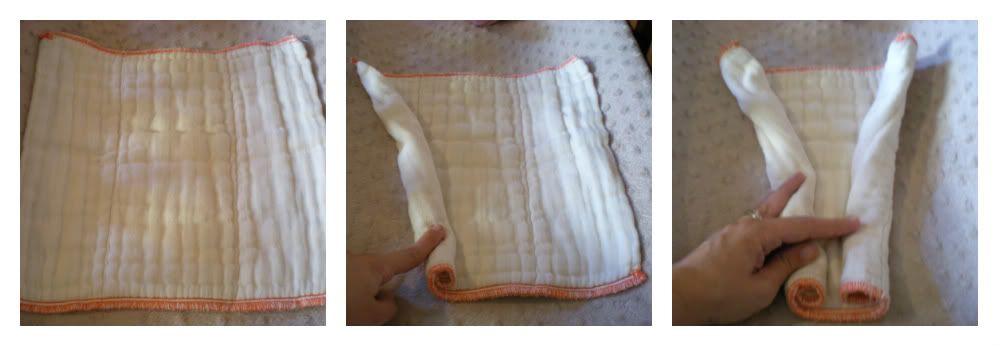
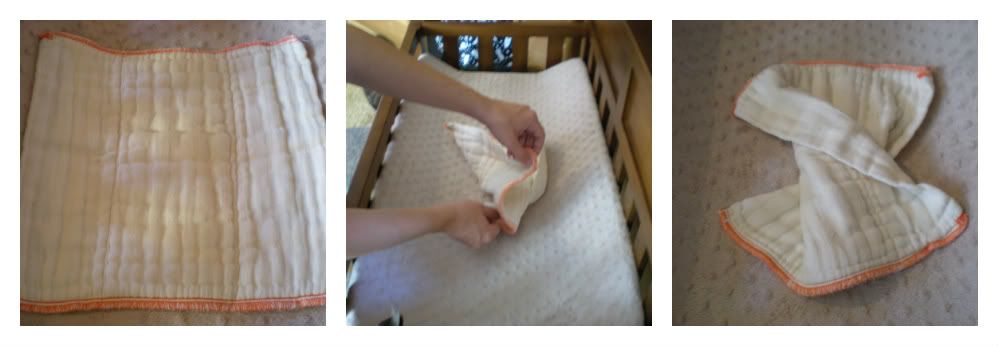
Flat Cloth Diapers – Pack enough flats for two days.  I pack one per change, but you might need two per change if you have a heavy wetter. Sometimes I’ll throw an extra flat or two in for good measure. I find that birdseye cotton flats are the easiest to hand wash and dry the fastest as well. 

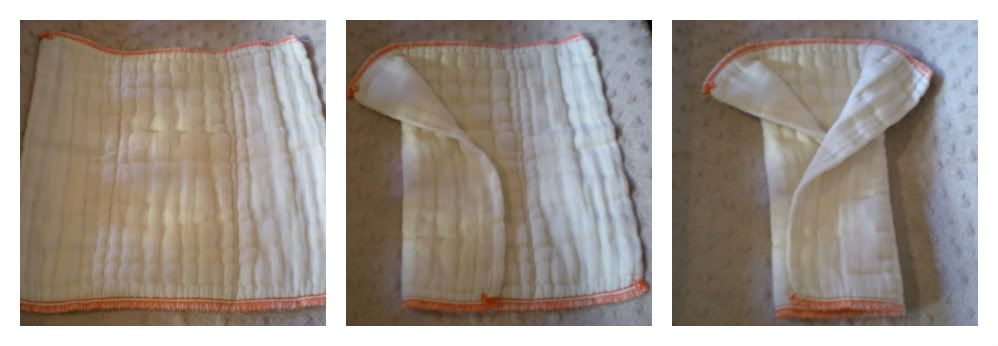
Diaper Closure Device – You will not need these if you are just padfolding your flats and laying them in the diaper, but if you will be fastening your flats to your baby, make sure to pack two sets in case one gets lost (snappy, boingo, pins, etc) 

Nighttime Diapers – If at all possible I would stick with flats for nighttime diapering since they will be the easiest to hand wash. This might be the time you want to pack 1 wool cover or dare I say disposables, but I use a PUL cover? If you do use disposables I would just buy them at your destination to save on luggage space. 

Swim Diaper – I like to pack two just in case Linc poops while in his swim diaper. I want to have a back up. 

Cloth Wipes (single ply) – You definitely want to go with single ply when hand washing. They will clean so much better than double sided wipes. Pack enough for 3 days of diaper changes. 


Large Wet Bag - Ok, this one is optional.  If you are able to bring a bucket to wash in then I would use that to store your dirty diapers instead of a wet bag.  If you do not have a bucket then a wet bag might be necessary.  I would recommend a bag that does not have a cotton exterior so is easier to clean and faster to dry.

Small Wet Bag – I usually bring two small wet bags (one for the drive to my destination and one for the drive home). You’ll probably need to use these during your trip for day use as well. In that case I would pack a small wet bag that doesn’t have a cotton exterior so that it’s easier to clean and faster to dry. 

Cloth Diaper Safe Detergent - Pack enough in a zip lock bag for your entire trip and a measuring spoon.


Washing System - Now this part depends on where you're going and how you're getting there.  If you're driving you can bring a bucket and plunger for a camp style washer.  If you're flying you could just pack the plunger (in a plastic bag) and clean your diapers in a bathtub.  You could also pack a washboard if that's easier since it's flat or go really basic and just scrub, scrub, scrub with your hands.  If you go the hands route then be sure to pack some gloves too.  Check out my post on handwashing to see how I wash my flats.  You can also check out my camping post to see some fun pics of us roughing it with cloth.


So there you have it!  That's my tried and true method for traveling with cloth.  How do you travel with cloth?


Click HERE for a chance to win a $15 Gift Certificate to Kelly's Closet

Click HERE for a chance to win a Beach Bash Prize Package


For more great Blogger Beach Bash posts, visit the Kelly's Closet Blog for a complete list of participating bloggers.


Kelly's Closet Blogger Beach Bash


**Kelly's Closet sent me a Tots Bots S-T-R-E-T-C-H Bamboozle for my participation in this campaign.  Be sure to check back during my September Fitted Diaper Event for a full review of this diaper!!!

Monday, June 18, 2012

Fluffy Tips #2 - Hang Wall Hooks Above Your Changing Table


One of the most used features I have at Lincoln’s diaper changing station are the hooks I attached to the wall just above the changing table. This is the perfect spot to hang three or four hooks to hang your diaper covers on while they are drying in between changes. Hooks are also great to hang pajamas or an extra outfit so you don’t have to leave your child un-attended on the table. I also keep a toy or two hanging on a hook for Linc to play with while I change his diapers. 

You can get hooks in all sorts of shapes, colors, and sizes. I got nickel ones for my first daughter’s modern nursery. I got ones in the shape of anchors for my second daughter’s under the sea nursery. I got bronze rustic ones for Linc’s woodsy cabin nursery. The options are endless. It’s a very inexpensive addition with a whole lot of function.


Friday, June 1, 2012

Scarlet's Naturals - Review

Scarlet's Gift Set (Lotion, Wash, Cream, & Bites)
Scarlet's Gift Set
Well I'm at it again.  What can I say?  I love baby booty cream.  Haha!  Yes, this is the 5th brand of baby booty cream I've tried.  You know what the funny thing is?  I never even used diaper rash cream with my girls... or at least I really hated it.  Regular diaper rash cream is sooooo gross.  It's thick, doesn't smell great, gets everywhere, and is hard to wash off.  Ugh!  I hate that stuff!  Then there is cloth diaper safe diaper rash cream.  It's light, smells good (most of the time), and just rubs right into the skin.  Oh I love it!  It's like a smooth lotion only better.

Well I came across another natural baby products line recently.  I kept hearing the name Scarlet's Naturals on the cloth diaper boards here and there and everyone had such great things to say about their products.  I mostly heard good things about the diaper rash cream.  Comments ranged from "GREAT" to "AMAZING!"  I just had to try it!  I was super excited when Desiree, the creator of Scarlet's Naturals, posted that she was looking for testers for one of her new products.  On top of that I was even more excited to be offered to test out her Scarlet's Gift Set containing some of her most popular products, including her Hiney Honey Bites, Hiney Honey Cream, Honey Lotion, and Honey Wash.  Would it live up to all the hype?  Check out my thoughts below.

Scarlet's Hiney Honey Cream for baby diaper rash
"Scarlet's Hiney Honey Cream is an all natural diaper rash cream. It is cloth diaper safe, no barrier or liner needed. Just rub a pea size amount into your hand and apply liberally to affected skin. Works well for other skin problems, such as dry, sensitive skin or eczema. Using the power of coconut oil, Hiney Honey Cream is able to safely and effectively clear up skin."
What I Love: Let me just start off by saying that this stuff is A-M-A-Z-I-N-G!!!  Yes, the rumors were right.  This stuff is magical.  I could tell from the first time I used it that Linc's butt was softer.  I know baby butts are soft, but Linc's is super soft now.  He also has yet to have diaper rash since we began using the cream and I've been using it almost a month now.  I did try it out on a rash on his neck and it did nothing, but then again I've yet to find anything that will take that rash away, so I'm not sure what to do about it.
What I Would Change: I know I've said before that I don't like diaper rash cream in tins or jars because it's messier than sticks or tubes but Scarlet's Naturals has already addressed this.  She just came out with her Hiney Honey Cream in stick form!  I did try the tester, but have yet to try her perfected formula.  I can't wait to try that one.  I also wish her formula came in a scented version.  I did talk to her about this and it looks like adding a scent would change the formula too much and it wouldn't be as effective and/or would not be as good for sensitive skin.  Knowing this I am fine with it being an unscented formula because my baby's bum is much more important, but I'm still a sucker for super yummy smelling things.  

Scarlet's Hiney Honey Bites wipe cubes
"Hiney Honey Bites are dissolvable wipe solution bites. Cloth diaper safe, they make diaper changes easier. Dissolve in hot water, once cooled either pour over wipes or place into a spray bottle and spray directly onto wipe when ready to use. Uses Tea Tree oil as an antibacterial and antifungal to leave fresh and clean. Can also be used as a bath water conditioner if your child has raw or sensitive skin. Just place a couple in tub and enjoy! Comes in 5 scents: Pearberry, Coconut, Raspberry, Soothing Lavender, and Unscented."
What I Love: Speaking of super yummy smelling things... Scarlet's Hiney Honey Bites ARE super yummy smelling!!!  When I got her package in the mail I couldn't stop smelling it.  It took me awhile to figure out which item was creating the super awesome smell, but I soon found out these were the culprit.  I got the Pearberry scent and it's simply delicious!  Please take note though... The strength of the smell will vary depending on how many cubes you use.  Two gives a very subtle scent to my wipes in the warmer, but I think I'll use three next time.  I could also tell as soon as I started using it that wiping Linc's butt was a lot smoother.  It seems like just another layer of protection in addition to the Hiney Honey Cream.  The wipe just glides across his butt now.
What I Would Change:  I wish making up the wipe solution was a bit faster.  I'm not a fan of having to go heat up some water in order for the cubes to dissolve.  I prefer using a liquid wipe solution that I can just pour in.  I have been using the microwave lately and that's helping, but I'm a bit impatient.      

Scarlet's Honey Lotion for baby
"Paraban free and extra gentle for delicate skin Honey Lotion uses Lanolin, Vitamin E, Aloe Vera, and coconut oil to give a boost of moisturize and protect skin. This all natural lotion is 100% chemical free, non-irritating and works great on all skin types including dry, sensitive skin, or eczema. Comes in 4 scents- Soothing Lavender, Oatmeal Milk & Honey, Pearberry, and Unscented! Soothing Lavender Works Great for Bedtime!"
What I Love: I sampled the Oatmeal Milk & Honey lotion.  It's a subtle fragrance which is nice when you're just about to put your baby to bed.  You don't want to get something that's so strong that your baby won't be able to sleep.  The consistency seems really nice too.  Not too oily and rubs in very well.
What I Would Change:  I can't think of anything I would change about the lotion.  I would love to try some of the other scents though.  Lavender sounds so soothing and Pearberry is so yummy!

Scarlet's Honey Wash as a shampoo for baby
"Made out of a Castile base, this body wash is incredibly gentle on baby skin, and is as close to a no tear babywash that an all natural baby wash can be! This low lather wash is 100% chemical free, non-irritating and works great on all skin types including dry, sensitive skin,or eczema. Comes in 4 scents- Soothing Lavender, Oatmeal Milk & Honey, Pearberry, and Unscented! Soothing Lavender Works Great for Bedtime!"

What I Love: The first time I washed Linc's hair with Scarlet's Honey Wash my husband couldn't stop saying how good Linc's hair smelled and how soft it was.  So funny because the Oatmeal Milk & Honey scent is so subtle, but it's just enough that it makes you want to say yum and go in for another sniff of sweet baby hair.  I also noticed that Linc's hair stays looking nice for longer than other shampoos.  Normally his hair gets oily looking after a day or two, but not with this one.  I try not to dry out his hair so I only wash it a couple times a week.  I can't wait to try some of the other scents.  Like the lotion I'd LOVE to try the Pearberry and Lavender.
What I Would Change: I'm a lather type of girl and I guess natural soaps do not lather.  This made it hard for me to feel confident when it came to washing Linc's body.  I felt I was using more wash than I should have, but I just wanted bubbles.  Because of this I'll probably just use the wash for Linc's hair.  I don't want to waste a whole bunch of his yummy wash trying to make bubbles when it's just not going to.   

In Conclusion ...
I'm a total fan of the Hiney Honey Cream and I will be getting it again, and again, and again.  Yep, it's that good.  I'll also probably get more of the Honey Wash for Linc's hair.  I just laugh every time my husband sniffs his head and smiles.  I can't take that simple pleasure away from him, or me for that matter.  I'm not sure if I'm sold on wipes cubes yet, but that's a personal preference for me.  The product is great as far as wipes cubes.  I'm just too lazy to prep them.  I'm on the fence about the lotion.  We'll see if I keep up my routine of putting lotion on Linc.  I don't usually do it, but if I do then I'll definitely get more of the lotion as well.  I'm in love with that Pearberry scent so I'm sure I'll test that one out next.  So what's the verdict?  Thumbs up for me.  I would recommend this product line to anyone and would definitely say that the Hiney Honey Cream is a must have!
_________________________________________________________________________________
** Please note that while I aim to provide the most thorough and honest reviews possible, this review is based on my own preferences and experiences.  Each baby is different and each parent has different likes and dislikes.  What works for one may not work for another, so keep that in mind while doing your research.**

If you would like to purchase one of these products for your little one, then please visit the Scarlet's Naturals website.  You can also get the latest info by "Liking" Scarlet's Naturals Facebook.


**Just a heads up.  Scarlet's Naturals is sponsoring an awesome prize for the Fluffy Butts Cloth Diapering Giveaway Hop.  Check back here from June 4th - June 15th for your chance to win.**

**This product was given to me for the purpose of a review, but the review is comprised completely of my own opinions  and was not influenced by any other outside source.**

Wednesday, May 23, 2012

DAY 3 - DDL Flats & Handwashing Challenge - My Favorite Folds

Orange Diaper Company Bamboo Square (Size: Toddler)
Orange Diaper Company Bamboo Flat (Toddler)
Well it's Day 3 of the Dirty Diaper Laundry Second Annual Flats and Handwashing Challenge.  Did you all think I would make it this long?  I know my husband didn't think so... or at least he hoped I wouldn't.  For those of you that have not been following my recent journey, I'm currently taking part in the Second Annual Flats and Handwashing Challenge hosted by Dirty Diaper Laundry.  For 7 days I will be using only flat cloth diapers and handwashing them in an effort to prove that cloth diapering can be affordable and accessible to all. You can learn more about the rules and why this challenge was started by visiting the announcement post.  This year there are over 450 participants from all over the world!

Well for the past couple of days ... and a few prep weeks before the challenge started I've been testing out some of the various flat diaper folds.  Let me tell you, there are a lot of folding options out there and I haven't tried them all, but I can bet there's a fold out there for everyone.  Personally I like the basic easy folds.  My reason for this?  Well, Linc is going through quite the cranky stage and taking time to do crazy folds is just not an option right now.  If I did have the time though I'd be all about doing crazy folds. I actually find folding quite relaxing and fun. I love the perfect order and the crisp lines. I've even been trying to come up with my own folds but have yet to perfect one. That being said, I've been sticking to the basic folds. I've listed them below in the order that I use them the most.

My Favorite Flat Folds:

The Padfold
The padfold is the easiest of all the folds and this is why I use it the most.  As soon as the flats come off the clothes line I fold them all into the padfold so that they are ready to lay into a diaper cover.  I also get all the layers right where I need them (in the pee zone).  Because Linc rarely poops (about twice a week) I don't have to worry about messes getting all over the cover.


The Origami Fold
The origami fold is my second favorite fold.  I do it just about as much as I do the padfold.  I love that I can get lots of layers in the pee zone, yet also get a full booty fit so that if Linc does decide to poo, it will be contained.  I also love the art of folding and putting on the origami fold.  It feels like true flat folding to me.  I will say though that if your little one is cranky then they might not wait for you to put on one of these more complicated folds.  It's also very difficult to do this on a changing table.  It can be done, but I usually assemble it on the floor and then put it on him on the table.


The Kite Fold
I've only recently started using this fold, but it's growing on me pretty quick.  I don't get quite as many layers in the pee zone as the origami fold, but I can definitely see how it will fit longer than the origami fold will since I can adjust the rise a lot higher.  Of course Linc is pretty chunky around the waist and legs though so if he keeps getting bigger this fold might not work anymore either.  I do a slightly modified version of the original kite fold so I get another layer in the pee zone.


The Triangle Fold
This fold is great for my Orange Diaper Company Infant Flat.  The flat is really too small to do any of the other folds except the padfold.  So if I want a full booty fold then I do the Triangle Fold.  It doesn't give many layers in the pee zone, but since the Orange Diaper Company Bamboo Flats are so thick it doesn't matter.  This fold is also extremely easy to do so I can do it on the changing table and put it on in seconds.


The Airplane Fold
This is the newest fold I've been using but I find it very comparable to the Kite Fold. If you've ever made paper airplanes before then you can easily do this fold.  I love how adjustable this fold is.  It's easy to adjust both the rise of this diaper as well as the wing span.  You also get a tremendous amount of absorbency up in the front so it's a great fold for boys.


DAY 3 NOTES:
- Last night's diaper was a success.  I used a receiving blanket origami folded with an Ikea kitchen towel padfolded in. No leaks at all.  For this fold I used a Thirsties Duo Wrap on top.  I'm really excited because this fold wasn't that bulky at all and it costs way less than my other night diapering options.
- My girls have started complaining that the nursery stinks.  I've been just placing the dirty flats (all pee) in my wash pail in there, but now I'm putting the lid (with a hole in the top) on the bucket to keep away some of the stink.  Hopefully this will solve the stink issue.
- I tried out several different diaper folds yesterday and I had a lot of fun!  If I get some time I'm going to test out a few more folds today.
- I'm so thankful I live in California.  The weather here is perfect for drying diapers outside!  On the other hand I was quite freaked out when I went to fold up a washcloth and saw a bee sitting on it.  Ack!!!!
- I've noticed that the Hemp Babies flats do not keep their square shape.  They also get quite small so I find that they only way that you can use these is to padfold them.  


Monday, March 19, 2012

Your DIY Solution To Diaper Pail Stinkies

Does your diaper pail smell less than luxurious?  Does it lack the smell of roses and lavender?  Is that a stupid question?  Sure it is.  I mean it's a pail that stores a whole load of pee and poo.  Why would it smell luxurious?  I know we've talked about a few ways you can help to keep the stink away.  Make sure your pail has good air flow.  Spray off poopy diapers.  Sprinkle some baking soda in your pail.  Wash your diapers at least every other day.  All of these sujestions can really help to minimize the stink.  But what about the roses?  What about the lavender?  Is that too much to ask?  I don't think so.  Below I'm going to show you a tutorial on How To Make Your Own Diaper Pail Essential Oil Diffuser Pillow.  Attached to the inside of your diaper pail this diffuser will freshen your nursery and keep those stinkies at bay.

WHAT YOU WILL NEED:
(2) 4"x4" Fabric Squares (I just used some terrycloth fabric scraps I had)
(1) 4"x8" Fabric Rectangle  (I just used some terrycloth fabric scraps I had)
(1) 1/2"x1" Sew On Velcro Loop
(1) 1/2"x1" Stick On Velcro Hook
Essential Oil (I used lavender)

STEP BY STEP:
- Sew the Velcro loop strip to the center of one of the 4"x4" pieces of fabric.  Sew a straight stitch as close to the edge as possible.  Make sure the Velcro is sewn on with the loop facing out on the "right" side of the  fabric.
- Lay the two 4"x4" fabric squares on top of each other.  Make sure that the "right" sides of each fabric are facing each other.  The Velcro should be on the inside as well.
- Sew a straight stitch 1/4" in around the squares.  Make sure to leave about 2" open so you can turn the pillow right side out.
- Cut the extra fabric off the three sewn sides and the corners.  Leave the extra fabric on the side that you did not sew shut.
- Take your 4"x8" fabric piece and fold it in half... then fold it in half again... then fold it in half again... till you have a little square.
- Turn the pillow right side out.  Make sure to fully push out each of the corners.
- Stuff the pillow with the folded up piece of fabric.
- Fold the ends of the fabric in on the open section of the pillow.
- Sew around the entire pillow with a straight stitch an 1/8" in.  Make sure that you seal the opening closed.

- Add some Essential Oil to your pillow.  Start with about 5 drops.  Don't overdo it!  I didn't think it was getting enough and put way too much on.  Let's just say that the room smelled a little "too good".  If you accidentally put too much just throw it in the wash (with towels or something not cloth diaper related).  If it's not enough just add more.  You can add any fragrance you want.  I'm using lavender right now.
- Stick your sticky back piece of Velcro hook onto the underside of the lid of your diaper pail.
- Stick your pillow to the Velcro on the diaper pail.

Voila!  You're done.  Now sniff the air and know that it will not burn the hairs from your nose... unless you put way too much essential oil on your pillow like I did.  You can use these little pillows anywhere.  If you don't need to stick it on a surface then just eliminate the Velcro.  You can put these in your lingerie drawer.  You can put them in your shoe closet.  You can put one in your gym bag.  Freshen up your life with a little essential oil.  {Snifffff} Ahhhhhhhhhhhhh!  Smells so good.


Friday, November 18, 2011

I LOVE ... Happy Baby Booty Balm by Mum Mum's Crafts

This being my first child in cloth diapers I've had to open my mind to new products that work better with cloth and my fluffy routine.  One of those products is diaper rash cream.  All the diaper rash creams that I had used with my girls are now on the no-no list in the cloth diapering world, so I set out to find some new options.  I needed to find a diaper rash cream that would not create build-up on Lincoln's diapers causing them to repel and no longer be absorbent.  I found a couple brands that I registered for and received as gifts at my baby shower and thought I was set with enough butt paste to last me a year.  Diaper rash cream ... Check!

About two weeks before Lincoln was born though, a friend of mine contacted me about a new item that she was just about to add to her product line, Mum Mum's Crafts.  Mum Mum's Crafts is a product line made up entirely of handmade, eco-friendly products, that are perfect for those of us that have skin sensitivities, but can also be used by anyone wanting a product that is both gentle on not only you, but also the environment.  Her products include mineral makeup, lotions, lip balms, deodorant, facial care products, soap, and more.  Being a mom and avid cloth diaperer herself, she began developing baby products and that included a cloth diaper safe diaper rash cream that she developed while pregnant with her third child.  Her Happy Baby Booty Balm is just now ready to present to the public and I was honored to be asked to test out the goods.  It was perfect timing with Lincoln about to make his debut.

I received two tiny sample containers of the Happy Baby Booty Balm.  My first thought when I opened it was "Hmmmmm...  It's green".  I wasn't expecting that.  All funny thoughts about the color quickly went away after I examined it closer though.  The smell of the booty balm is simply delicious!!!  It's sweet smelling, but not like candy.  It's natural smelling, but not woodsy.  It's the perfect blend that makes me want to lather my whole body in it just so I can smell it all day long.  Being that the sample is so small though, covering myself in it was not an option.  I guess Lincoln's booty would have to do.

My samples - Each container lasted two weeks
I started using the Happy Baby Booty Balm from day one of using cloth diapers on Lincoln.  With every change I wipe him clean from front to back and then dry him completely using a dry cloth wipe.  After he is completely dry I smear a small dab of the Happy Baby Booty Balm on my finger and spread it over his bum area.  It smells so great every time I use it and I love how thin and clear it is unlike your typical diaper rash cream.  I use the Happy Baby Booty Balm as a daily preventative care solution.  In the event that I do get a slight redness on Lincoln's bum, I have another cream I put on for the next change or two and then I go straight back to using the Happy Baby Booty Balm.  It's a great system for us and has kept Lincoln's butt looking smooth and clear from the start.

As for the specifics of the balm itself ... It comes in a cute little tin that you can take with you everywhere, and holds 1.2oz of balm.  The balm itself is made with a base of coconut oil and lanolin along with a medley of herbs, essential oils, and more that give it that sweet organic smell, feel, and look.  You won't find anything in this balm that isn't made in nature.  Listed below are the specific ingredients.

Ingredients: Cocos Nucifera (Coconut) Oil, Lanolin, Arctium lappa (Burdock Root) Extract, Echinacea Purpurea Extract, Althea officinalis (Marshmallow Root) Extract, Calendula Officinalis Extract, Olea Europaea (Olive Leaf) Extract, Symphytum Officinale (Comfrey Leaf) Extract, Plantago Major (Plantain) Extract, Carapa guianensis Nut (Andiroba) Oil, Emu Oil, Olea Europaea (Olive) Fruit Oil, Cera Alba (beeswax), Tocopherol, Lavandula Angustifolia (Lavender) Oil, Anthemis Nobilis (Chamomile) Flower Oil

If you would like to purchase Mum Mum's Crafts - Happy Baby Booty Balm (or any of her other products), you can find them at her Etsy Shop, or Hyena Cart Shop.  The Happy Baby Booty Balm goes for $9.75 + Shipping.  Also be sure to check out Mum Mum's Crafts on Facebook, Twitter, and Mum Mum's Blog, for the latest news on new products and current specials.  Just a heads up that there is currently a special for 10% for all Mum Mum's Crafts Facebook fans.

**This product was given to me for the purpose of a review, but the review is comprised completely of my own opinions  and was not influenced by any other outside source.**

Monday, October 3, 2011

Folding Prefolds - It's an Art Form

I remember when I first got the idea that I was going to use cloth diapers with our third child.  I said that prefolds were definitely not for me.  I wanted something cuter than prefolds and I definitely wanted something easier than prefolds.  I looked at all the AIO's, AI2's, Pockets, & Fitteds, and thought ... Why would anyone want to use prefolds?  I bet if I went back to my first post on here, I probably even said that I would not use them.  What's the point?  Then I started chatting with other cloth diapering moms.  I kept hearing over and over how great prefolds are to use in the newborn stage.  They kept saying how easy they are to clean.  They kept saying how much more economical they were.  They kept saying how easy they are to use.  You can only hear positive feedback so many times before you break and decide to give in.

I ended up buying a small stash of prefolds for the newborn stage.  I got mine from Green Mountain Diapers in the newborn size and size small.  I only bought six of each.  That should be enough to at least see if I like them and say I gave them a shot.  I prepped them and put them with my other newborn diapers ... and there they sat.  Finally one day I decided that I better learn to use these diapers before Lincoln gets here.  I went online, watched tutorials, looked at pictures, and then armed with a prefold, a snappi, and one of my girls dolls I set to work.  I was going to figure these things out!

To my surprise, putting on a prefold isn't that bad at all.  It's actually kind of fun.  I find myself wanting to try again and again to see if I can put them on faster and nicer each time.  I can still use some improvement and I know that having a real baby will present a whole new obstacle when it comes to mastering this art form, but I have to say that after some research and practice, I'm actually pretty excited to test these babies out!  Listed below are the most common folds that you can use and a few tricks of the trade that I learned from other cloth diapering parents.

**NOTE: All Prefolds Need A Diaper Cover**


TRIFOLD
Lay your prefold diaper out flat on the changing table with the absorbent section in the middle going length wise.  Fold one of the long sides in over the absorbent middle section.  Then fold the other long side in over the middle section.  You should now have one long rectangle.  Lay your prefold inside your diaper cover.  Lay baby on top of the prefold and diaper cover and fasten cover to the baby.  No snappi is required for this fold.  The great thing about this fold is that you can trifold all your diapers ahead of time to make diaper changes quick and easy.  You can even go so far as to have them already laid in your diaper covers.

ANGEL WING FOLD
Lay your prefold diaper out flat on the changing table with the absorbent section in the middle going length wise.  Lay your baby on top of the diaper so that the back of the diaper lines up with their belly button.  Trifold the front of the diaper while leaving the back of the diaper fully opened up.  Fold the front of the diaper up over the baby.  If the diaper is too big then fold the front of the diaper in towards the baby till it's the right size.  Pull the back wings forward around the baby and secure with a Snappi.

NEWSPAPER FOLD
Lay your prefold diaper out flat on the changing table with the absorbent section in the middle going length wise.  Lay your baby on top of the diaper so that the back of the diaper lines up with their belly button.  Fold the front section of the diaper in.  The amount you fold it up will depend on the size of your baby.  Fold it so that when you pull the diaper up over the front of your baby, the top of the fold just reaches the belly button.  Fold one side of the front of the diaper in over the middle section.  Fold the other side in and tuck it into the first side that you folded in (make sure it's tucked into the fold, not under the fold).  You should now have a nice a secure fold in the front.  The back of the diaper under the baby will still be fully extended out.  Fold the front of the diaper up over the baby.  Pull the back wings forward around the baby and secure with a Snappi.

JELLYROLL FOLD
Lay your prefold diaper out flat on the changing table with the absorbent section in the middle going length wise.  Lay your baby on top of the diaper so that the back of the diaper lines up with their belly button.  Take each side of the diaper and starting at the back wings of the diaper roll the sides in so they taper in closer and closer till they touch at the far front of the diaper.  Fold the front of the diaper up over the baby.  If it's too bulky in the front then you can flair the rolls out around the baby's belly.  Pull the back wings forward around the baby and secure with a Snappi.

BIKINI TWIST FOLD
Lay your prefold diaper out flat on the changing table with the absorbent section in the middle going length wise.  Lay your baby on top of the diaper so that the back of the diaper lines up with their belly button.  Crossing your arms, grab each of the front corners of the diaper.  Rotate the sides 180 degrees so you get a twist in the crotch of the diaper.  Fold the front of the diaper up over the baby.  Pull the back wings forward around the baby and secure with a Snappi.

TRICKS OF THE TRADE
For A Boy:  Diaper folds that include folding the front of the diaper in at the front of the diaper are great for a boy.  This will double up the absorbent layers in their wet zone (the front).

For A Girl: Try laying your diaper in the opposite direction before you start your diaper folding (with the thick soaker zone going sideways instead of length wise.  This will double up the absorbent layers right in their wet zone (in the middle) when you fold the diaper.

For The Super Pooper: Try folding the back of the diaper in before you lay your baby on the diaper and start folding.  This will create an additional poo pocket in the back.

For The Wetness Sensitive Baby:  If your baby is sensitive to being wet, then add a fleece liner on top of your diaper right before you fold the diaper up and fasten it to your baby.

For The Super Soaker: Try adding a doubler to your prefold along the soaker zone before you start folding the diaper.  If you need to fold the doubler to make it fit then fold it up front for a boy or in the middle for a girl.

For The Thick Waisted Baby: Try sewing some extended tabs onto your prefolds.  See my tutorial on how to do this.

For The Prefold Challenged: Try sewing some of my Easy Winged Prefolds, or even easier yet ... you can purchase them on my Etsy shop - Fluff N Stuff.


Now that I've got the folds down it's time to start practicing my speed.  The faster I get the less crying and pee geysers I will have to deal with.  I hope this tutorial helps you with folding your prefold diapers and makes them seem a lot less intimidating than they might look at first glance.  I really enjoy my prefolds now and can't wait to try them on Lincoln.  Till then keep checking back for more tips, tutorials, and giveaways on Adventures In Fluff ... and other mommy stuff.

Friday, September 30, 2011

My Diaper Changing Station - Organized and Ready to Go!

With only about a month till Lincoln gets here and my diaper stash pretty much complete, I thought it was high time that I get the diaper changing station organized and ready to go.  Let me tell you, that isn't easy when you've got a nursery as small as ours is.  Well, it's really about an average sized room, just awkward in the space that's available.  It took some pretty creative thinking in order to get everything I needed easily accessible for diaper changes.


I started out with a basic changing table just big enough for a changing pad on top and two shelves underneath. Baskets were the obvious choice for the shelves so I started there.  I found a cute set of baskets at Home Goods that were already embroidered with the words "Baby Stuff" and "Baby Things", and the colors were a perfect match for the nursery theme.  Score!  Unfortunately I realized after I got home that I also needed to put my wipes warmer on one of the shelves, so that meant that two of my baskets would need to be skinny and long in order to utilize my space the best.  I found these two canvas baskets at Lowe's of all places, but Target also has some great ones right now too.  My bottom left basket holds my AIO's, AI2's, and Pockets.  My bottom right basket holds my prefolds and covers.  The top left basket holds my disposable diapers that I'll use for the first couple of days.  Later this basket will hold all my covers.  The top right basket holds my fitted and easy winged prefolds.  I also have one basket in the back that holds all my rarely needed items such as wool wash, wipes solution, etc.

Well the diapers took up all my shelving space so now I had to figure out what to do with the rest of my necessary items.  That's when I decided to add a cabinet above the changing table.  I still wanted the cabinet to look good though, so it mostly holds decorative items, but a few of my diaper changing necessities are also up there.  On the bottom left and right cubbies I have my wipes and the middle cubbie has my q-tips.  The rest is all decorative with pictures and dolls.  Under the cabinet I put three hooks.  These are great to hang a couple outfits so that you always have a change of clothes nearby.  They're also great for hanging toys for your little one to play with during diaper changes or hang your diaper cover to dry between changes.

I still had lots to organize though.  What about all my inserts, doublers, snappi's, liners, and more?  Where was I going to put all of those?!?!?!  This took me quite a bit of time to figure out.  I knew in my mind pretty much exactly what I wanted ... I just couldn't find one.  I wanted something skinny (about 6 inches) and deep (about 18 inches).  I wanted it to be as tall as the changing table and attach to the side.  I also knew that I wanted it to be canvas to match some of the other items in the room.  I just could not find one!!!  I almost broke down and completely sewed a storage unit, but then at the last minute I had an idea.  I decided to buy some small canvas bins that I saw at Babies R Us, string them together with ribbon, and hang them from the side of the changing table.  The storage bins even have dividers already built into them.  It was PERFECT!  In the top bin I store my wee wee covers, brush and comb, snappi's, diaper rash cream, and liners.  In the second bin I store my extra wipes and a few inserts.  The third bin has inserts and doublers.  The last bin has breast pads, my extra pail liner, wet bags, and disposable inserts.  If you don't want to take the time to modify all these bins I also found this great hanging storage unit that's ready to go at Babies R Us.  All you have to do is add ribbon to the top so you can hang it from your changing table.

You might laugh, but this is just storage for my newborn stash.  I also needed storage for my post newborn stash.  For that I purchased one of those hanging canvas storage units for the closet.  It's the perfect size to hold everything that Lincoln won't fit in when he's born.  I love that it's easily accessible so I can check now and then to see what diapers I can pull out next for Lincoln to use.

All that's left for my changing station is my diaper pail.  I have a basic swing top trash can I got from Target and I use a Planet Wise pail liner inside.  I love the way the top swings in so all I have to do is drop my diaper on top and the diaper will fall in.  I also love that the trash can is plastic so it's easy to clean if I need to.  Another detail that's great about my changing station is that our nursery is attached to a restroom so I have quick access to a sink as well as the toilette for diaper spraying.  The laundry room is also just next door so everything is in close proximity.  I love it!

Well, that's another thing I can check off my list.  Diaper changing station is prepped and ready to go!  I think the setup is going to work out great and I hope it helps to stir some ideas for you when you're organizing your changing station.  Feel free to share your changing station pics on my Facebook page.  I'd love to see them and see if I need to make any changes.  Till then keep checking back for more posts about my Adventures In Fluff.

Tuesday, July 5, 2011

How To Sew Your Own Cloth Wipes

The decision to use cloth wipes was a no brainer for me.  Seems only logical that if you're going to use cloth diapers that you use cloth wipes as well.  All I need to do is throw the wipe in the laundry with my diapers vs having a separate trash can just for my wipes.  Easy as that!  Using cloth wipes will also save us a lot of money and work a lot better than disposables.  How many times have you used 5 disposable wipes to clean off a messy poo explosion?  With a nicely textured cloth wipe you can easily get the job done with 1-2 wipes.  Like I said, using cloth wipes was a no brainer decision for me.

What I did need to decide on was whether to buy cloth wipes or make my own.  I do have a sewing machine but I'm by no means an expert sewer.  I've never used anything but a straight stitch.  Being the do it yourself girl that I am though I decided quite quickly that I was going to make my own wipes.  How fun to be able to pick whatever colors or patterns that I want.  Yay!  I love new projects.

First thing's first ... I needed to research sewing my own cloth wipes.  What fabrics should I use?  What size should I make my wipes?  How do I sew my wipes?  Here are some answers I found to those questions.

What Fabrics Should I Use???
You can use just about any fabric combination to make your wipes.  Some fabrics you might find right around your house.  For example, if you have some old towels or flannel sheets try cutting those up for your wipes.  Some great fabrics to try are flannel, terrycloth, velour, sherpa, or hemp fleece.  Thinner fabrics are great for double layer wipes, while thick fabrics are great for single layer wipes.  Just don't use regular fleece.  It will just smear the poop around.  I've decided to use a combination of flannel and terrycloth on my wipes.  Both are easily obtained at any fabric store.  Flannel will give the wipe a cute pattern and some lively color, while the terrycloth will be the workhorse side and help to clean up those messy poos.  For more information on fabric options check out Zany Zebra Designs list of Diaper Fabrics.

What Size Should I Make My Wipes???
There really is no rule as to the size of the wipes you want to make but there are two common sizes that might work for you.  There is the 8" x 8" wipe which fits nicely into a wipes container when folded in half or there is the 8" x 4" wipe which fits nicely into a wipes container without folding it in half.  I've decided to make mine 8" x 8" because they will give more surface area to clean with while still fitting nicely into my wipes warmer.

How Do I Sew My Own Wipes???
I've found three different ways you can sew your own wipes.  I knew from the beginning that I wanted a combination of flannel and terrycloth so I've tried out both the double layer wipes options.  Of the two I like the turned and topstitched method the best.  If I had a serger then I might like the serged option better, but since I only own a regular sewing machine I had to use the zig zag stitch and it did not seem to contain the edges of the terrycloth very well.  Maybe with a double sided flannel wipe it would work better.  Here are the directions to the three different methods.

Single Layer Wipe w/ Zig Zag or Serged Edges
     - Cut your fabric into squares or rectangles in the size you've decided on.  You can round the corners if you like.
     - Zig Zag or Serge all the way around the edge.  If you are using the Zig Zag stitch make sure that the Zag of the stitch goes a little over the edge of the fabric so that it seals in the edges minimizing fraying.  (*You can have fun with this stitching by using a contrasting thread color)
     - *Helpful Tip* ... When you come to a corner stop the machine with the needle in the down position so it's still in the fabric.  Lift the sewing foot and rotate your fabric (the fabric will freely rotate without losing your sewing place).  Lower the foot and then continue sewing down the other side.
     - Be sure to back-stitch at the beginning and end of stitching or finish the serge stitch so that the stitching won't pull out.
     - Trim the threads close the the fabric and you're done!

Double Layer Wipe w/ Zig Zag or Serged Edges
     - Cut both fabrics into squares or rectangles in the size you've decided on.  You can round the corners if you like.
     - Lay one fabric with the "right side" (the side you want to see) face down on the table.  Lay the other fabric on top with the "right side" (the side you want to see) facing up so you can see it.
     - Line up the edges of the two fabrics and pin all the way around (be sure that you can see the "right" side of the fabric on both sides).
     - Zig Zag or Serge all the way around the fabric removing the pins as you go.  If you are using the Zig Zag stitch make sure that the Zag of the stitch goes a little over the edge of the fabric so that it seals in the edges minimizing fraying.  (*You can have fun with this stitching by using a contrasting thread color)
     - *Helpful Tip* ... When you come to a corner stop the machine with the needle in the down position so it's still in the fabric.  Lift the sewing foot and rotate your fabric (the fabric will freely rotate without losing your sewing place).  Lower the foot and then continue sewing down the other side.
     - Be sure to back-stitch at the beginning and end of stitching or finish the serge stitch so that the stitching won't pull out.
     - Trim the threads close the the fabric and you're done!

Double Layer Wipe - Turned and Topstitched


     - Cut both fabrics into squares or rectangles a half inch bigger each way than the size you've decided you want your wipes to be (Ex: If you want 8" x 8" wipes, then cut your fabric into 8-1/2" x 8-1/2" squares).  You can round the corners if you like.
     - Lay one fabric with the "right side" (the side you want to see) face up on the table.  Lay the other fabric on top with the "right side" (the side you want to see) facing down so you can't see it.
     - Line up the edges of the two fabrics and pin all the way around (be sure that you can see the "wrong" side of the fabric on both sides).
     - With a straight stitch, stitch almost all the way around the wipe, about a 1/4 of an inch away from the edge removing the pins as you go.  Stop sewing about 2-3 inches from where you started to leave an opening.
     - *Helpful Tip* ... When you come to a corner stop the machine with the needle in the down position so it's still in the fabric.  Lift the sewing foot and rotate your fabric (the fabric will freely rotate without losing your sewing place).  Lower the foot and then continue sewing down the other side.
     - Be sure to back-stitch at the beginning and end of stitching so that the stitching won't pull out.
     - Carefully trim each corner near the stitching (being sure not to cut the stitching) so that it's not bulky when you turn it right side out.
     - Turn your wipe right side out by carefully pushing each corner through the opening and then turning it fully right side out.
     -  Smooth the wipe out making sure that all edges and corners have been completely pushed out and turn the edges of the opening in so that it looks the same as the rest of the wipe.
     - Iron the wipe flat.
     - Straight stitch all the way around the wipe LESS THAN a 1/4 inch away from the edge making sure to seal the opening of the wipe.  (*You can have fun with this stitching by using a contrasting thread color or using a decorative stitch instead of the straight stitch)
     - Be sure to back-stitch at the beginning and end of stitching so that the stitching won't pull out.
     - Trim the threads close the the fabric and you're done!

**Update -You can also use this tutorial to create washcloths (I'd do them the same size as the cloth wipes) or burp cloths.  I like to cut my burp cloths out at 9" x 16". **

I hope this tutorial was helpful for you and you have lots of fun sewing your own wipes.  I'd love to see some of the color and fabric combinations that you come up with so feel free to post some of your photos on my Facebook page.  I'll be posting pictures of mine on there as well to document just another one of my Adventures In Fluff.

Sunday, June 5, 2011

My Search for the Perfect Diaper Pail is Over ! ! !

While out picking up the girls from school this week I had to run one errand at Target and decided to look at trash cans for my dirty diapers while I was there.  To my surprise I found the PERFECT trash can!!!  It's not much to look at, but I think it will work perfectly.  It's the Hefty 13.3 Gallon Pivot Lid Wastebasket in Black.  I love that all I have to do is drop the diaper above it and the diaper will fall into the trash can.  It was also half the price of the one I was looking at on Amazon ($17 vs $40).  This trash can also filled another one of my requirements which was that it was not an air tight trash can.  A lot of trash cans with a flip top lid are air tight and are more prone to creating an ammonia smell which can be hard to get out of your diapers.  This one has cracks around the edges which will create great air flow and hopefully keep the ammonia smell away.  I had also thought about just using a tall wicker laundry basket, but then thought a plastic bin would be more sanitary since I could wash it out easily if I needed to.  Here are pictures of the trash can and my daughter Riley showing how it works.  I'm probably going to spray paint the top to match the nursery and sew a skirt for the bottom.  Click HERE for more info on this trash can.

Here are some other great articles that will help you select a diaper pail that is perfect for you.
What Should I Use For A Diaper Pail - Green Mountain Diapers
Cloth Diaper Pails ... Dry or Wet? - Diaper Pin
Cloth Diaper Pail (Wet vs Dry) - Zany Zebra Designs


I know it's crazy to get excited about diaper pails, but I'm excited about anything that has to do with cloth diapering right now.  I hope my blogs are getting you excited about it too.  Thanks for reading my blog and I hope you're enjoying my Adventures In Fluff.