Ok, I know almost all of you know that laying your diapers out in the sun will take away the stains. Most of you probably even know that adding lemon juice to these stains will help even the toughest stains come out. What you might not have thought about is that this basic principal goes way beyond diapers. Next time you get a stain on your clothes, sheets, or towels, try sunning them out! Just make sure you don’t leave colored fabric out in the sun for too long. You don’t want them to start fading.
So how do you do this? Just take your wet piece of clothing (or whatever else you are sunning), and hang or lay it out in the sun. The item needs to be wet to work effectively. You can also try adding lemon juice to really tough stains, but I would test this out in a small area first if you’re doing this on a colored or delicate fabric. This method won’t work on all stains, but I’ve had a lot where it worked like a charm! Check out this bib that I only had in the sun for about 30 minutes.
I LOVE my GroVia AI2 hook and loop diapers. They’re actually one of my top diapers at the
moment. Well you could imagine my
confusion when I hear so many people talk about their dislike of GroVia hook
and loop closures. I heard complaints of
curling and cracking the most, so I thought I’d share some tips with you all on
how I keep my hook and loop closures looking perfect wash after wash.
First off, you need to make sure to secure your hook and loop
closures properly before putting your diapers into the washing machine. GroVia details how to do this on their site,
but I’m sure most of you haven’t even seen it.
You know those little loops of fabric that go over the laundry
tabs? They are there for a reason. You need to secure your hook closures to the
laundry tabs UNDER the loops. Make sure
that your tabs are laying nice and flat on the laundry tabs before throwing
your diapers in the wash. Watch my video
to see how to do this. Why is this so
important? As you can see in my video,
putting the tabs under the loops is the key feature to making sure that your
tabs stay secure in the wash and do not stick to anything else.
The second step to keeping your hook and loop closures
looking nice is to smooth them out before laying them out to dry. This tip I learned over time on my own. I realized that if I just hang my diaper
covers straight out of the washing machine then the wing tabs would curl. To solve this problem I make sure to
completely smooth out both wing tabs before hanging my diapers to dry. Watch my video to see how to do this. Why is this so important? If your wing tabs are curling then they won’t
secure to your diaper as well as when flat, they will be more prone to
cracking, and they will look aesthetically unpleasing.
So there you have it!
I hope this helps with any woes you’ve had with GroVia hook and loop
closures, or any other diaper company that uses touch tape. Who knows… these tips might just make touch
tape your new favorite closure.
**I purchased the above diapers and I was not paid or compensated in any way for this post. This post is comprised completely of my own opinions and was not influenced by any other outside source.**
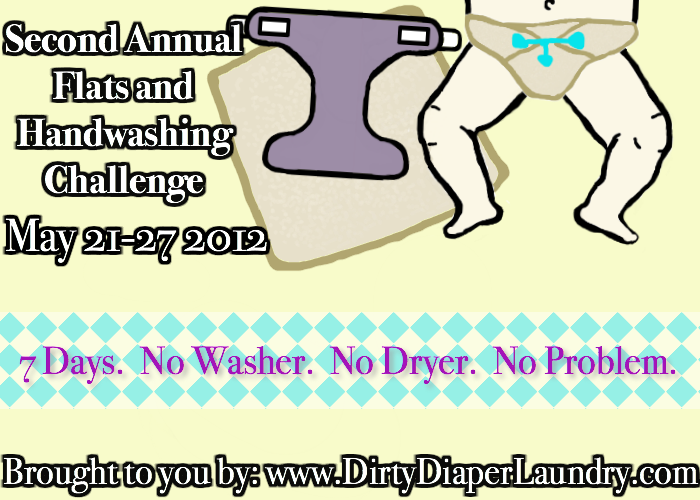
It's Day 4 of the Flats and Handwashing Challenge! We're officially over the hump. For those of you that have not been following my recent journey, I'm currently taking part in the Second Annual Flats and Handwashing Challenge hosted by Dirty Diaper Laundry. For 7 days I will be using only flat cloth diapers and handwashing them in an effort to prove that cloth diapering can be affordable and accessible to all. You can learn more about the rules and why this challenge was started by visiting the announcement post. This year there are over 450 participants from all over the world!
I'm so proud of myself for making it this far. I'll admit I was a bit scared of the hand washing before I got started, but now that I've got the routine down it just seems like a regular part of my day. I'll admit it would be a LOT easier if Linc wasn't so attached right now. It takes me quite awhile to get a load done because I have to take quite a few breaks to entertain Linc (who is not entertained by diaper laundry), but I eventually get it done. Now that I think about it, I actually get diaper laundry done a lot faster than I do when I wash it in the machine. That's a crazy thought.
So what am I doing you ask? Ok, even if you didn't ask I'm still going to tell you. LOL! That's the perk (or problem) with blogging. I'm kind of just talking to myself. Anyways, back to my handwashing routine. It's been quite the evolution through the week and who knows, it might just change again. I'm liking my current routine though, so I feel good about letting you in on my secret. {wink} {wink}
My Cloth Diaper Handwashing Routine:
After each diaper change I rinse all pee and poop off of the diapers and throw it in my 5 gallon washing bucket. I keep the bucket in the bathtub. It's an ideal location since I rinse all my pee diapers in the tub faucet and spray all my poopy diapers in the toilet next to the tub. This way I don't have to carry wet diapers that far.
I wash dirty diapers each morning. This gives me the entire day for drying and gets my most potent diaper (the nighttime diaper) in the wash ASAP. I usually have anywhere from 4-7 flat diapers per load plus about 5 wipes and 2-3 covers.
I fill my bucket with room temperature water a little over 3/4 full. I then take my plunger (with holes drilled in it) and agitate the diapers using a full up and down motion. I make sure to bring the plunger up out of the water with each stroke so that the air pressure works the mess out of the diapers. I also make sure to agitate all around the entire bucket and not just in one spot. I do this for about 5 minutes.
I then let the diapers soak for about 30 minutes.
I drain the water while pressing the diapers with my plunger to get out as much water as possible.
I fill my bucket with hot water a little over 3/4 full then add 1tbs of detergent (I've been using Eco Sprout, but I'm going to try Tide today). I then agitate the diapers for another 5 minutes.
I drain the water while pressing the diapers with my plunger to get out as much water as possible.
I fill my bucket with room temperature water a little over 3/4 full. I then agitate the diapers for another 5 minutes. (I'd repeat this step if suds, smell, or mucky water is still present).
I dump out the whole bucket into the tub and run each diaper, wipe, and cover under running water individually. After each item is squeezed out then I throw the item in the bucket.
I then line dry everything outside. Birdseye flats take about 1 hour to dry. Bamboo and hemp flats take about 2 hours to dry. Wipes and covers take about 3 hours to dry (I think because they aren't big enough to be blown around by the wind).
Once the laundry is dry I take each item off the line and shake them out and beat them against my leg. This helps to soften them up a bit. They're not as soft as the dryer, but they aren't crispy anymore.
I fold and put away.
There you have it! That's my current handwashing & drying routine. So far it's working great! Sure, it's not as great as my machine washing routine, but it works. Not to mention I get the extra added bonus of a workout without the gym.
DAY 4 NOTES:
- Last night I used my Orange Diaper Company Toddler size Bamboo Square with a washcloth and a Swaddlebees Capri Cover. No leaks! I did have his wool longies over just in case but took them off halfway through the night. It was too hot.
- I've noticed that my flats are getting off square from hanging them on the clothes line. I hope that they get back to a more regular shape after I dry them in the dryer again. Maybe I should try using a third clothes pin in the center of each flat.
- I'm liking the padfold more and more everyday. It's just so easy. I'm going to continue using it after this challenge.
- Oh how I LOVE Tide! Today was my first day using it in my wash and it works soooooo much better than Eco Sprout. Oh how I never should have doubted you for handwashing Tide. I should have been using you all along.
Well, the day I dreaded is finally here. I tried to put it off as long as possible, but you can only hold off solid food for so long. Linc is now on solids once a day and you know what that means... stinky, thick, peanut buttery (but not nearly so yummy), gag me I'm gonna barf poo!!!
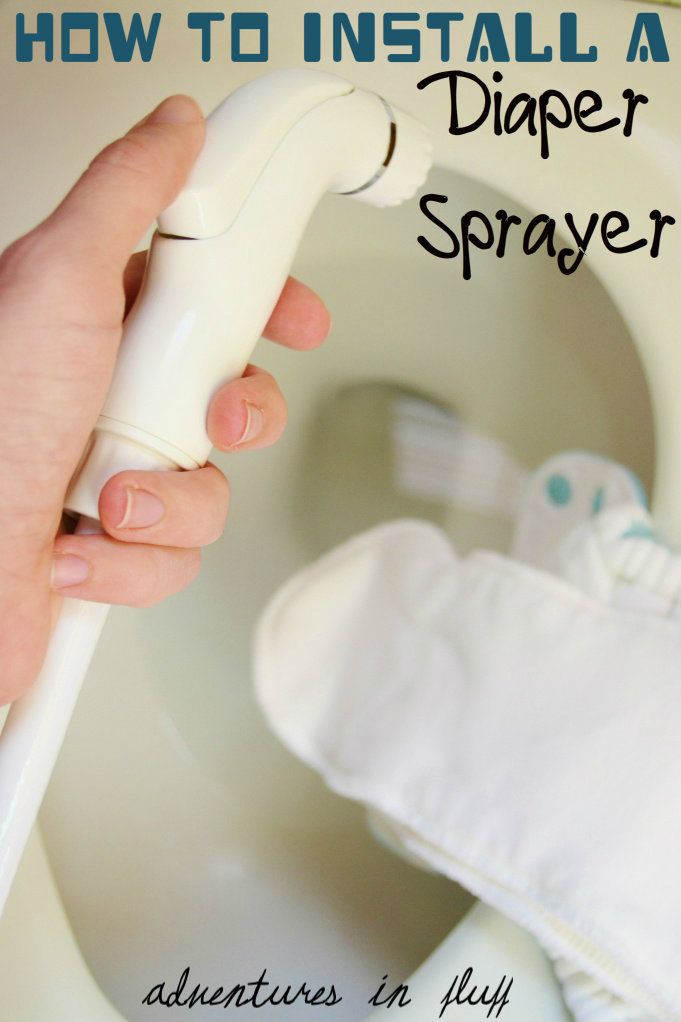
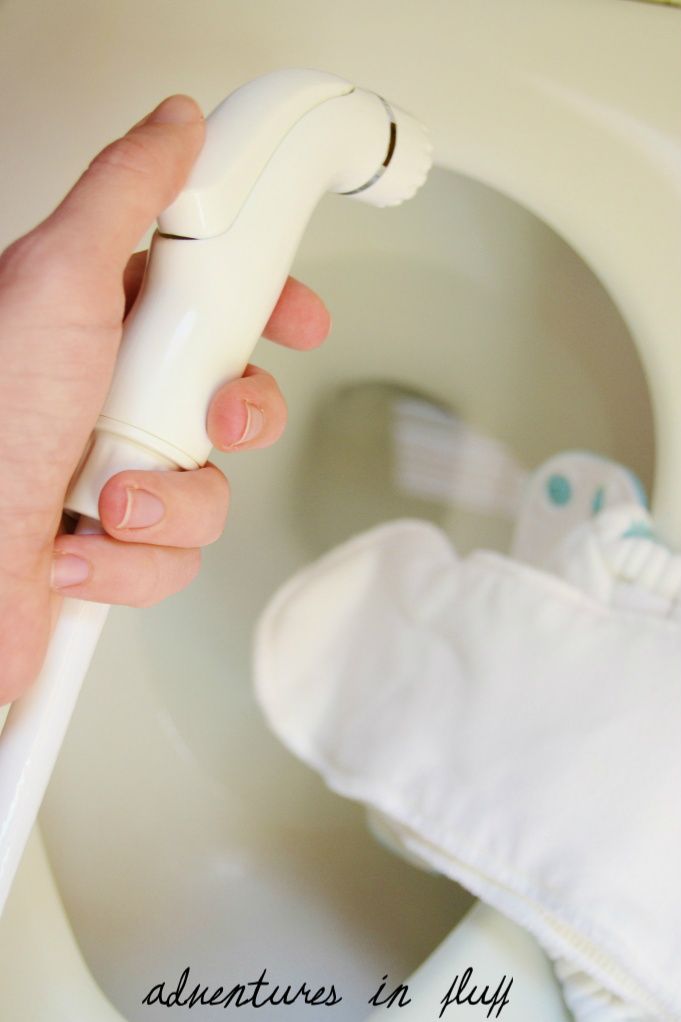
Oh yes, the poo from hell is here. I'd say it took me by surprise, but really I think I was just in denial that the day would come. Each day I'd see the diaper sprayer I purchased just sitting there waiting to be installed, but I kept telling myself that I still had time. Even after he started solids and I knew it was only a matter of days, I still put the task on the back burner convinced that his poo would never change. Oh how I was wrong. Well the day came and boy was it a doosie! Freak! Guess what wasn't installed??? Even worse, guess what happened 30 minutes later??? He pooped again! Ok, no more procrastinating. Time to install the diaper sprayer.
Are you ready???
What You Will Need:
Diaper Sprayer (I have the Sigma Diaper Sprayer)
Mounting Bracket (included with diaper sprayer)
Mounting Bracket Hardware (included with diaper sprayer)
Adjustable Wrench
Hammer
Drill
1/4" Drill Bit
Screwdriver
Towel
Step By Step:
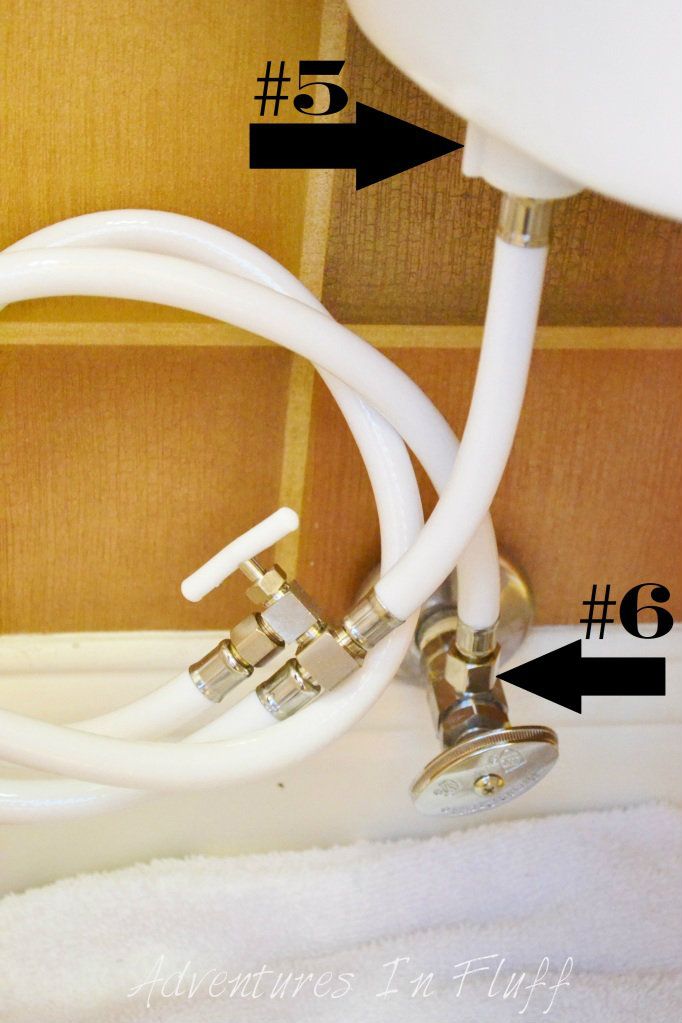
#1 - Place your towel under the water shut-off valve and flexible water supply line under the tank of your toilet.
#2 - Turn off the water supply by turning the shut-off valve clock-wise.
#3 - Flush your toilet to empty the water from your flexible water supply line.
#4 - Remove the flexible water supply line connecting the shut-off valve to the tank. To do this just unscrew the large tank nut that is on the underside of the flush tank counter clockwise. You can probably do this with your hands. Then unscrew the nut that is connecting the water supply line to the water shut-off valve counter clockwise. You'll probably need your adjustable wrench in order to do this. A small amount of water will come out. Don't worry. That's what your towel is for. (*Note: If a lot of water comes out make sure that you turned off the water supply first! See #2)
#5 - Attach the 1" white tank nut on the diaper sprayer to the underside of your tank. Make sure that you screw it on straight or it will leak.
#6 - Attach the smaller nut on the other end of your diaper sprayer to the water shut-off valve on the wall. You will need your adjustable wrench to tighten it. Mack sure that it is snug, but do not over tighten. You can tighten it more if it leaks.
#7 - Attach your sprayer wall bracket to the wall or tank. You can do this using the provided screws and wall anchors or the double sided tape.
#7.1 - If using the anchor screws, mark the location where you want the bracket by poking a pen or drill bit through the screw holes on the bracket.
#7.2 - Using a 1/4 drill bit, drill holes in the wall where the screws will go.
#7.3 - Using a hammer, tap the wall anchors into the wall where you drilled the holes.
#7.4 - Using a screwdriver and the provided screws, screw the wall bracket into the wall.
#7.5 - Hang the head of the diaper sprayer on the wall bracket.
#8 - Turn the water supply back on by turning the shut-off valve counter clockwise. See picture #2 (*Note: If you have leaks at this point turn off the water and see the trouble shooting guide below)
How To Use Your Diaper Sprayer:
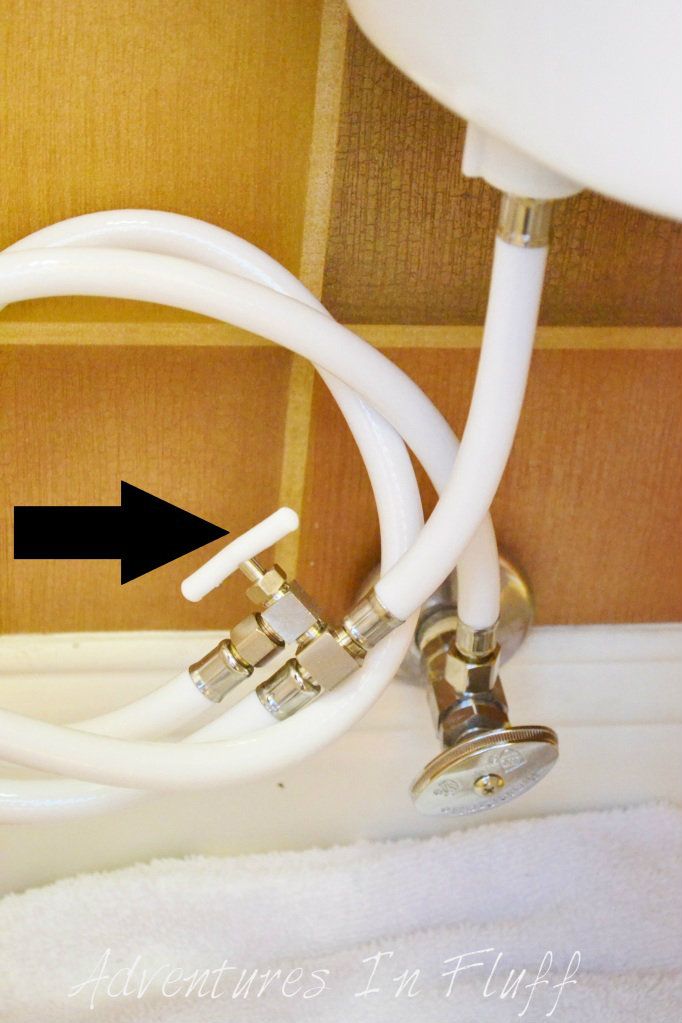
- Turn the adjustable flow valve on the diaper sprayer counter clockwise. The more you turn it the more water that will come out of the diaper sprayer.
- When you are done using your sprayer turn the valve clockwise to turn off the water. This will help save your bathroom from water fights between the kids.
Troubleshooting:
- If the tank nut is leaking remove it and make sure there is a rubber washer. If not then you need one. Also make sure that the washer is laying properly and not cracked or damaged. If the washer looks fine screw the nut back on. Make sure you are screwing it on perfectly straight. If it's still leaking try tightening the nut or loosening the nut.
- If the connection to the shut-off valve is leaking try softly tightening it a bit more.
- If the water is not spraying make sure you've turned your water shut-off valve back on and that your adjustable flow valve on the sprayer is turned on as well.
- If your sprayer is leaking when not in use, make sure that you are turning the adjustable flow valve off on the sprayer (see "How To Use Your Diaper Sprayer") and emptying the water from the sprayer before you hang it on the wall bracket. To empty the water from the sprayer simply spray the water out of the hose into the toilet until no more water comes out.
Now that I have my sprayer installed I am so happy. I actually couldn't wait to spray my first diaper and have fun spraying Linc's diapers clean each time. Does that make me strange??? Haha! Probably, but don't judge me yet. Just wait till you get started. You might just love it too. Happy Spraying!!!
The Second Annual Flats and Handwashing Challenge is coming up soon May 21-27th. Are you up for the challenge??? I am!!! I've been waiting all year for this. Last year I was pregnant with Lincoln and still clicking away on all my cloth diaper research when the first challenge took place, but I just knew that in a years time I too would be joining the masses in this wonderful tribute to the days of old and your most economical choice when it comes to diapering your child. So are you ready to pack away those All In Ones, brush up on (or in my case learn for the first time) your flat folds, and get to washing? Great! Well roll up your sleeves, give your arm muscles a pep talk, and let's get started!
The Flats & Handwashing Challenge is an event put on by Dirty Diaper Laundry that challenges families to use flat diapers exclusively (some exceptions apply) for a whole week. In addition to using flats, you also must refrain from using your washer or dryer. All diaper laundry must be done by hand. Sounds simple enough right? Haha! Maybe not, but then if it was simple it wouldn't be called a challenge.
So what's the point of this you ask? Well there are lots to speak of. The main point is to show families in need that there are other options out there when it comes to diapering that can cost you as little as $50 to diaper your child over the course of their diapering years. The second point is to raise money for various cloth diaper charities. Kim Rosas of Dirty Diaper Laundry is personally pledging $1 per participant (up to $200) who completes the challenge, to Giving Diapers, Giving Hope. She's also asking that other businesses do the same to help raise money for other cloth diaper charities. If you're not a business or can't afford to pledge, then you can also help by signing one or both of the following petitions. The first petition is to get WIC to cover cloth diapers or cloth diaper education. The second petition supports the DIAPER ACT (H.R.3134) and helps to get more babies access to cloth diapers. So much good is coming out of this event!
So if you're pumped and ready to dive in diapers first, then head on over to Dirty Diaper Laundry to sign up for the Flats & Handwashing Challenge and to read the official rules. I'll be there along with several other moms and dads across the world to show my support. Leading up to the challenge I'll be discussing various topics on flats and hand washing. In addition I'll be blogging & vlogging (on YouTube) my experience each day of the challenge. It's going to be a great event. Hope to see you there!!!
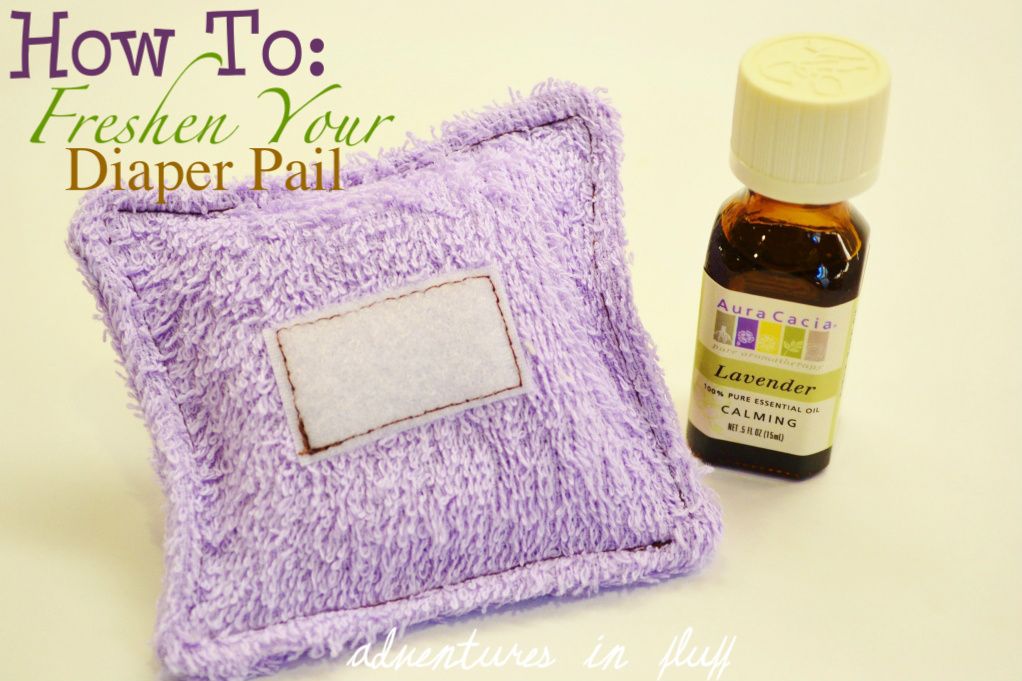
Does your diaper pail smell less than luxurious? Does it lack the smell of roses and lavender? Is that a stupid question? Sure it is. I mean it's a pail that stores a whole load of pee and poo. Why would it smell luxurious? I know we've talked about a few ways you can help to keep the stink away. Make sure your pail has good air flow. Spray off poopy diapers. Sprinkle some baking soda in your pail. Wash your diapers at least every other day. All of these sujestions can really help to minimize the stink. But what about the roses? What about the lavender? Is that too much to ask? I don't think so. Below I'm going to show you a tutorial on How To Make Your Own Diaper Pail Essential Oil Diffuser Pillow. Attached to the inside of your diaper pail this diffuser will freshen your nursery and keep those stinkies at bay.
WHAT YOU WILL NEED:
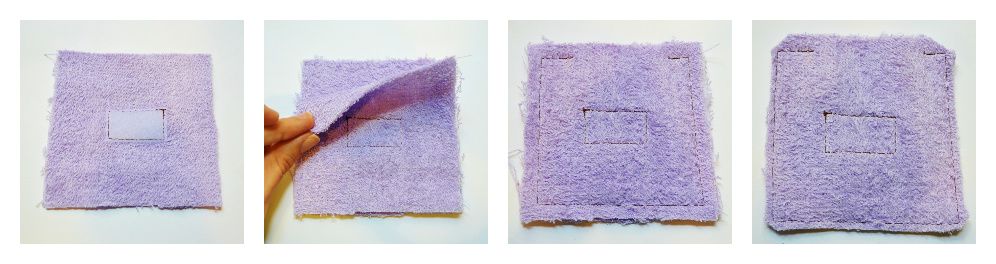
(2) 4"x4" Fabric Squares (I just used some terrycloth fabric scraps I had)
(1) 4"x8" Fabric Rectangle (I just used some terrycloth fabric scraps I had)
(1) 1/2"x1" Sew On Velcro Loop
(1) 1/2"x1" Stick On Velcro Hook
Essential Oil (I used lavender)
STEP BY STEP:
- Sew the Velcro loop strip to the center of one of the 4"x4" pieces of fabric. Sew a straight stitch as close to the edge as possible. Make sure the Velcro is sewn on with the loop facing out on the "right" side of the fabric.
- Lay the two 4"x4" fabric squares on top of each other. Make sure that the "right" sides of each fabric are facing each other. The Velcro should be on the inside as well.
- Sew a straight stitch 1/4" in around the squares. Make sure to leave about 2" open so you can turn the pillow right side out.
- Cut the extra fabric off the three sewn sides and the corners. Leave the extra fabric on the side that you did not sew shut.
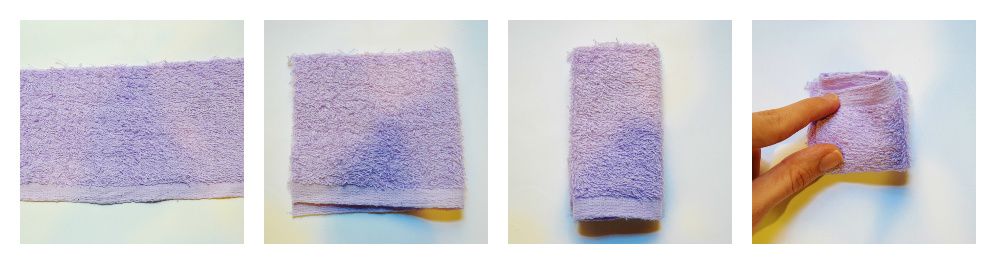
- Take your 4"x8" fabric piece and fold it in half... then fold it in half again... then fold it in half again... till you have a little square.
- Turn the pillow right side out. Make sure to fully push out each of the corners.
- Stuff the pillow with the folded up piece of fabric.
- Fold the ends of the fabric in on the open section of the pillow.
- Sew around the entire pillow with a straight stitch an 1/8" in. Make sure that you seal the opening closed.
- Add some Essential Oil to your pillow. Start with about 5 drops. Don't overdo it! I didn't think it was getting enough and put way too much on. Let's just say that the room smelled a little "too good". If you accidentally put too much just throw it in the wash (with towels or something not cloth diaper related). If it's not enough just add more. You can add any fragrance you want. I'm using lavender right now.
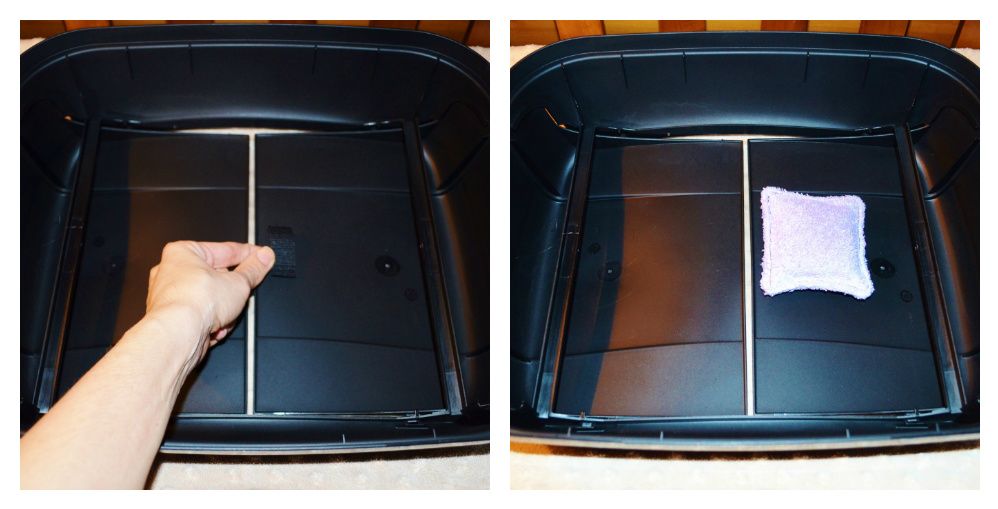
- Stick your sticky back piece of Velcro hook onto the underside of the lid of your diaper pail.
- Stick your pillow to the Velcro on the diaper pail.
Voila! You're done. Now sniff the air and know that it will not burn the hairs from your nose... unless you put way too much essential oil on your pillow like I did. You can use these little pillows anywhere. If you don't need to stick it on a surface then just eliminate the Velcro. You can put these in your lingerie drawer. You can put them in your shoe closet. You can put one in your gym bag. Freshen up your life with a little essential oil. {Snifffff} Ahhhhhhhhhhhhh! Smells so good.
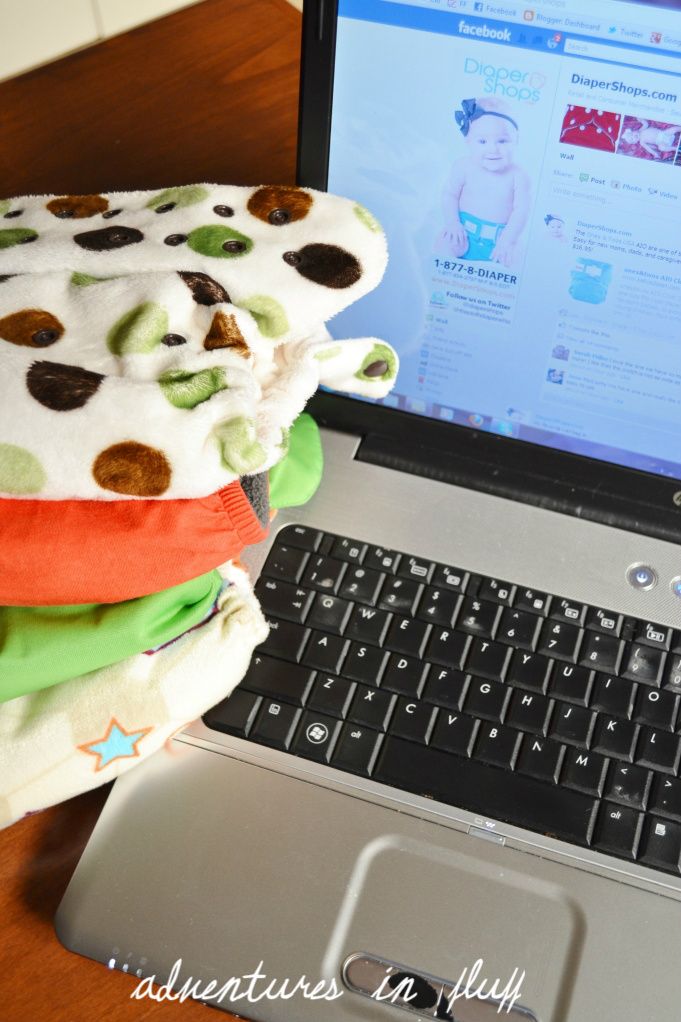
I've been meaning to write this post for awhile now, but when DiaperShops.com posted their "No Pins Required Pinterest Contest" it really pushed me into gear. I've been officially cloth diapering Lincoln for over four months now and have a pretty good idea of what I bought that helped, what didn't, and what I couldn't live without. Listed below are my top 15 must haves for cloth diapering. Stick to this list and I assure that you will be ready for any and all cloth diaper situations ... Adventures In Fluff style.
DiaperShops.com
#1 - Supportive Community - Why is a supportive community number 1? Because you just can't do this alone. I don't know how many times my cloth diaper support groups have helped me. Too many times to count I would assume. This was especially true in the beginning. In the beginning I had nobody near me that knew about cloth or even supported my decision to cloth diaper. Where do I start? What do I do? How do I fix this? So many questions. Who else are you going to run to when you get a new diaper in the mail and want to share your excitement? Certainly not your next door neighbor that's going to think your pregnancy knocked one too many screws loose in your head. So where do you find these communities? Online forums like DiaperSwappers is great. There are tons of Facebook groups. If you have a local cloth diaper store then start there. Maybe they have a group. The Great Cloth Diaper Change is coming up April 21st. You'll meet LOTS of cloth mamas there. Whatever your source, you're going to need a group of parents that you can go to when it comes to The Good, The Bad, and The Poopy of cloth diapering. My Faves: Fertility Friend "The Cloth Diaper Crew" (paid subscription), Facebook Group "Cloth Diaper Chat", & all the cloth diaper Facebook pages (I tend to frequent my favorite brands, stores, & blogs).
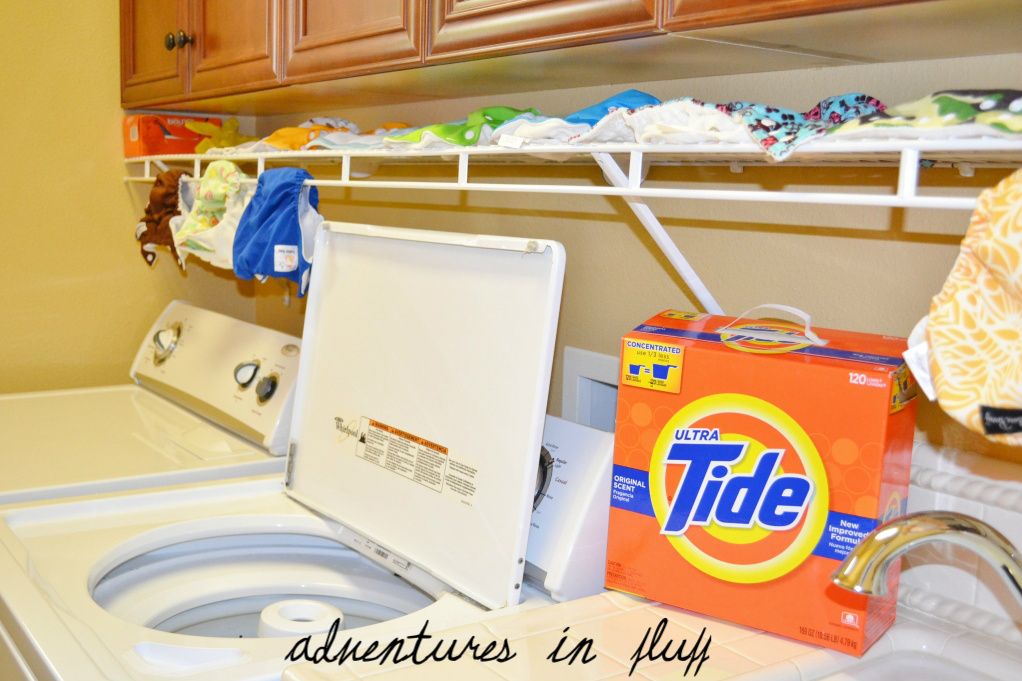
TIDE Ultra Detergent
#2 - Laundry Routine And Detergent - This was a VERY close second for me. I almost put it as number 1. I don't know how many people I've seen quit cloth diapering because they can't get a good laundry routine down. This was one of the areas that I spent most of my time researching before Lincoln was born. There's nothing more discouraging when you really want cloth diapering to work, but you keep getting leaks, stink, buildup, and stains. This is a tricky one though because everyone's laundry routine and detergent that works for them is different. It all depends on your water, your load size, the age of your child (pee concentration and poop type), the washer you have, and the types of diapers you have. Do you have hard or soft water? Do you have large or small loads of laundry? Do you have a newborn or a toddler? Do you have a top loader or a front loader washing machine? Do you have mostly synthetic diapers or natural diapers? It all comes into play when trying to come up with your laundry routine and detergent type. I don't mean to scare you. It's really not that bad. Most routines are fairly similar in fact. It's just a matter of tweaking it to fit your needs. My Faves: My Cloth Diaper Wash Routine with Tide Ultra.
Bumgenius 3.0 All In One
#3 - Easy All-In-One Diapers - These diapers are perfect for dad, grandparents, and childcare facilities. To tell you the truth I LOVE them for myself too. They're just so easy and about as close to a disposable diaper as you can get. Get these with hook and loop closures and you pretty much have a disposable diaper. Sure they take longer to dry and you can't customize the absorbency as easy as a pocket diaper, but they are soooooo easy. I just love them. These are my out and about diaper. If I have to run errands then you can bet an All-In-One diaper is what's in my diaper bag. My Faves: Ragababe & BumGenius 3.0 AIO (discontinued)
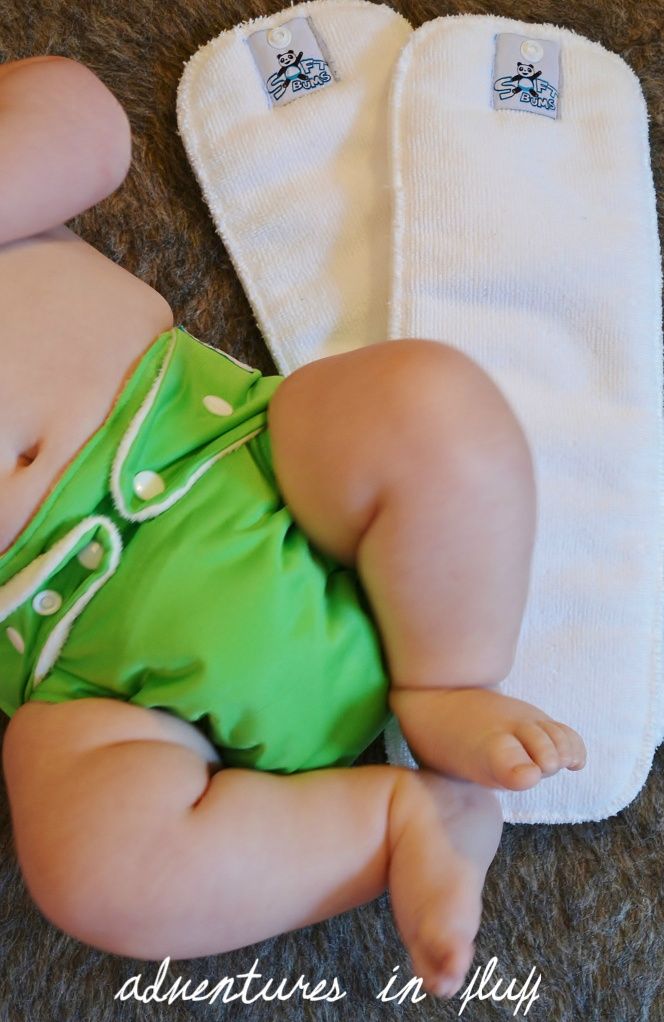
SoftBums Echo AI2 Diaper
#4 - Economical All-In-Two Diapers - When I first started researching cloth diapers I totally did not understand the point of an All-In-Two diaper. How could a little snap in insert contain everything? How could you possibly re-use the diaper shell again? Wouldn't that be gross? Wouldn't it be soaked with pee or smeared with poop? Ick!!!! Then I tried a few. OMG! I love them! I just love being able to take out a wet soaker (I just use my wipe to unsnap it and throw it in the laundry bag) and then snap in a new soaker for the next change. It makes me feel so great that I get to use my super cute shells more than once. If the shell is slightly damp then I let it dry and use it for the next diaper change. If it gets poop on it (Linc doesn't poop as often as I thought he would), then I just throw it in the laundry. Not only do I love that I can use my cute diapers more than once, but I'm saving money by doing so. The shell is the most expensive part and if I get to use it 2, 3, or even 4 times, then I'm usually paying wayyyy less than any other diaper system (except prefolds and covers). I also find that my All-In-Two systems are much trimmer fitting than most other diapers. Great when you're trying to fit jeans over a diaper. That said, I normally use my All-In-Two's at home so I have somewhere to hang my diaper shell up in between changes. I also use these for long distance travel since they take up the least amount of space in my luggage. My Faves: Ragababe Two Steps, SoftBums Echo, & Grovia Shells.
Tiny Tush Elite Pocket Diaper
#5 - Night Time Diaper Solution - When your baby starts sleeping through the night ... or more than a two hour stretch, you're going to need a night time diaper solution. Now that solution is different for everyone. It depends on several factors. Is your baby a heavy wetter? Is your baby sensitive to wetness? Does your baby sleep on their back, tummy, or side? Linc is easy. He sleeps on his back, he's not a heavy wetter, and he's not sensitive to wetness. We can do almost anything. That said, Linc does go 12 hours without a diaper change at night so we do need a solution that can hold a lot of liquid just in case. Some parents use fitted diapers with PUL or wool. Some parents use pocket diapers with lots of inserts. There are many other options as well. I myself am a pocket with inserts type of girl. My Faves: Tiny Tush Elite or Kawaii Heavy Duty, paired with a Thirsties Hemp Insert
Hefty Pail & Planet Wise Liner
#6 - Dirty Diaper Storage Solution - You're going to need somewhere to put all your stinky diapers until laundry day. There are lots of options out there, but I've found that it's best to take the following into consideration. A diaper pail with airflow keeps stink away better than a diaper pail that is tightly closed. I also find that a plastic container is best, just in case your pail liner springs a leak. Once in awhile I like to set that bad boy outside and let it air out with the fresh clean air. Using a pail liner will help to keep your pail clean and avoid having to wash it every other day. I own two so that while one liner is in the wash, the other goes into my pail. Another option is to use a large hanging wet bag. This is a great option if you just don't have the space for a diaper pail or if you move your diaper changing station from one area to another depending on what time of the day it is. My Faves: (2) Planet Wise Pail Liners and Hefty 13.3 Pivot Lid Wastebasket
Home Made Cloth Wipes
#7 - Cloth Wipes - I can't say enough good things about cloth wipes. I LOVE them! Gone are the days where it took 10 wipes to clean up a poopy mess. I use at the most 2 cloth wipes for each diaper change and 90% of the time I only need one. I have about 50 cloth wipes on hand, but you could easily get away with about 35. My Faves: Ragababe & My own home made cloth wipes made with terrycloth and flannel (tutorial here)
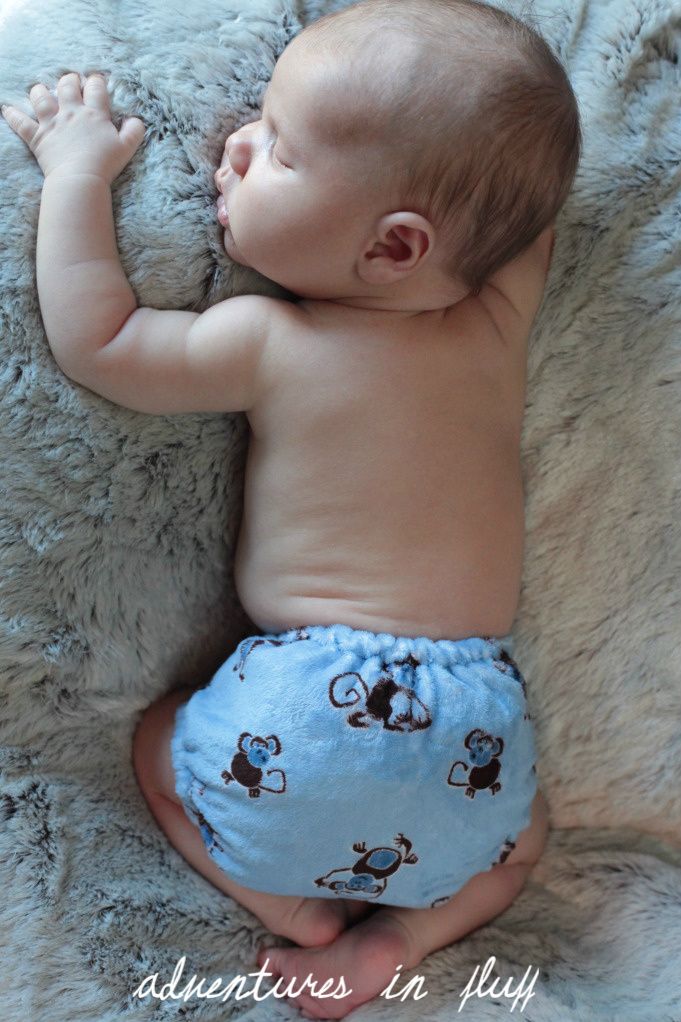
#8 - Newborn Diapers - Some debate on whether newborn diapers are necessary or not. Some go with prefolds and covers till their baby can fit in one-size diapers. Some just go with disposables. Not me! There's something about newborn diapers that just makes your eggs drop in hopes of another newborn to put them on. Newborn diapers are just toooooo cute to pass up. Not only are they too cute, but they have a great resale value so you usually get a lot of your money back on them. Not in the mood to buy newborn diapers and deal with selling them? Try renting them instead. I almost did. My Faves: Kissaluvs Cotton Fleece Fitted Diapers (Size: 0) with a Thirsties Duo Wrap (Size: 1). See more of my favorite newborn diapers HERE.
KAEL&KAED Wet Bag
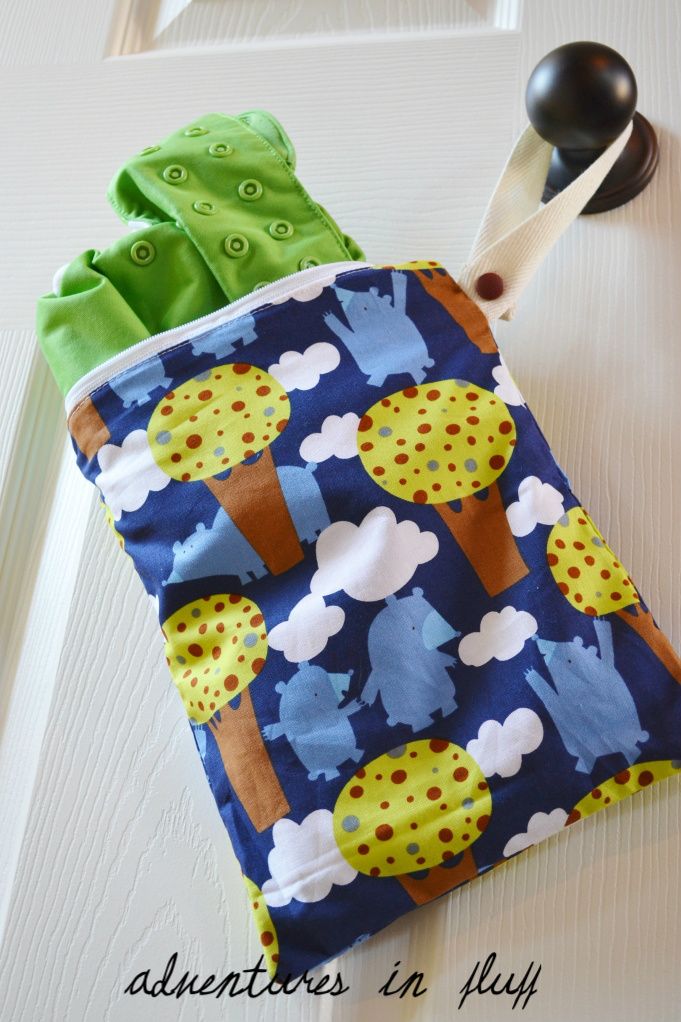
#9 - Wet Bags - You're on the go and you've got to change a diaper. What do you do? Yes, you could throw it in your diaper bag and hope it doesn't leak (yes, I've done this before). You could leave it on the floor of your car till you get home (can someone say hot stink box? ... ummm no thank you!). You could just leave the diaper on the baby and let them marinate in their own sloshy mess (hmmmm ... not a bad idea. Ok, I'm not that mean). What you do is get a wet bag. Wet bags are waterproof bags that zip up and hold your wet stinky diapers till you get home or it's time to wash them. They come in several sizes and I recommend you get a couple sizes. I have a couple small ones (they'll hold about one or two diapers), and a couple medium ones (they'll hold about 6-8 diapers). The small ones are great for really quick trips out of the house. The medium ones are great for all day trips out of the house. The large ones are great for overnight trips (I still need to get one of those). The best part? When you're done with cloth diapering these can be used for pool or beach bags to hold your wet swim suits. My Faves: Planet Wise & KAEL&KAED
CJ's Butter
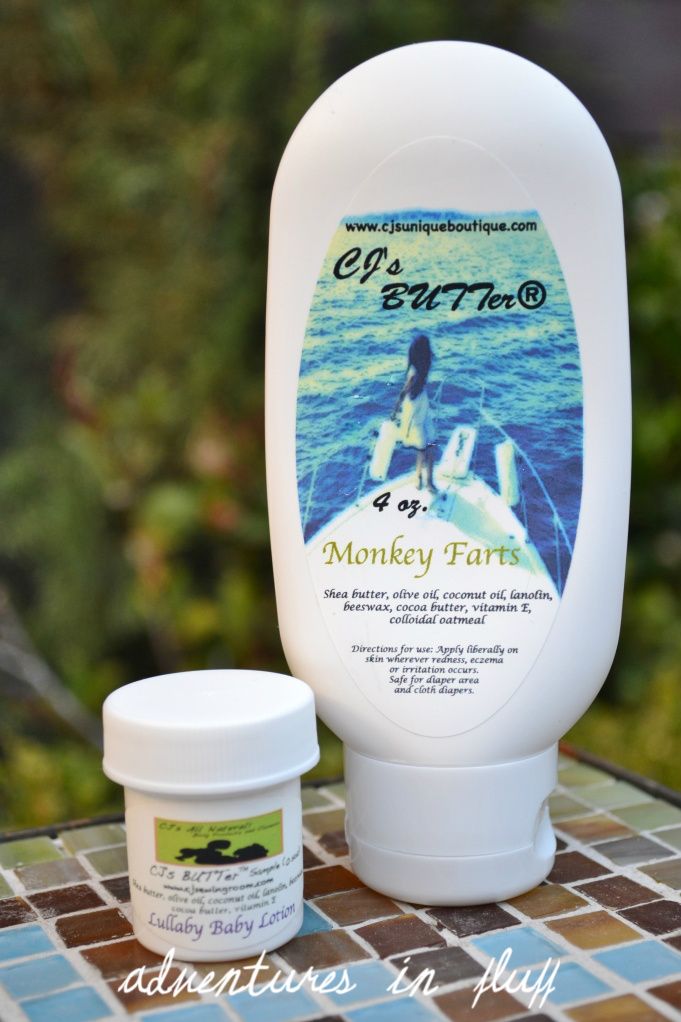
#10 - Diaper Rash Cream - Now one of the reasons that I decided to cloth diaper Lincoln was because I heard that babies got less diaper rash when cloth diapered due to the diaper being more breathable and less chemicals being used. For us that has been pretty much true, but we do still get the occasional diaper rash. When using cloth diapers you can't use the typical diaper rash creams that you would use with disposable diapers. They would leave a buildup on your diapers that would cause your diapers to repel and leak. You need to use a diaper rash cream that is labeled to be cloth diaper friendly. My Faves: CJ's Butter & Mum Mum Crafts Baby Booty Balm
Blueberry Pocket Diaper & Ragababe Doublers
#11 - Diaper Doublers - A diaper doubler is basically anything that you can use to boost up the absorbency of your cloth diapers. There are many reasons why you might want to increase the absorbency. You'll probably need a doubler at night since your baby will be in the diaper for a long time. You'll probably want a doubler for long car rides since your baby will be pressing on their diaper in a seat. You'll probably want a doubler for a heavy wetter baby. There are many options out there to choose from. You can use hemp, cotton, bamboo, microfiber, prefolds, etc. My Faves: Thirsties Hemp Inserts, Ragababe Doublers & Inserts & BabyKicks Joey Bunz
Sigma Diaper Sprayer
#12 - Diaper Sprayer - I haven't used my diaper sprayer yet, but you can bet that it was at the top of my list to buy one for later on down the road. We're actually only about a month or two away from breaking that bad boy out. So what's a diaper sprayer you ask? Oh well let me tell you it's a super fun device that you hook up to your toilet plumbing to spray your @$$ with after you take a dump. Haha! Ok, that's what my husband thinks it's for. Actually it is a device that you use to spray the poop from your diapers onto you, your toilet, and the walls of your bathroom (if you're not diaper sprayer skilled). That said, I plan to conquer the diaper sprayer technique so that I can avoid having to swish Linc's diapers in the toilet... and clean my walls The point of the diaper sprayer is to get as much poop off the diapers before you throw them in the wash. You don't need to do this with breastfed poo since it's water soluble (thus I have not broke my diaper sprayer out yet), but as soon as babies start solids or formula then you're going to need to break that bad boy out. I'll be practicing with a clean diaper at first. My Fave: Sigma Diaper Sprayer
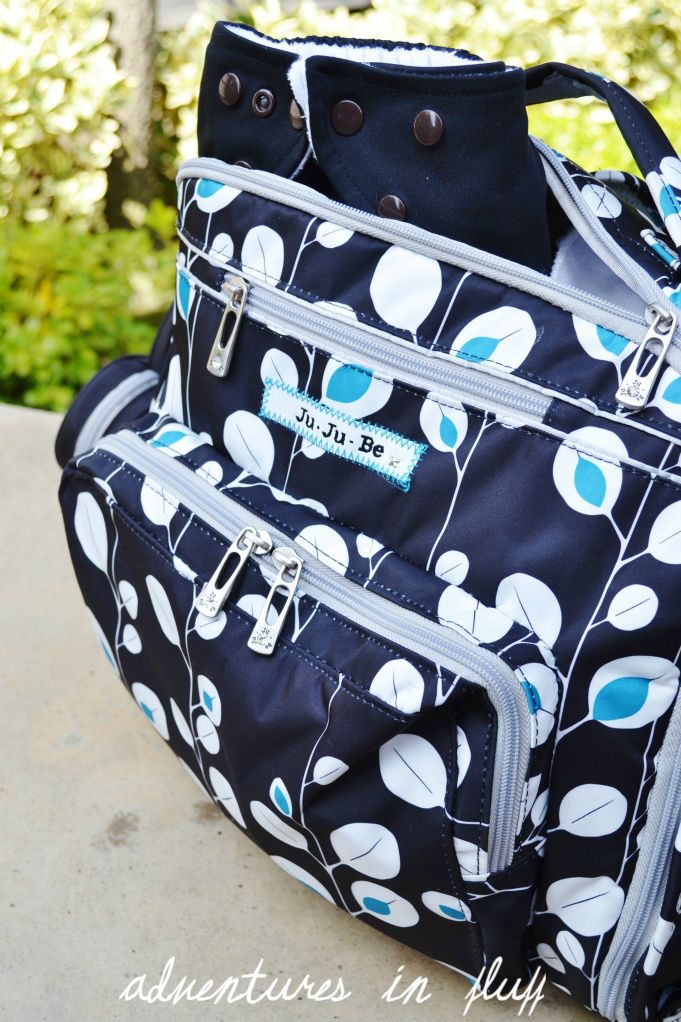
Ju Ju Be . BFF Diaper Bag
#13 - Diaper Bag - Now here's an area where I splurged. I knew this item was going to be with me everyday and a part of my cool mommy wardrobe for the next 2-3 years (nothing says cool like a big teddy bear on the side of your diaper bag). I knew I needed something big enough to carry all of Lincoln's stuff as well as my stuff (this would be my new purse), plus some little things for the girls such as snacks. I also knew that I wanted a backpack. I just think that backpacks are super easy to carry around while trying to manage two kids and a baby at the same time. My Fave: Ju-Ju-Be B.F.F.
Ragababe Easy All In One Diaper
#14 - Super Cute Diapers - You might say "What??? Why do I need cute diapers???". Ok, all cloth diapers are cute, but I'm talking super cute. Those diapers that just make you squee with delight and bust your budget trying to collect them all. Now you don't have to bust your budget to get super cute diapers. Just get at least one or two. So what's the point you ask? The point is to make other parents swoon and other babies wish they had back like your baby does. I find this really helps when all your friends and family can't understand your cloth obsession and swear you're going to quit one day. Oh yes! When they see that cute fluffy bum they will secretly wish they had picked cloth too. My Faves: Ragababe (I also have a Doodle Dypes on the way and Chelory on my purchase radar)
Smart Snugs Diaper & My Little Legs
#15 - Leg Warmers - I know technically leg warmers are not a cloth diaper accessory, but oh how they make cloth diapering easier. Don't be deceived by the name and have visions of Flashdance in your head (Oh memories! I should watch that movie again). They're basically really long socks with no feet that cover the entire leg. Ok... they're leg warmers, but I try not to call them that around my husband since Linc is a boy. I love that I can leave them on during diaper changes and I don't have to worry about pulling pants over his fluffy bum. Plus they come in so many cute prints and I can show off Linc's cute diapers since they're not covered up with pants. At the same time his legs are warm and protected while crawling. My Faves: My Little Legs & Making my own (tutorial here)
So there you have it! Those are my Top 15 Cloth Diaper Must Haves. Not sure what I would do without them. I definitely wouldn't be having as much fun as I am right now. I definitely had a lot of fun creating this list. Thanks DiaperShops.com for hosting such a great contest. Here's a link to my Official Adventures In Fluff "No Pins Required" Contest Entry. I'd LOVE to see all your entries too!!! Feel free to post a link to your No Pins Required contest entry below so we can all get some great ideas of new products to try.
Well it’s that day again. That day I look forward to every other day. My day of organization. My day of routine. My day of fresh clean smells … well, by the end of the day anyways. It’s diaper laundry day! Don’t ask me why I love diaper laundry day. I actually hate doing any other type of laundry. Weird huh? There’s just something about it that makes me happy. It’s my little Zen time. I just get in the routine and I go. Plus I love sorting through all of my Lincoln’s cute little fluff.
In honor of diaper laundry day I thought I’d share with you my diaper washing routine. I know everyone has their own groove that works for them, but this is what works for me and I’ve used the same routine from day 1 of cloth diapering without any problems. No buildup. No Stinkies. And I rarely have any stains. Can't get any better than that.
Step 1: Make sure all hook and loop closures are fastened to their laundry tabs and all inserts are removed from their pockets. If your child is to the point of eating solid foods then make sure that all poop is sprayed off of diapers. I always complete Step 1 after each diaper change.
Step 2: Remove pail liner of dirty diapers from diaper pail and put extra pail liner in diaper pail so it’s ready for the next diaper change.
Step 3: Dump diapers out of pail liner into washing machine. Turn pail liner inside out and put into washing machine. I do all this without ever touching a diaper or the inside of the pail liner.
Step 4: Set washer to highest water setting. Set temperature to cold. Run a rinse cycle.
Step 5: Keep washer set to highest water setting. Set temperature to hot. Set washer to run an Extra Rinse Cycle. Add Tide Ultra Original Scent up to the “2” line (quantity will vary depending on your washer and water type). Run a super wash cycle.
Step 6: If you’re still trying to figure out your detergent quantity level then check on your diapers during the agitation of the Extra Rinse Cycle. If you see suds then you’ll need to run another Rinse Cycle. This will also tell you that you need to use less detergent next time you do diaper laundry. Repeat this step if you still see suds during the next rinse cycle. Keep repeating till there are no suds. Once you have your routine down you can eliminate this step and just do it periodically.
Step 7: Hang dry all diaper covers, All-In-Two shells, and pocket diapers. I actually have a wire shelf in my laundry room that I dry all my diapers on. It helps to save the elastic by laying them flat instead of hanging them to dry. Once in awhile I’ll lay them in the sun outside to get all the stains out and brighten everything up.
Step 8: Throw all the All-In-One diapers, wipes, inserts, liners, doublers, wetbags, & your diaper pail liner in the dryer. Make sure that no PUL is exposed (turn all wetbags, diaper pail liners, and AIO diapers right side out). Set dryer to 45 min on Medium heat. If you want your diapers to dry faster you can throw in some dryer balls or a dry towel. Note: Do NOT use dryer sheets!!!
Step 9: Remove wetbags & diaper pail liner. Note: If everything feels dry at this point then you’re finished. Normally my AIO diapers, thick cotton inserts (GroVia snap in inserts), and hemp inserts will need more time.
Step 10: Set dryer to 45 min on Medium heat. If anything is still wet after this then I lay it out on my wire drying shelf.
Step 11: Fold all wipes, stuff all pocket diapers, and organize all doublers and liners. When putting away all my diapers I rotate all the old diapers to the front and the newly washed diapers to the back. This keeps all my diapers in rotation and keeps my favorite diapers from getting worn out because I use them too much.
So that’s my diaper wash routine. I’ll admit that even though I love diaper laundry day I still don’t keep on top of it like I should. Life gets in the way and I usually end up folding, stuffing, and putting away my diapers the next day or even the day after that when I start the next load. I guess that’s what happens when you have as many diapers as I have and can afford to have a whole set of diapers out of rotation. Does that mean I have too many diapers and a diaper addiction? Haha! Yeah, probably.
I’d love to hear about your diaper wash routine. I know everyone’s routine is different and it’s always helpful to hear about different routines till you find one that works for you. You can post your routines in the comment section below. Thanks for sticking with me through this journey and I hope you’ll join me again for more Adventures In Fluff.
Ok, It was a week before I was due to have Lincoln, and I had yet yet to lanolize my wool. I set it all in a nice stack and stared at it each day saying that I'd lanolize it all "tomorrow". It was always tomorrow. I don't know why I was so scared of it. I guess because you spend so much money on wool items that you don't want anything bad to happen to it. Well, with the due date coming up I couldn't put it off any longer. Time to lanolize.
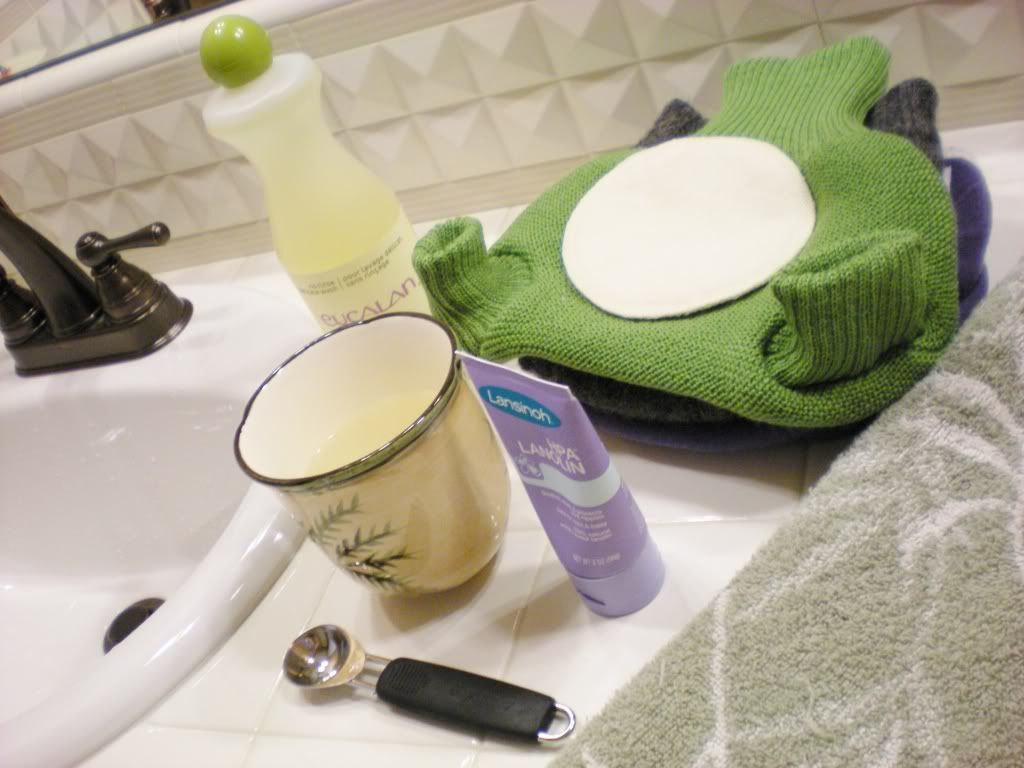
Before I got started you can bet that I searched the web for every tutorial and YouTube video I could find. Of course I found quite a few different views on how to lanolize, but it seemed like there was a fairly clear pattern, and I'd already purchased a few products so I went with the routines that used those. Here are the products that I've decided to use.
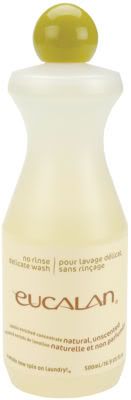
Out of all the wool washes it seemed like Eucalan was the most popular. It's basically a mild soapy wash with lanolin mixed in. Eucalan also comes in four fragrances (Eucalyptus, Lavender, Grapefruit, and Unscented). I went with the Lavender scent. It's a mild scent, but still sweet and calming. Eucalan also comes in a couple different sizes. You can get the single serving sample size (.17 fl oz), the small bottle (3.3 fl oz), or the big bottle (16.9 fl oz). I went with the big bottle. I hate having to re-order stuff all the time so I might as well stock up. Technically you could use this without adding any additional lanolin, but I've decided to add additional for extra protection. (Approx $11.25 retail)
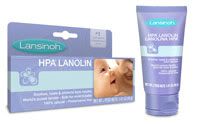
Lansinoh Lanolin for Breastfeeding Mothers
If you've ever breastfed your children then you probably already know what Lansinoh Lanolin is. I used it with both of my girls and I'll be using it again this time. The only difference this time around is that I'll not only be using it to sooth my nipples, but also to lanolize my wool diaper covers and breast pads. This is the pure solid form of Lanolin so it works great to give your wool extra protection. I'll be using this in addition to my Eucalan Wool Wash when soaking my diaper covers. I just got the standard 2oz tube. I love that it's so readily available and inexpensive. (Approx $9.99 retail)
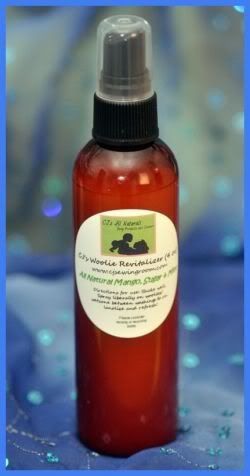
This product is used to add just a little bit of lanolin to your diaper covers in between washes. It comes in a 4 oz spray bottle in seven different scents (All Natural Mango Sugar Mint, Blueberry Crumble, Monkey Farts, Oatmeal Milk & Honey, Warm Vanilla Cake, Unscented, & Honeyed Patchouli). I got mine in the Warm Vanilla Cake scent and it smells heavenly!!! Now I know that wool is self cleaning and for the most part won't smell, but it can't hurt to add a bit of fragrance anyways. I plan on spraying a couple of spritzes to the inner soaker area every couple of uses just to keep a fresh smell and fully lanolized diaper cover. (Approx $10.25 Retail)
HOW TO LANOLIZE YOUR WOOL
Fill a sink or bucket with tepid (warm) water. You want just enough to fully emerge the items that you will be lanolizing. I like to use my laundry room sink.
Add a teaspoon of Eucalan Wool Wash for each gallon of water that you fill your sink with. Use your hand to mix and distribute the wash into the water.
Heat up a cup of water to boiling (or at least very hot). Add a large pea size of Lansinoh Lanolin for each gallon of water that you fill your sink with. Mix until the lanolin is no longer in chunks. It should just be oily water. Add this mixture to your sink of water and wool wash. Use your hand to evenly distribute and mix the water, wash, and lanolin.
Submerge your wool items in the water. Gently press each item in the water so that it soaks completely through. I like to press one side, then flip the diaper cover over and press the other side. *Note: If you're worried about lanolin spots on your wool then be sure to turn your wool inside out before you submerge them in the water*
Let your wool items soak in the water for at LEAST 30 minutes. I like to let mine soak overnight.
Drain the water out of the sink (or bucket). Fold your wool item in half or quarters and press out as much water as you can. You can also roll your wool item up and squeeze the water out. (Do NOT wring your wool items out! This will warp and stretch your wool)
Lay your wool items on a towel. Roll the towel up and press to soak up as much water as you can. If needed get another dry towel and repeat this process to soak up even more water.
Lay your wool items on a towel or drying rack FLAT to dry. This will take approximately 24 - 48 hours. Do NOT dry out in the sun. The heat will cause your wool to shrink.
Voila! You are done.
HOW TO WASH YOUR WOOL
After the first lanolizing, I'll want to wash my wool periodically after it is soiled (approx every 2-4 weeks or more often if needed) in addition to lanolizing. I plan on completing the following routine first, and then completing the lanolizing routine.
Fill a sink or bucket with tepid (warm) water. You want just enough to fully emerge the items that you will be lanolizing. I like to use my laundry room sink.
Add a teaspoon of Eucalan Wool Wash for each gallon of water that you fill your sink with. Use your hand to mix and distribute the wash into the water.
Submerge your wool items in the water. Gently press each item in the water so that it soaks completely through. I like to press one side, then flip the diaper cover over and press the other side. If your diaper cover is soiled with feces, then concentrate on these areas pressing and squeezing to work the soil out. *Be sure not to rub and irritate the fibers of your wool*
Let your wool items soak in the water for 10 minutes.
Drain the water out of the sink (or bucket). Fold your wool item in half or quarters and press out as much water as you can.
Set your wool items aside as you prep your sink to lanolize (see steps above for lanolizing).
Well, I'm done with my first lanolizing and I can't believe I put it off for so long. It was sooooo easy and took no time at all. I can't wait to test them out and see how they hold up. Won't be long now and we'll be switching Lincoln from disposables to cloth. You can bet Lincoln will be wearing lots of wool now. I love the natural look of it and I'm not scared of the washing routine anymore.
I hope this tutorial helps you overcome your fear of washing wool as well, or help to refine your own routine. If you've found other techniques that work better for you please feel free to let me know. I'm definitely open to trying new things. Till then please check back for more great tutorials, information, reviews, and giveaways, as I continue on with my Adventures In Fluff ... and other mommy stuff.
Over the last couple of months I've been acquiring diapers for my diaper stash, but have yet to prep a single one. I was going to wait till I finished getting a majority of my stash, but I figure I can only prep so many diapers at once and I know it's going to to be a daunting repetitive task so I might as well get started. Let the prepping begin!
BEFORE THE PREP ...
First thing's first ... I need to prep my washer. I've only had my washing machine two years, but I've yet to ever clean the inside. I could see a bit of soap scum buildup both at the top of the drum walls as well as on the agitator blades. That couldn't be good for my cloth diapers. Better get rid of that before I start prepping. I set to work researching how to clean my washer. After scouring tons of websites I settled on an article titled "How To Clean Your Top-Loading Washing Machine". Feel free to read the article for the full details, but in a nutshell I just ran the washing machine on the highest load setting with the hottest water with 3 cups of distilled white vinegar and 1 cup of baking soda. After the cycle was done I grabbed a scrub brush and got to work on the soap scum making sure not to scratch the inside of the washer up. I also cleaned the inside top of the lid, any nooks and crannies, the fabric softener dispenser, and the bleach dispenser. Soon as that was all done I ran another hot wash cycle with a cup of bleach (I added this step from "How To Clean A Washing Machine"). As a final step I ran a hot wash with nothing in it. This helped to clean out any of the cleaning products that I just put in there. I also wiped the machine with a damp cloth. Voila! My washer was ready to roll.
WHAT DETERGENT TO USE ...
When I first started researching cloth diapering I thought I had the whole detergent thing figured out right in the beginning. I was going to use the Country Save detergent because it seemed to be one of he most popular cloth diaper safe detergents out there. I'd looked on tons of sites and scanned many safe detergent lists. I even had it on my registry and couldn't wait to try it out. Then I started to notice on various cloth diapering social networking community boards that a lot of families were washing their diapers in Tide. Now technically this detergent is not on the cloth diaper safe list since it does contain dyes, enzymes, brighteners, & fragrances, but it's because of these things that it seems to work. A lot of the cloth diaper safe detergents just don't seem to get your laundry clean enough unless you have the perfect type of water. With all that said I've decided to use Tide. Since they don't sell Original Tide anymore, I purchased Tide Ultra. You do have to make sure it's the original Tide with nothing else added to it. It also has to be the powder version (not the liquid). And if you have an HE washer then you would get the HE version. My only concern with Tide would be if you have a very sensitive baby, but both my girls were fine with regular detergents so I'm confident that we will not have a problem.
If you'd like to do some research on your own before selecting your own detergent please check out the following sites. They have some great lists of all the available detergents out there and their ratings.
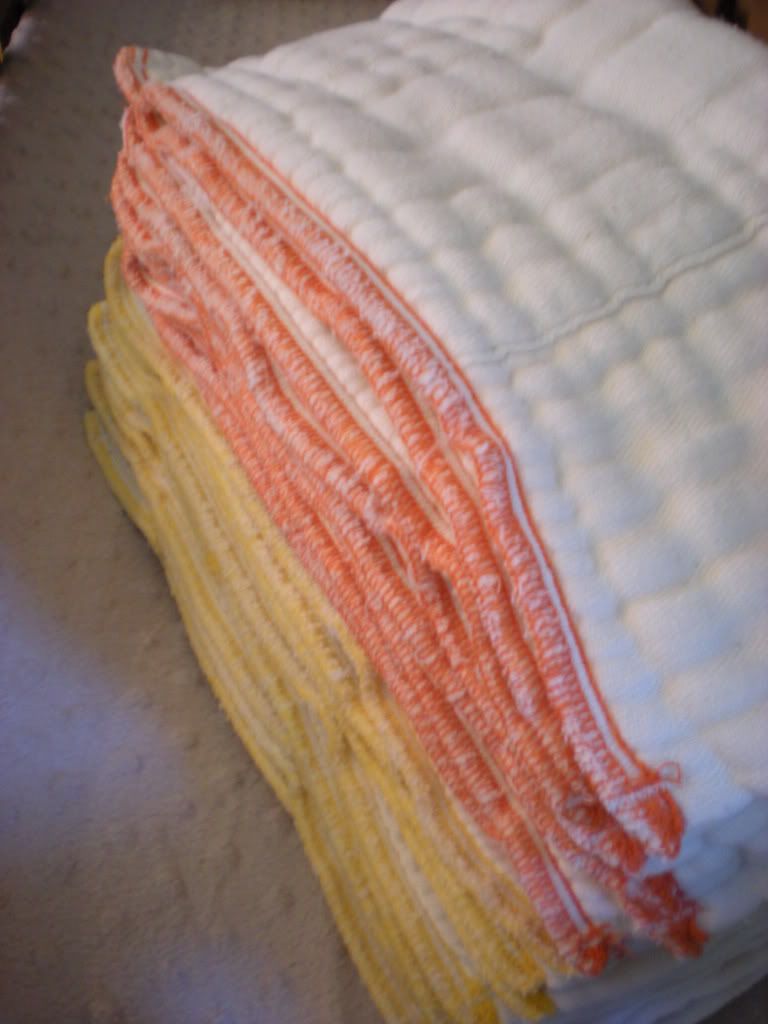
PREPPING COTTON PREFOLDS & DIAPERS ...
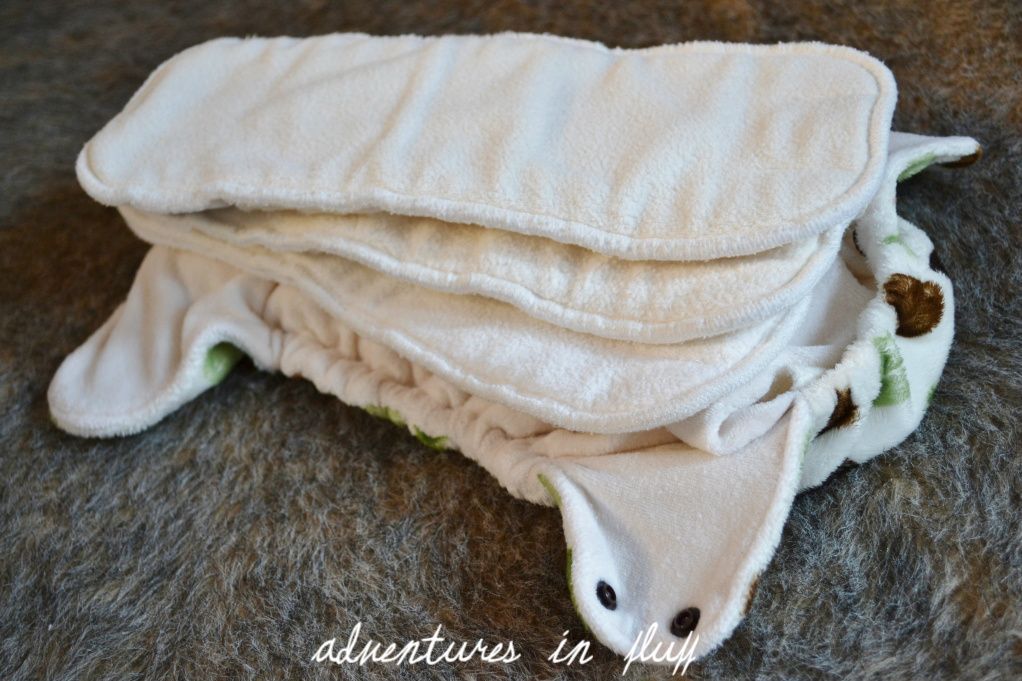
When my GMD Cloth-eez Unbleached Cotton Prefolds first got to my home they were crisp and flat and new. I knew they wouldn't always be that way though. Eventually I'd need to prep them to get the soft, thick, fluffy texture that you look for in a good prefold diaper. I also have lots of fitted diapers such as Kissaluvs, Rearz, Sustainablebabyish, & Green Scene. Some of these were knit and just needed a good cleaning and fluff. Others were fuzzy and linty and needed a good wash to get all the loose fibers off. Into the wash they went.
1. First, divide your diapers into quantities of 12. You don't want to overload the washer when prepping. I ended up with two loads. One load of 12 cotton prefolds and one load of 12 fitted cotton diapers.
2. Second, do one cold wash cycle on the highest water setting with a tiny bit of detergent. I filled my scoop about 1/2 way to the 1st line. This will remove all of the residue from the manufacturing process. You don't want to bake that stuff into your diapers by starting off with a hot cycle.
3. Third, wash your diapers with hot water on the highest water setting using 1/2 the recommended detergent on the manufacturer's packaging. I filled my cup up to the 1st line. 4. Fourth, after washing the diapers put them in the dryer on hot till they are dry (about 60min). Do NOT use fabric dryer sheets. If you want to speed up your drying time, reduce static, and create a fluffier texture in your laundry then you can invest in 2-6 dryer balls.
5. Fifth, Repeat steps 3 and 4 at least 4-5 times to reach a usable absorbency for your diapers (unless otherwise noted on your diaper's prepping instructions). Test your diapers just to make sure they are absorbent enough to use on your baby. Just pour a little water on one of your diapers. If the water soaks in right away then your diapers are ready to use. Unbleached and Organic cotton diapers will not reach full absorbency till about 10 wash/dry cycles have been completed, but I just plan on using them after 5 wash/dry cycles keeping in mind that I will need to wash them 5 more times before they are at their most absorbent state.
MORE PREPPING TO COME ...
So far I've only prepped my cotton prefolds and fitted diapers. I still need to prep all my covers, synthetic, bamboo, hemp, and wool diapers. I'll save those for another weekend and a later post on my blog. At least I've got a head start as I hope you do too. Stay tuned for more prepping, reviews, DIY projects, & Adventures In Fluff !
While out picking up the girls from school this week I had to run one errand at Target and decided to look at trash cans for my dirty diapers while I was there. To my surprise I found the PERFECT trash can!!! It's not much to look at, but I think it will work perfectly. It's the Hefty 13.3 Gallon Pivot Lid Wastebasket in Black. I love that all I have to do is drop the diaper above it and the diaper will fall into the trash can. It was also half the price of the one I was looking at on Amazon ($17 vs $40). This trash can also filled another one of my requirements which was that it was not an air tight trash can. A lot of trash cans with a flip top lid are air tight and are more prone to creating an ammonia smell which can be hard to get out of your diapers. This one has cracks around the edges which will create great air flow and hopefully keep the ammonia smell away. I had also thought about just using a tall wicker laundry basket, but then thought a plastic bin would be more sanitary since I could wash it out easily if I needed to. Here are pictures of the trash can and my daughter Riley showing how it works. I'm probably going to spray paint the top to match the nursery and sew a skirt for the bottom. Click HERE for more info on this trash can.
I know it's crazy to get excited about diaper pails, but I'm excited about anything that has to do with cloth diapering right now. I hope my blogs are getting you excited about it too. Thanks for reading my blog and I hope you're enjoying my Adventures In Fluff.