
The thing I love about sewing baby blocks is that it gave me a chance to use up some of my scrap pieces of fabric that keep piling up in my sewing cabinet. I also had a lot of ribbon scraps that I was able to use up too. I love it when I can do a project and not even have to run out and buy more supplies. I even happened to have a bag of stuffing on hand in order to stuff them with. Extra bonus!
Now that I'm excited and you're excited, let's get started!!!
What You Will Need:
Scrap pieces of fabric (I like to use three coordinating fabric pieces that are different textures)
Ribbon (That coordinates with your fabrics)
Stuffing
Thread
Sewing Machine
Pins
Needle
Crinkle Paper or Plastic Bags (Optional)
Bells (Optional)
Squeaky Ball (Optional)
Step By Step:
Follow this link to see the step by step instructions including photos from Zaaberry's blog. HERE
**Note: I like my square cutouts to be 4-1/2 x 4-1/2**
You can also view my video tutorial on YouTube below.
Fun Optional Variations:
- Try using crinkle paper or plastic grocery bags inside of your block instead of or in addition to the stuffing so that your blocks will have a crinkly sound when your baby plays with them.
- Try adding some bells inside some of your blocks so that your baby can hear some jingles when he shakes the blocks.
- Try adding a squeaky toy inside your block (in addition to stuffing) in order to have a squeaky toy.
- Try making each block a different color scheme (Red, Orange, Yellow, Green, Blue, Purple) so that they can be used to teach your toddler different colors.
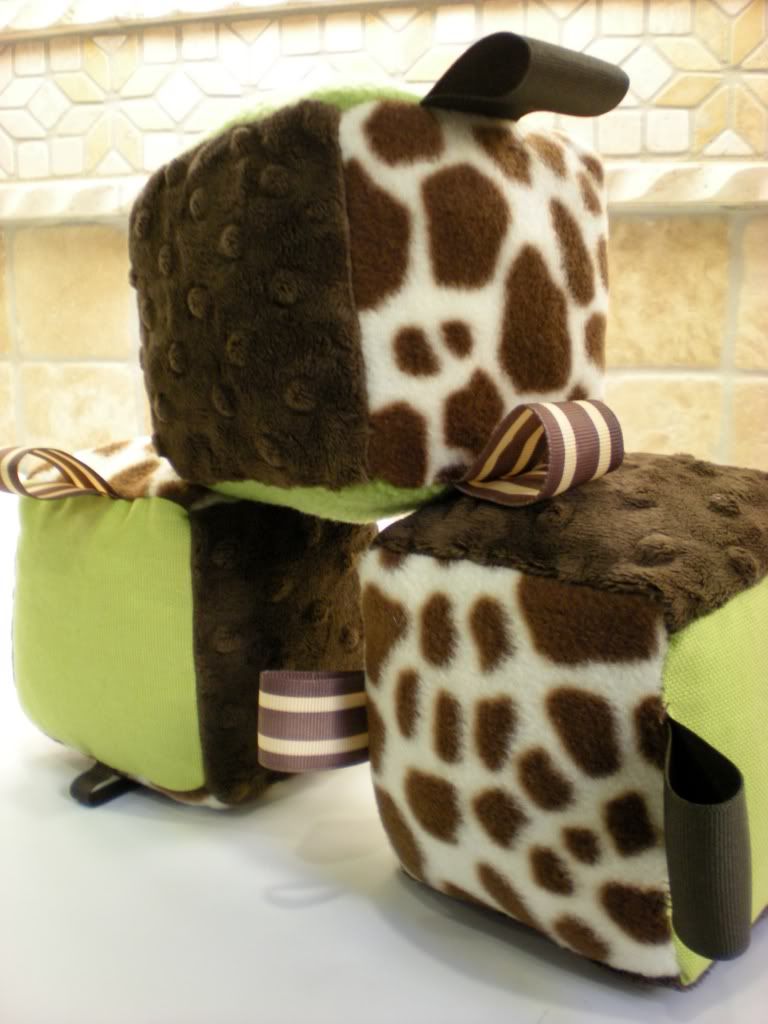
I love my cute little block set that I sewed. I have one squishy standard block with just the stuffing interior, one block with grocery plastic bags stuffed inside instead of the regular stuffing, and one block with stuffing and a couple bells inside. Each one has three different textures also. I used minky, fleece, and sailcloth. I also added various sizes of ribbon on each side. The final outcome is a block set that will stimulate my little guys senses and teach him different sounds, colors, and textures. I hope he loves them.
I hope you enjoyed this tutorial and go on to sew some baby blocks of your own. If you do then remember to post some pictures on my Facebook page so I can see how they came out. I love checking out your projects. Till then keep checking back for more tutorials, helpful information, reviews, and giveaways here on my Adventures In Fluff ... and other mommy stuff.

I LOVE this!!! Thanks for the tutorial, I pinned it!
ReplyDeleteThese are super cute! I should make some up to have on hand for baby showers.
ReplyDeleteso lovely and great idea.. thank you so much:)
ReplyDeleteAre these washable? That would be really nice.
ReplyDeleteI haven't tried washing mine, but I would think so, unless you're using a filling that is not ok for a washer... like plastic bags.
Deletethanks so much for the tutorial. I'm a beginner to sewing, and it was so easy to follow that I made two in the past hour :) thanks
ReplyDelete