
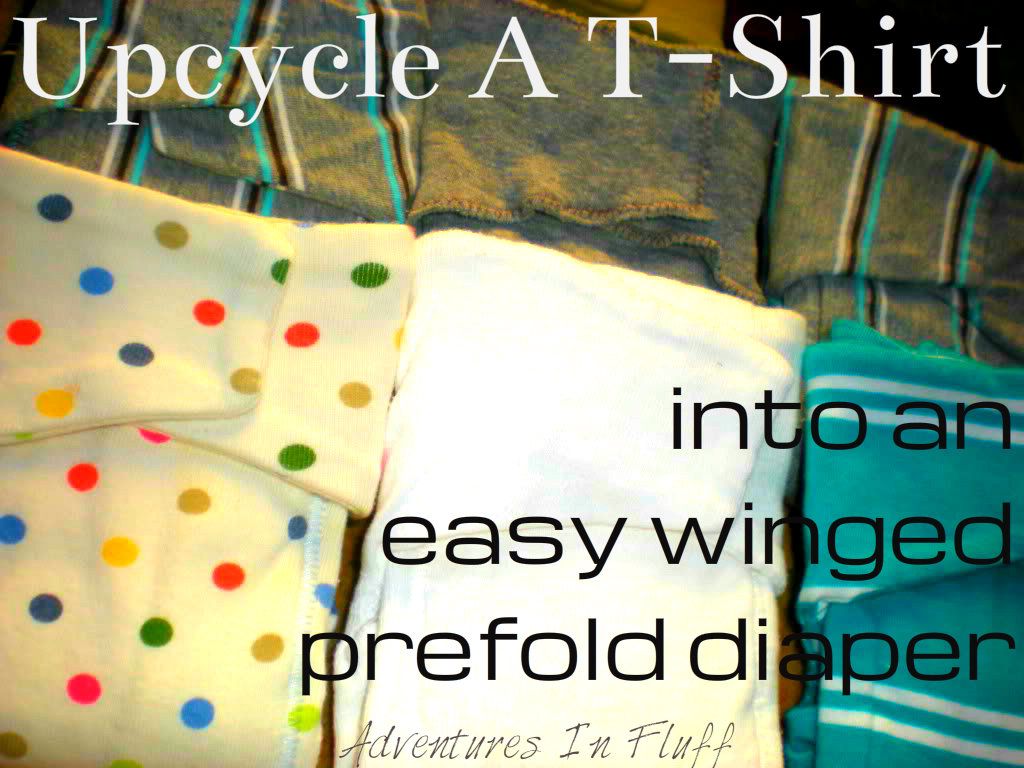
 Ok, I’m itching for another project. Are you? What to do???? I got the idea for this next project from a friend of mine on Fertility Friend. She found the project on Diaper Swappers where a mom had created “Daddy Flats”. These are essentially flat cloth diapers made from old t-shirts that daddy doesn’t wear anymore. They are cut to have wings that easily fold in to create more absorbency in the center of the diaper. Maybe that's another reason they call them Daddy Flats. They are a flat diaper, but cut into a shape that makes cloth diapering easy for even the most origami challenged (aka ... Daddy).
Always trying to tailor projects to my needs, available resources, and my uncontrollable urge to experiment, I’ve decided to change up the original design. First, I'm going to turn and topstitch my diapers. If I had a serger machine I'd love to try a few that way as well since it would be faster, but I don’t and I do not like the look of a zig-zag stitch on the edge (although you could do it that way as well). Secondly, I am going to be adding a soaker pad into the center of the diaper turning it from a flat to a prefold diaper. This will increase the drying time, but also the absorbency of the diaper. Lastly, I'm going to change the pattern design a bit. I wanted to be able to jellyroll the side flaps easily so I squared them out instead of angling them at the top. I also squared out the tabs on the waist so they lay nicer when on the baby.
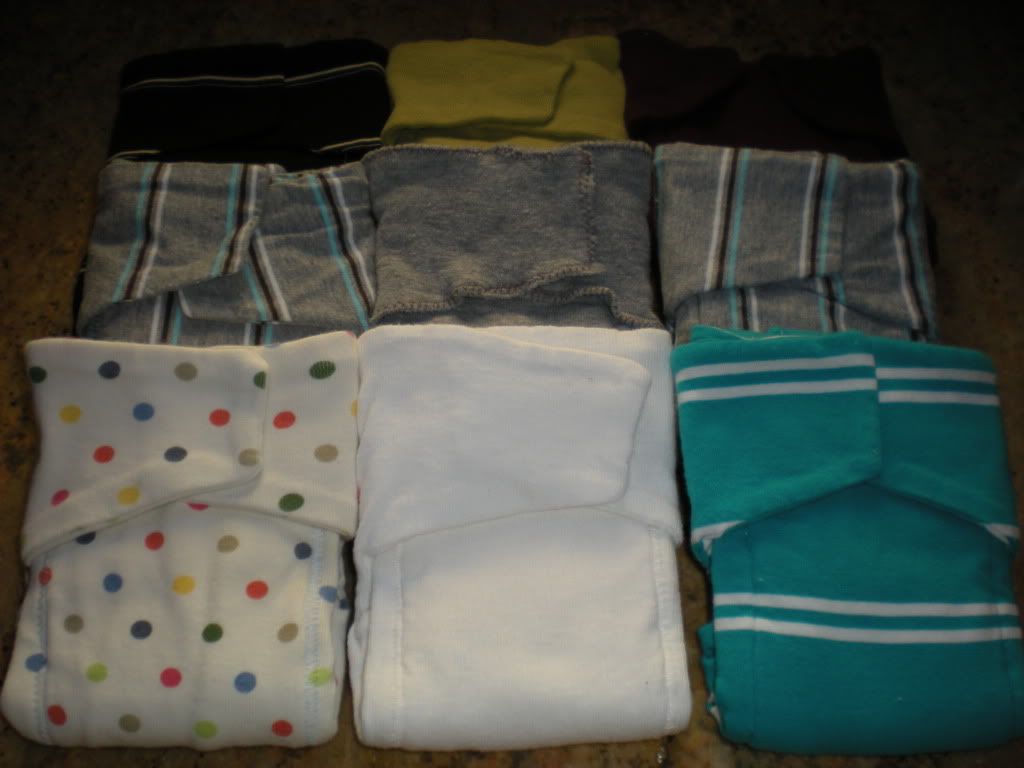
First thing is first. We need to gather up some old t-shirts. I gathered up a mixture of both my old t-shirts and Brian’s old t-shirts. The more fun the pattern on them the better. Brian’s shirts are of course much larger so I can get two or three diapers out of each of his shirts depending on the cut versus only one out of mine. I tried to find the shirts with the best quality of cotton and that were the thickest. I have some shirts that are REALLY thin and those just won’t do. I also tried to make sure that they were all 100% cotton.
Next thing I needed to do was gather up an old towel that I could cut up for the soakers. Believe me. I have plenty of old towels lying around in my closet. Light colors are better so they don’t show through the fabric of the t-shirt.
Now it’s time to get down to business. Follow the step by step process below to create your own Upcycled T-Shirt Wing Prefolds.
What you will need:
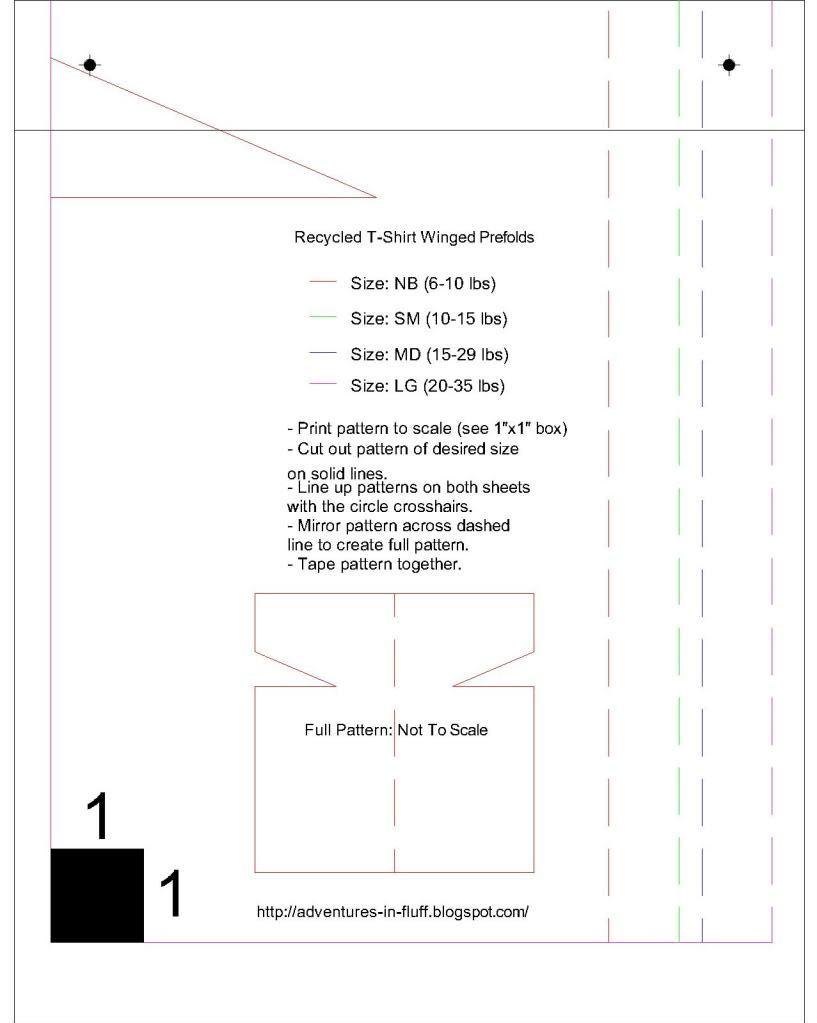
Wing Prefold Pattern (Print both Pattern A and Pattern B to scale)
***UPDATE*** Here is a measurements pattern for those that can't get the scaled pattern to work for you. Just take the measurements for the size you want and draw out your own pattern.
Old T-shirts (make sure there are no holes and they are not too thin)
Old Towel
Sewing Machine
Thread (in coordinating or contrasting color to your t-shirts)
Pins
Scissors
Fabric Marking Tool (Washable Marker, Washable Pencil, Chalk, etc.)
Iron
Upcycled T-Shirt Wing Prefolds – Step By Step:

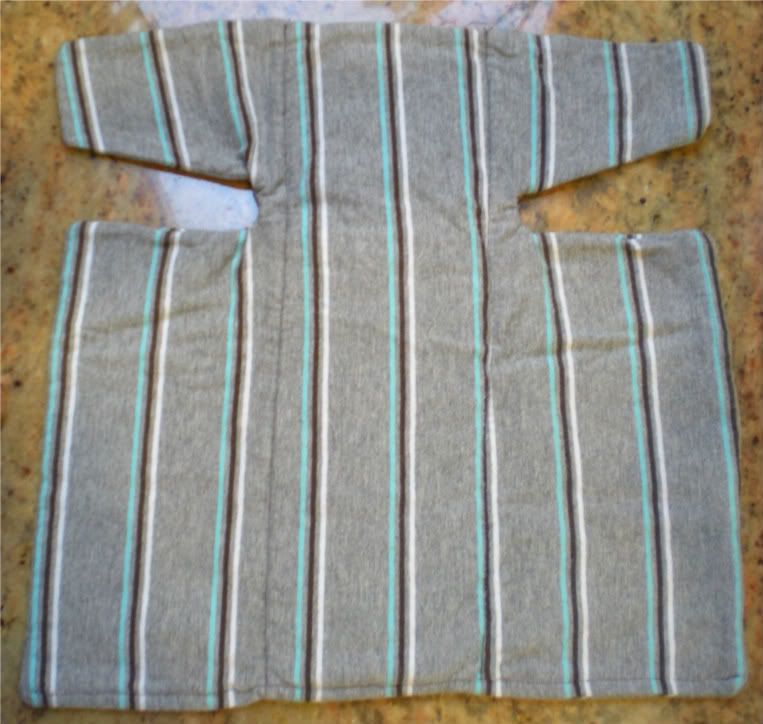
- Lay your T-Shirt out on a flat surface. Make sure that the T-Shirt is turned inside out. Completely smooth out the T-shirt. Iron if necessary.
- Lay your pattern on top of the T-shirt making sure that it is straight. If the T-shirt has a pattern, center it where you want it on the diaper. Pin your pattern onto the shirt, or use weights to hold it down. Trace your pattern onto the shirt. Remove the pins and pattern from the shirt. Leave the shirt sitting flat on the table.
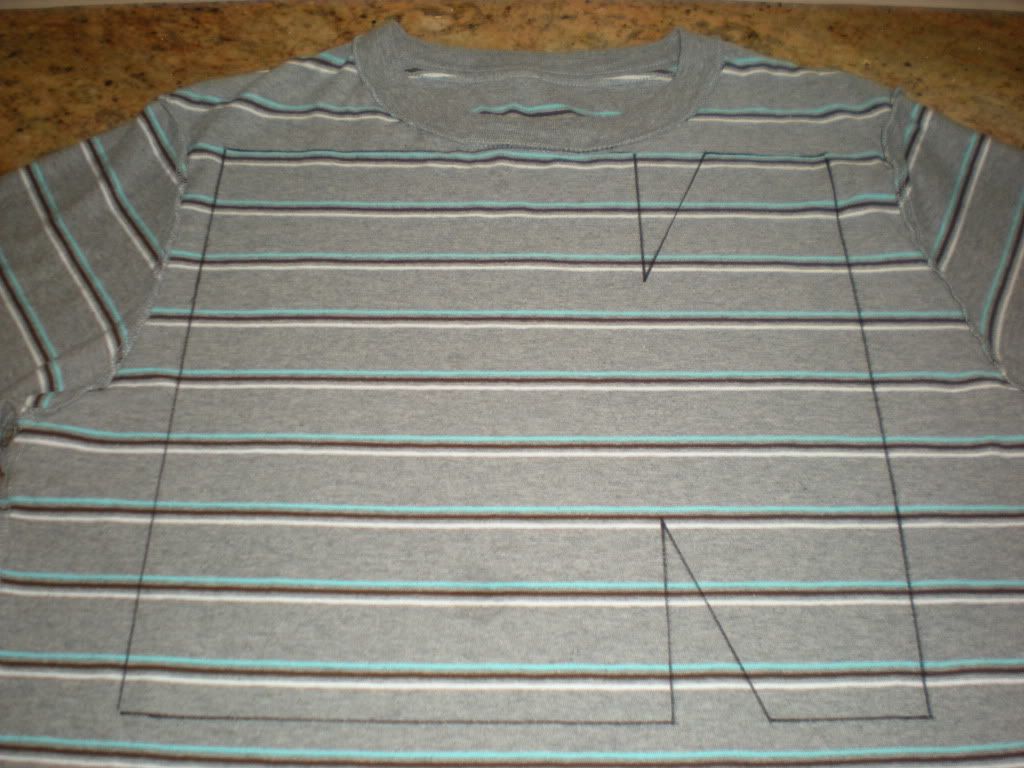

Size: NB (8"x12")
Size: SM (9"x14.5")
Size: MD (9"x16.5")
Size: LG (10"x19")
- Fold your soaker in half and lay it in the center of your t-shirt diaper cutout. Pin the soaker to the diaper at the top and the bottom.

- Trim the corners of your diaper so that they will not be bulky when you turn the diaper right side out. Make sure not to cut into your stitching.
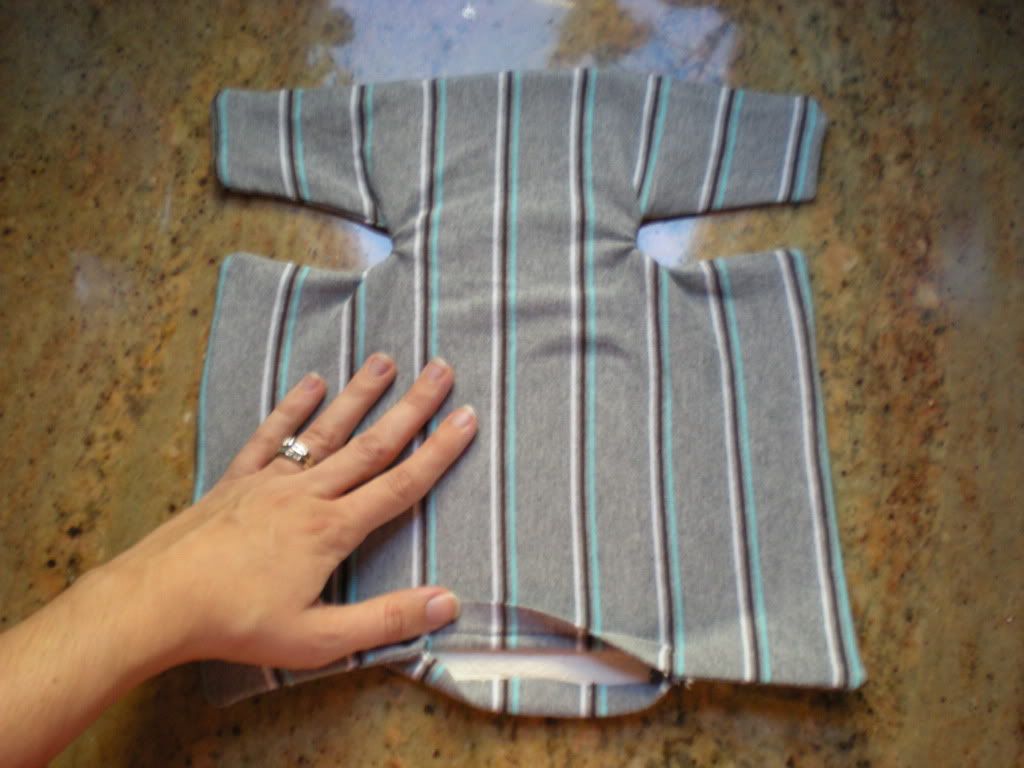
- Straighten the soaker out so that it is once again in the center of the diaper. Flip the edges of the exposed soaker into the diaper as well as the edges of the t-shirt that are not sewn. Iron this flat so it will be easier to sew closed. Fasten with a pin if needed.
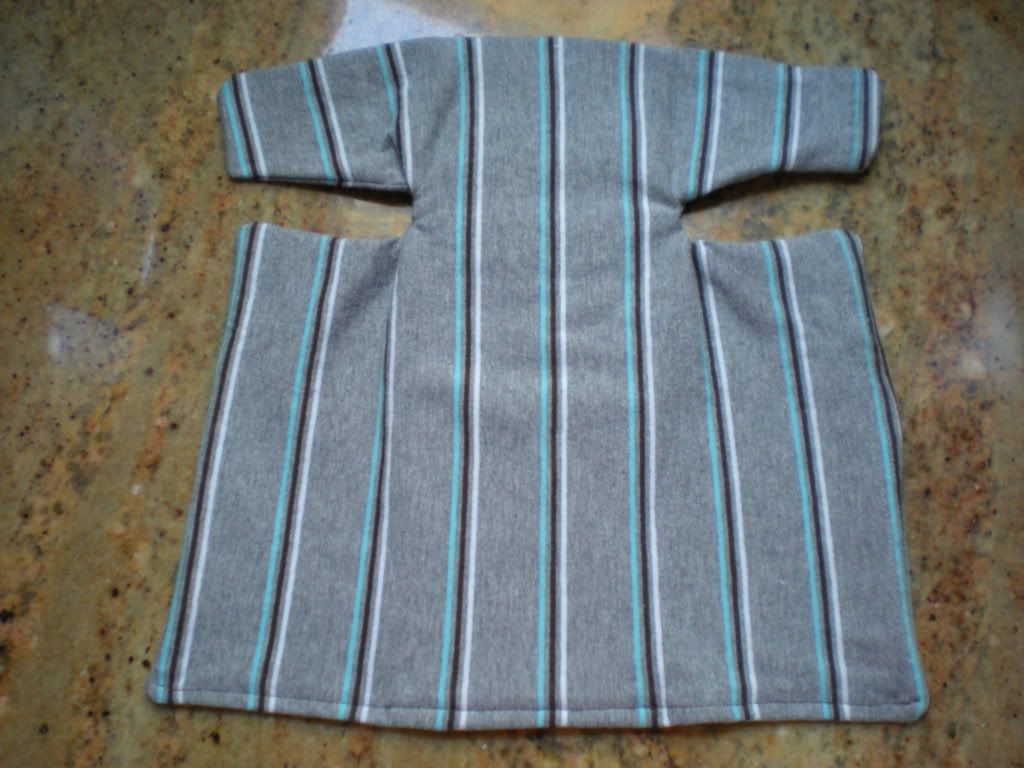
Voila! How did yours come out? I can’t wait to use mine. They look so cute. The best part is that I didn’t have to go out and spend any money to make these diapers to add to my stash. Cost = $0.00. Can’t beat that!
*SOME HELPFUL TIPS*
- Make sure to back stitch at the beginning and end of stitching so that your stitching won't pull out.
- When rounding corners, stop the machine at the corner, lower your needle, lift the foot, and rotate your fabric. Lower the foot again and continue sewing. This will create a nice clean corner.
- Use fun coordinating thread to really make a statement with your diapers.
- Knit fabric is really stretchy. Keep a close eye on your sewing so you don't get off track and make sure your fabric doesn't get get sucked into the sewing machine causing it to jam.
*SOME FUN ALTERATIONS*
- Try one T-Shirt fabric on one side and another on the other side. This will give you a fun reversible diaper.
- Try leaving a pocket opening where the soaker is so you can easily add additional inserts as needed.
*HOW TO USE YOUR UPCYCLED T-SHIRT WING PREFOLD*

- Trifold the side flaps in. Flip the front of the diaper up over baby. Close the wings around the baby's waist. Secure with a Snappi or pins. *For added absorption lay a doubler in the diaper before you trifold the side flaps in.
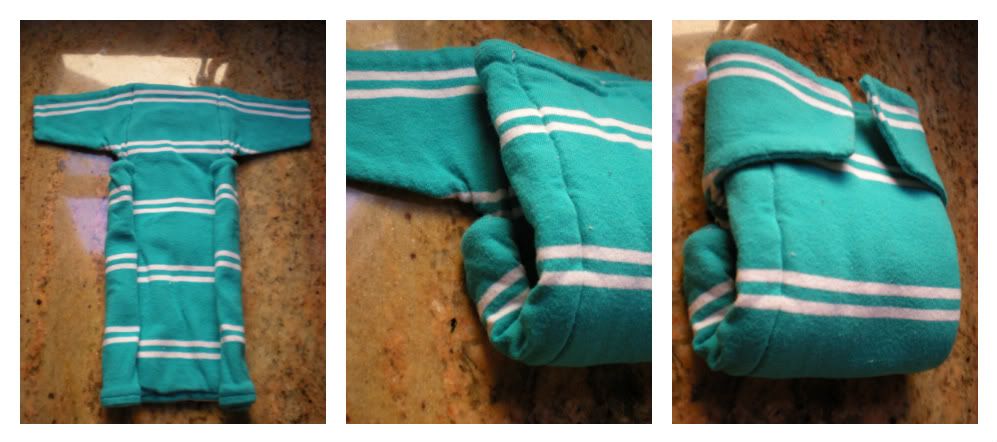
- Jellyroll the side flaps in. Flip the front of the diaper up over baby. Flair the front of the diaper out and around baby's tummy. Close the wings around the baby's waist. Secure with a Snappi or pins. *For added absorption lay a doubler down the center of the diaper.

I hope you enjoyed this tutorial. Don’t forget to post pictures of your creations on my Facebook page so I can see how cute they all came out. Better yet … post a picture of your little bundle of joy wearing one of your Upcycled T-Shirt Prefolds. Who doesn’t love to see babies in fluff?
*This post is part of the Upcycled Crafting Challenge (#freefromtrash) hosted by Calley, The Eco Chic, and is part of a one month challenge to create from trash. This challenge will hopefully open your eyes to the number of items that we still end up trashing every day that could be used by ourselves or our kids to create fun and useful items. To find out more about the challenge and to see other projects click on over to Calley’s announcement post.*
Check out some of the other great posts from today below and be sure to link up your projects today too!!! Just link to your blog post, Pinterest picture, Photobucket Picture, etc. I'd love to see your t-shirt projects.


Wow, Chana....Brilliant! You amaze me!
ReplyDeleteSeriously - I think you need an Etsy store! ;-)
Chana, your are one talented Mama!! I still haven't finished my wipes or burp clothes and now I want to do these. OMG I will be backed up forever!
ReplyDeleteThanks! I'm having some of the girls in the sewing forum test them out for me and give me some feedback. I'm planning on opening an Etsy store ... my company name is taken though so I'm trying to work around that. I'll let you all know when it opens. : )
ReplyDeleteOMG Chana, you rule!
ReplyDelete2Godbglory - LOL! I know. I'm always backed up on projects. I've got a million I want to do. You guys are gonna love the next one. It's really easy, but a life saver for prefolds.
ReplyDeleteI so want you to make me a couple bundles of Girly wipes and matching burp cloths by the time I finish mine she will in college.
ReplyDeleteSo cute! Great job Chana!
ReplyDeleteThanks so much!! I plan on sewing this sometime soon. And when I do, I'll post a picture on your Facebook page. :-D
ReplyDeleteSo crafty! And the bear looks great. :D
ReplyDeleteChana, these are so cute and creative. I want to try, but I'm not sure how they will turn out.
ReplyDeleteCan't wait to see all your pics! Don't be afraid to try them. It took one or two for me to get the hang of it, but after that they were pretty easy.
ReplyDeleteI don't even like prefold/fitteds with covers and I want to try this! ahhhh I haven't even done the curtains for baby's room. If she wasn't 2 mos early I'd be caught up =p You're doing great!!
ReplyDeleteThese are soooooo damn cute! I love 'em.
ReplyDeleteThis looks great, thank you! I'm going to make several in the next week or two. I have a box of old t-shirts I've been trying to find a project for and this will be perfect. I'll be sure to come back with pics when I'm done.
ReplyDeleteOkay, I've searched the internet high and low and have never seen this pattern for upcycled diapers! I'm extremely excited to try it!
ReplyDeleteKeep the awesome projects coming Chana, I'm in love with your blog and your posts!
Mrs. Smitty - I looked high and low for one like it too and couldn't find one. I hope you like it when you try it out. I can't wait to try mine on my little guy.
ReplyDeleteOMG, thank you for posting this! I was searching and searching about a month ago for something simple like this. Today I though I'd try ONE more time and then give up. I'm so excited to try these!
ReplyDeleteYou're welcome Charla! I was doing the same thing as you searching the whole internet and finally just ended up designing my own. Hope it works out for you. Don't forget to post pics on my Facebook page so I can see how they come out. : )
ReplyDeleteCute Fun and Simple I LOVE IT!!!
ReplyDeleteOh, this is probably the best "Daddy Flats"-type pattern that I've seen, I was trying to figure out something like that, now you've already figured it out for me and done it very well!
ReplyDeleteNow I can hardly wait to get started on some, thank you very much for your pattern and tut!
I just found you! Yay, perfect. I can't wait to try these! Im due in 9 weeks, did you ever get any feedback on how these worked? absorbancy and fit?
ReplyDeleteThanks!
Nicole
I loved how these worked on Lincoln! I loved the stretch of the fabric and they were easy to snappy. The absorbency was pretty good too. I would only use them as a daytime diaper though. Congrats on your little one on the way!
ReplyDeletevery nice i really want to try this i hope its easy be cause i am not good at sewing yet.
ReplyDeleteAre these sized? how long can I use them poundage wise?
ReplyDeleteThese are sized. The sizing is on the pattern shown above in "What You Will Need". I based the sizing off the Green Mountain Diapers prefolds, but you can use these a lot longer because of the stretch.
DeleteQuestion, Can microfiber or terrycloth shop towels from Sam's Club be used for the soaker?
DeleteTerrycloth shop towels can totally be used. I've used them before.
DeleteLOVE this!! Wish I had a sewing machine!
ReplyDeleteSo this might be dumb. But I have no printer. Is there any way someone could tell me the dimensions of just the newborn pattern?
ReplyDeleteI keep meaning to put the dimensions on there. Some people find it easier that way. The newborn pattern is 12x12. Let me see if I can describe the rest right. If you start from the top left corner... go down 2.5" (that's the width of the wing of the diaper). Then go down 1.5" (that's the cutout of the diaper. Then go in 3.5" (that's the rest of the cutout of the diaper). I think that's it. Just repeat the same thing on the other side. Hope that helps. : )
DeleteThanks for posting your videos and instructions. I love your presentations.
ReplyDeleteThis is one of many sites I plan to use for making diapers for our waited arrival. Thanks again for all your information.
Great pattern...you can even elongate the pattern length and add in some leg elastic to help contain messes... thanks for posting this!
ReplyDeleteSo excited to try this - what if I put felted wool on the outside!!!!!
ReplyDeleteI'd actually thought about this, but if you put wool on the outside it would actually be folded into the inside when you fold the prefold. It would only work if you only sewed it on the outside "T" portion.
DeleteLove this idea. I'm expecting my second and would love to use cloth 90% of the time and these will be great for those first stages with changing the diaper so much and it's barely wet. Thanks for sharing
ReplyDelete@Chana is there any way you could make this into a one size?
ReplyDeleteI think as long as you don't put too much into the middle layer you could probably fold a larger size to fit a smaller baby and eliminate some of the smaller sizes.
DeleteChana, can you give us the dimensions for the size small written out like you did above for the newborn? Thank you!
ReplyDeleteThe small pattern is 15h x 13.5w. Let me see if I can describe the rest right. If you start from the top left corner... go down 2.5" (that's the width of the wing of the diaper). Then go down 1.5" (that's the cutout of the diaper. Then go in 4" (that's the rest of the cutout of the diaper). I think that's it. Just repeat the same thing on the other side. Hope that helps. : )
DeleteChana, can you please give us the pattern dimensions of the size small written out like you did above for the newborn? No printer:( Thank you!
ReplyDeletePerfect, Chana, thank you so much! :)
ReplyDeletePerfect, Chana, thank you so much! :)
ReplyDeleteIt looks like my daddy flats have become a generic household name but actually the design is something I cooked up when diapering daughter. Being the creative person that I am wanted to come up with THE diaper. And also wanted a creative catchy name. The daddy flat was named that because it IS easy that a dad could do it with no problem. It didn't get its name from dad's old shirts but that is an interesting twist to the name.
ReplyDeleteI am honored however, that the name has become some what of a house hold name but they are actually a name brand to a pattern I now offer based on my many many trials and errors of coming up with THE "perfect" design. www.daddyflats.com
is there any way u could write out all the pattern dimensions of the sizes in inches for me please and thank you or is there a post on your blog with all the dimensions written out?
ReplyDeleteI just posted a link to the dimensions. Hope that helps. :)
DeleteThese are wonderful. I made some very similar nearly 30 years ago for my first baby. (who is now expecting her first) Mine were old flannel sheets and very similar shape. I made just one layer of towel and then made the length twice as much..so they would dry much faster. i did them on a line in a laundry room and they were often just one day drying. ( Super over the top environmental and penny pinching too!) Just love your t shirt idea..and plan to make some for my daughter to enjoy using!
ReplyDeleteCan you give the deminsions for all of the sizes my printer will not print to scale
ReplyDeleteI just posted a link to the dimensions. Hope that helps. :)
DeleteI can not get a snappi to stick to any t-shirts I have..they say they are 100% cotton any ideas?
ReplyDeleteWeird! Are they new shirts? They have to be really well loved shirts so that the fibers are really worn in. They won't absorb well if they are new either.
DeleteI'm in the process of converting my prefolds to fitteds and came across your blog. What would you think of putting elastic and it's casing on the the inside of each center seam, lengthwise from the tab cutouts to the top/front of the diaper? I feel like I'd still be able to fold my fabric in on the elastic but I'm wondering how easy that would be if I didn't want to fold at the seam (allowing the diaper to be wider)My first baby was a blow out child at least 3x a week (disposables) and I really want there to be some elastic reinforcement on my diapers but I think using this pattern I'd be able to keep almost all of my fabric vs. making fitteds. plus save time on serging! :) Thanks
ReplyDeleteI think it would work using the elastic. Please do try and let me know how it works out!!!! I'd love to know. I thought about trying some elastic when I made these, but the point of this project was to make something really easy, so I thought I'd keep it basic.
DeleteChana,
ReplyDeleteYou must have some skinny babies! The waist measurement on the large (B) was way to small for my guy! 24 months and 27lbs but otherwise love the tutoiral and I am super excited to start my stash for baby # 2!
I'll admit I only used the newborn size. Good to know that you'll have to up the waist size for larger babies.
DeleteThe pattern link isn't working :( did u happen to make it down??
ReplyDeleteI checked all the links and they are still working for me.
DeleteWord to the wise: you will always regret the thought "Oh, I'll just skip that step on this tutorial." :p In other words, make sure you sew the vertical soaker edges down. I thought I'd leave them free so the dipe could dry faster, but the soaker got really twisted up inside (despite the top and bottom being attached) and I ended up having to cut one back open to straighten it out before going ahead and sewing the edges!
ReplyDeleteI had some issues sewing the soaker in. What are your sewing machine settings when sewing the soaker?
ReplyDeleteBrilliant. Can I link this post to my blog?
ReplyDeleteSure! Feel free to link up to it.
DeleteDoes it matter which way you lay the pattern for stretch? I have some knit fabric i want to use but is no where near as stretchy as a tshirt.
ReplyDeleteNormally it wouldn't matter, but if your fabric lacks a lot of stretch then make sure that the most stretch goes with the wings so that they stretch more around baby.
DeleteI love your pattern! I have made two now and I did make some alterations. I sewed my terry cloth in after I had completed the diaper and turned it out through the opening. The way you described made the one seam too bulky and it broke my needle. Also, I like to clip in the curves and clip the corners off outside the seam to make it easier to turn. Thanks so much! No elastic! No snaps!
ReplyDeleteThanks for the tips on the insert! I'll have to try that next time. I do normally clip the corners though. I'm surprised that I didn't mention it in the video. Thanks for bringing it up. It does help a lot to clip the corners.
DeleteI love your pattern! I am a pretty avid sewer but I never wanted to worry about making a bunch of diapers with elastic. So this is the perfect solution, plus I can use a snappi not snaps or velcro. I did alter your instructions a bit to reduce the bulk of the seam with the terry cloth (i sewed all end down after i turned it right side out and stuffed the terry cloth in there). I also had to sew the long seam of the folded terry cloth before inserting it so that it wouldn't shift. Thanks so much!
ReplyDeleteTwo things that would make this project 'sew' much easier. 1) A Walking Foot & 2) Ball Point Needles (they are knit fabric friendly)... I will be making some of these very soon! Thanks for sharing :)
ReplyDeleteThanks for the tips! I'm still a pretty novice seamstress and use only the most simple sewing techniques. I'll totally have to try these tips out. Thanks!
DeleteHow does this style compare to traditional prefolds holding in the mess
ReplyDeleteWith the jellyroll fold, these are pretty good at holding in the mess.
DeleteI'm doing this. I had issues with the stitching around the flat part and the wing, that little stitching b****ing me, and now, I'm looking the pics and realize that is so hard to get that area neat and clean. I'm planning to do a dozen of this so I can reuse my beloved t-shirts, some of them really important to me, I had one of a family reunion with my family tree printed, I think that having the family so close in cloth because they live in other town makes me feel that they are here. Thank you for sharing.
ReplyDeleteWhat do you think about putting a layer of PUL underneath the soaker?
ReplyDeleteYou would still need a cover.
DeleteClever idea!! I just did this diaper yesterday in the largest size, and I find it to be a bit narrow through the bum - I think of it as a "sumo style" diaper - next one I will try at 7 inches wide in the middle, and will add to the width of the lower section, so that I can get more layers in the middle. However, I like how slim it is in the hips. Also, I just zig zag stitched around the diaper, as I thought turning it inside out would lead to seams that took too long to dry and possibly trap build-up (we have very hard water and so I am always fighting build up of minerals). For the same reason I left out the soaker, and just use two inserts with it. I'm going to try it at least a few more times to see what I can get to work best for us.
ReplyDeleteAlso - the layer of PUL could make for a good toilet "training" diaper - although there would be a bit of gapping around the legs.
Thanks! Katia
Could you add Velcro to these if you don't like pins or snappis?
ReplyDeleteHi ! These diapers look great ! Do you think that I could use old towels not only for the soaker but for the whole diaper ? I'm wondering if this would be too stiff fabric as I suppose that the T-shirts you use are in jersey and so quite elastic...
ReplyDeleteBy the way I have just discovered your website and read your presentation and it sounds quite funny to me as I could almost have written the same... The way of seeing maternity, children (I have 3 kids too and I see the last one exactly how you see Lincoln) Except that I'm French and live very far from where you are !