
Well, the day I dreaded is finally here. I tried to put it off as long as possible, but you can only hold off solid food for so long. Linc is now on solids once a day and you know what that means... stinky, thick, peanut buttery (but not nearly so yummy), gag me I'm gonna barf poo!!!
Oh yes, the poo from hell is here. I'd say it took me by surprise, but really I think I was just in denial that the day would come. Each day I'd see the diaper sprayer I purchased just sitting there waiting to be installed, but I kept telling myself that I still had time. Even after he started solids and I knew it was only a matter of days, I still put the task on the back burner convinced that his poo would never change. Oh how I was wrong. Well the day came and boy was it a doosie! Freak! Guess what wasn't installed??? Even worse, guess what happened 30 minutes later??? He pooped again! Ok, no more procrastinating. Time to install the diaper sprayer.
Are you ready???
What You Will Need:
Diaper Sprayer (I have the Sigma Diaper Sprayer)
Mounting Bracket (included with diaper sprayer)
Mounting Bracket Hardware (included with diaper sprayer)
Adjustable Wrench
Hammer
Drill
1/4" Drill Bit
Screwdriver
Towel
Step By Step:

#2 - Turn off the water supply by turning the shut-off valve clock-wise.
#3 - Flush your toilet to empty the water from your flexible water supply line.

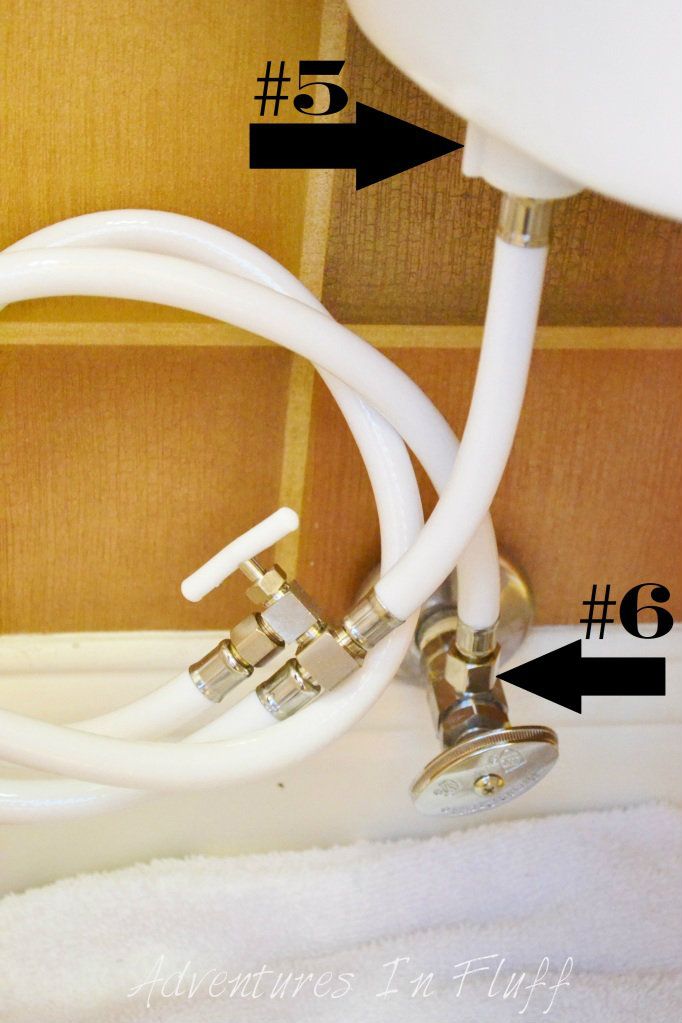
#6 - Attach the smaller nut on the other end of your diaper sprayer to the water shut-off valve on the wall. You will need your adjustable wrench to tighten it. Mack sure that it is snug, but do not over tighten. You can tighten it more if it leaks.

#7.1 - If using the anchor screws, mark the location where you want the bracket by poking a pen or drill bit through the screw holes on the bracket.
#7.2 - Using a 1/4 drill bit, drill holes in the wall where the screws will go.
#7.3 - Using a hammer, tap the wall anchors into the wall where you drilled the holes.
#7.4 - Using a screwdriver and the provided screws, screw the wall bracket into the wall.
#7.5 - Hang the head of the diaper sprayer on the wall bracket.
#8 - Turn the water supply back on by turning the shut-off valve counter clockwise. See picture #2 (*Note: If you have leaks at this point turn off the water and see the trouble shooting guide below)
How To Use Your Diaper Sprayer:
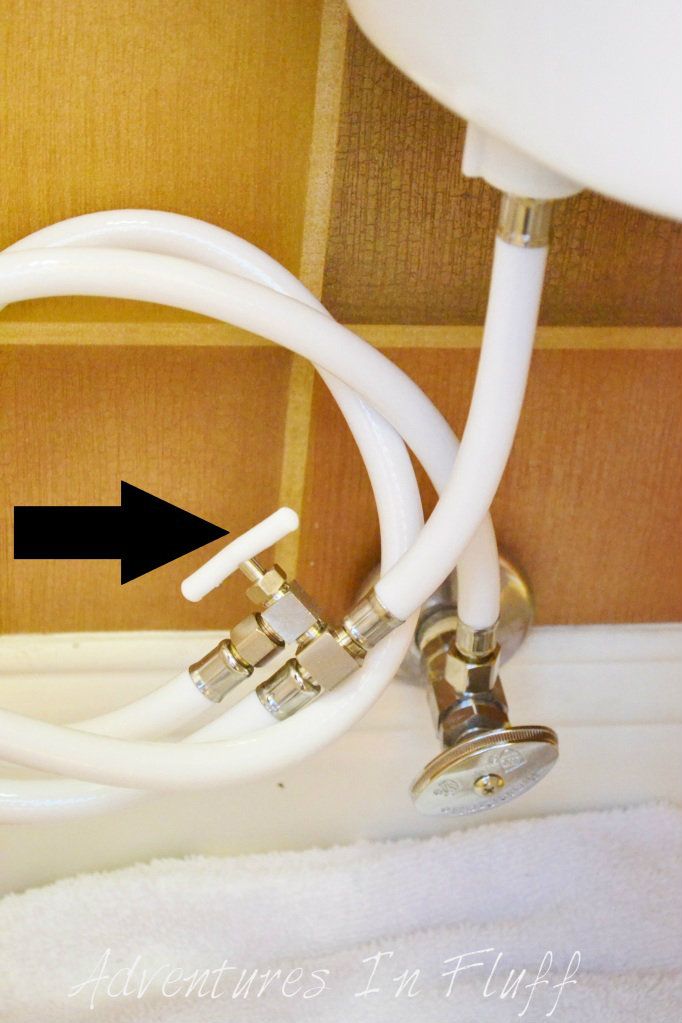
- When you are done using your sprayer turn the valve clockwise to turn off the water. This will help save your bathroom from water fights between the kids.
Troubleshooting:
- If the tank nut is leaking remove it and make sure there is a rubber washer. If not then you need one. Also make sure that the washer is laying properly and not cracked or damaged. If the washer looks fine screw the nut back on. Make sure you are screwing it on perfectly straight. If it's still leaking try tightening the nut or loosening the nut.
- If the connection to the shut-off valve is leaking try softly tightening it a bit more.
- If the water is not spraying make sure you've turned your water shut-off valve back on and that your adjustable flow valve on the sprayer is turned on as well.
- If your sprayer is leaking when not in use, make sure that you are turning the adjustable flow valve off on the sprayer (see "How To Use Your Diaper Sprayer") and emptying the water from the sprayer before you hang it on the wall bracket. To empty the water from the sprayer simply spray the water out of the hose into the toilet until no more water comes out.
Now that I have my sprayer installed I am so happy. I actually couldn't wait to spray my first diaper and have fun spraying Linc's diapers clean each time. Does that make me strange??? Haha! Probably, but don't judge me yet. Just wait till you get started. You might just love it too. Happy Spraying!!!


I had the very same thing happen to me just recently... Solid food poop denial. Funny how it really catches you by surprize, like you haven't been living and breathing baby poop for the last 6 months! I didn't even have a sprayer bought when the "big one" hit. But you can bet I bought one immediately after! Thanks for the lesson.
ReplyDeleteUgh. I had this exact same thing happen to me just recently: solid food poop denial. Its funny how it really does sneak up on you, like you haven't been living and breathing baby poop for the last 6 months! I didn't even have a diaper sprayer bought yet when the "big one" hit, but you can bet I was out there searching for one immediately after, and excitedly awaited the next post sprayer instalation poop. Yeah, we might be a bit weird...
ReplyDeleteYou've put together a great tutorial here! We bought the BumGenius diaper sprayer, and loved it! It had a slightly easier installation compared to the one you got, but it's the same basic steps. Daddy wanted to ditch the cloth diapers for awhile until we got the diaper sprayer - it's SO MUCH better than dunking and swishing! I'd recommend it to anyone - to me it's a must-have accessory!
ReplyDeleteGreat post! I love my diaper sprayer and couldn't live without it! Love your videos:-)
ReplyDeleteWe, too, bought the bumgenius diaper sprayer and thank goodness it was invented- I could not live without it!
ReplyDeleteHandy tips, particularly with the troubleshooting. We were running into leaks with our generic sprayer and it was probably because we were not turning the adjustable flow valve off on the sprayer. THX!
ReplyDeleteThanks for the post. We were running into leaks when not in use, probably because we were not turning the adjustable flow valve off on the sprayer. Thanks for the tip!
ReplyDelete