If you've been following my blog then you've probably already read my tutorial on "How To Sew Your Own Fleece Longies". Well this is pretty much a continuation upon that post and expanding on from longies to soakers. I started out with longies because a friend of mine had told me they were easier to sew. I'm soooooo glad I took her advice because it really did help to start out with the longies. The hardest part in my opinion on both patterns are the waistbands and legbands. It really helped to start out with just the waistbands on the longies and then when I got good at that try to tackle the very tiny leg bands on the soakers.
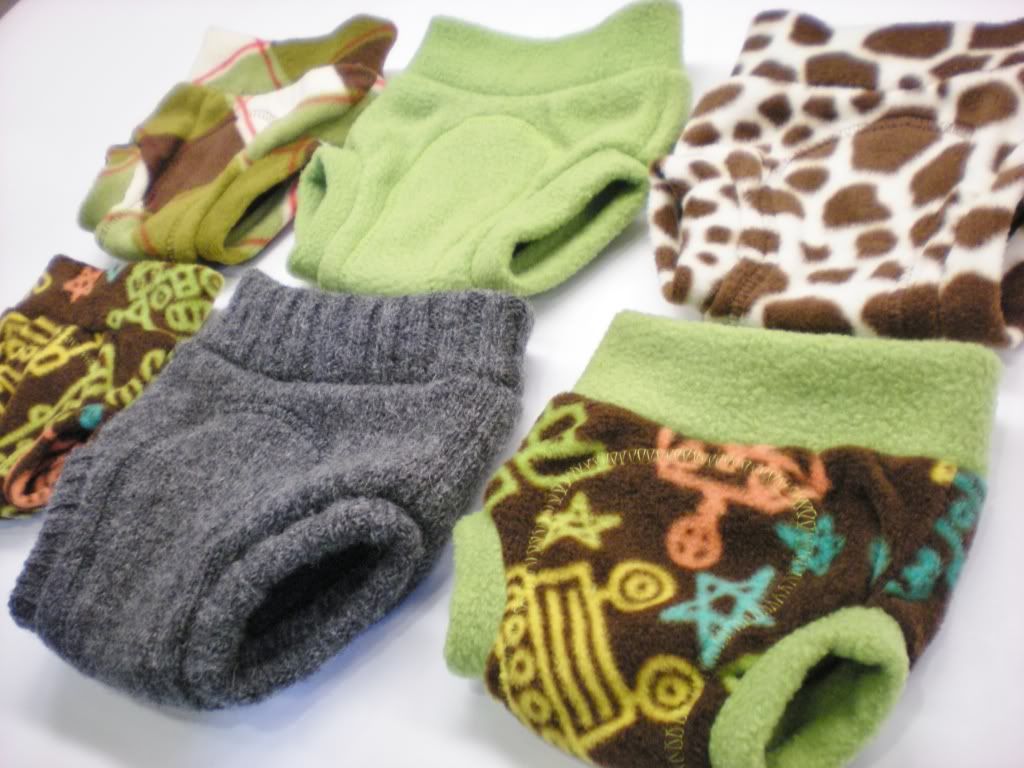
With all that said you might be asking yourself what longies and soakers are. Both longies and soakers are used as cloth diaper covers to create a much more breathable option in cloth diapering. You can use them as diaper covers all by themselves or you can use them over a PUL diaper cover to give you an extra layer of protection. You don't even have to use them as diaper covers at all. Longies are great just to use as pants or pajama bottoms. Soakers are great just to cover up less than attractive diapers in the summer or keep your little one from taking off their disposable or aplix closure diaper. So whether you're a cloth diaperer or not, longies and soakers are a fun and cute project for anyone.
What You Will Need:
Katrina's Sew Quick Soaker Pattern (you will need the soaker and the wet zone)
Anti-Pill Fleece
Washable Fabric Marker
Scissors
Pins
Sewing Machine
Coordinating or Contrasting Thread
Step By Step:
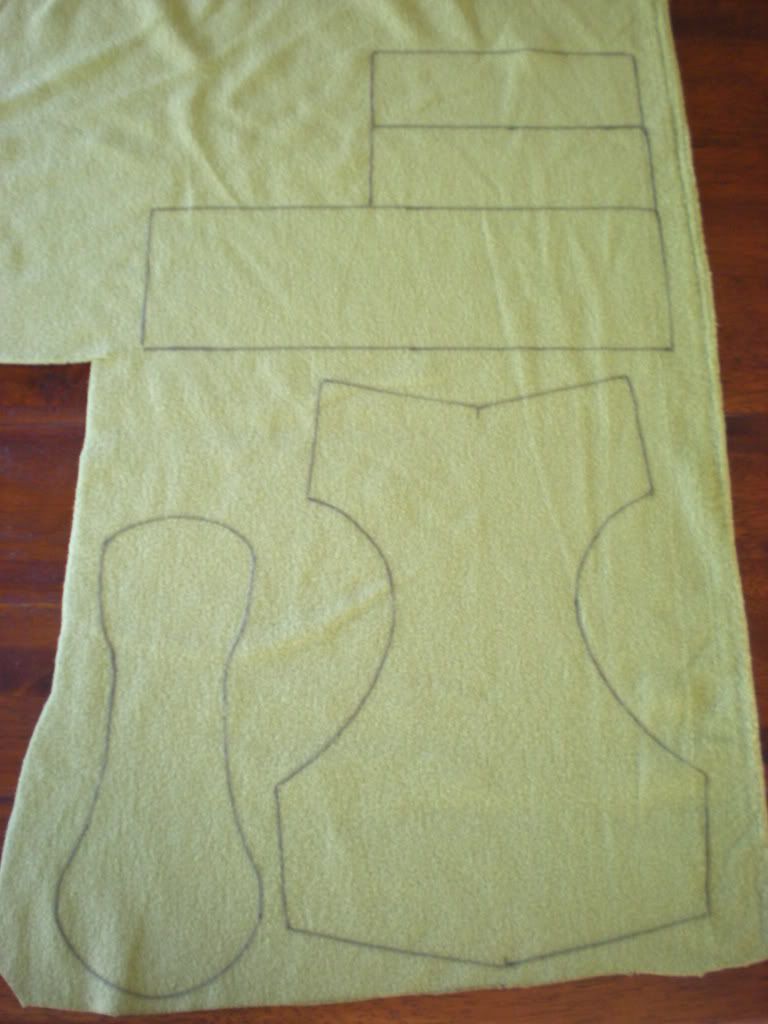
- Print out your Katrina's Soaker pattern and Wet Zone pattern. When printing make sure you un-check the box that says to "Auto Rotate and Center", and Select "None" on the "Page Scaling" option. Make sure that the 1x1 square prints out at 1x1 so that it is the correct size. Cut out your pattern. Tape the two sides of the pattern together along the dotted line.
- Lay your fleece out flat on your work-surface with the wrong side of the fabric facing you. Place your main portion of the diaper soaker pattern on the fleece. Make sure the stretch of the fabric is going side to side (not up and down) when laying out your pattern. Trace out the pattern on your fleece using a washable fabric marker.
- Flip the pattern over and repeat the last step to create the other half of the main portion of the diaper soaker. Make sure you flip the pattern over.
- Trace out your waistband and legbands (you will need two) onto the fleece. The Katrina's pattern only shows half the waistband and legbands. You will want them to be twice as long as what is shown. Have some fun with your waistband and legbands and make it a different color that coordinates with your main pant fabric.
- Trace out your extra layer for the wet zone.
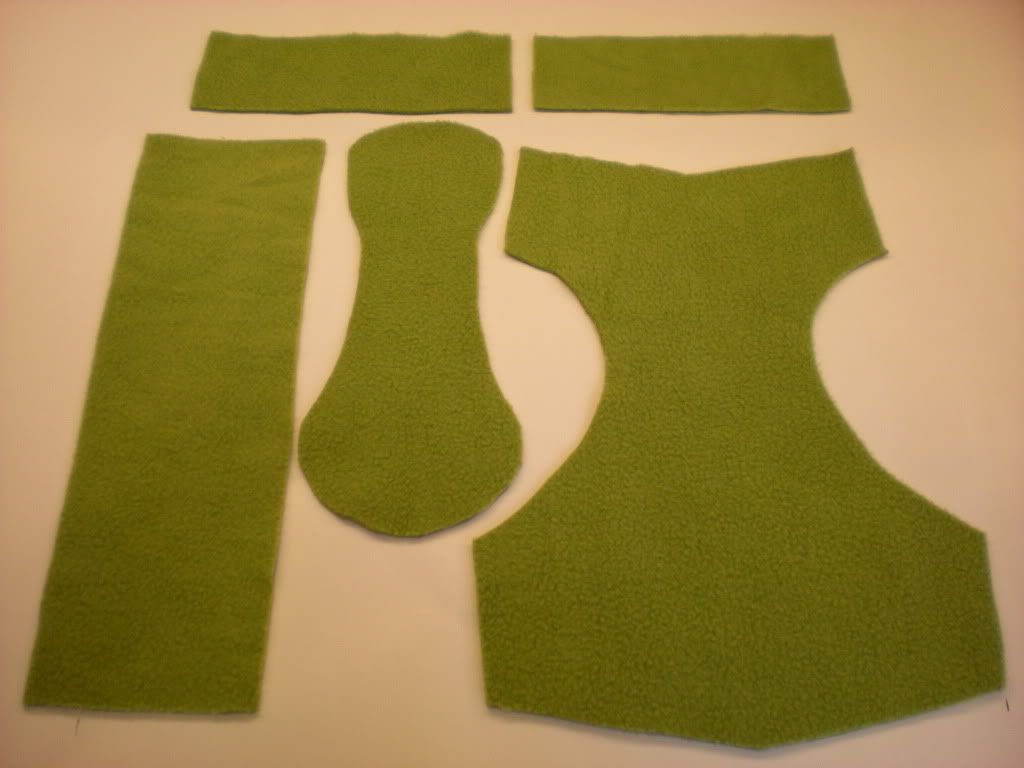
- Cut out all of your fabric pieces.
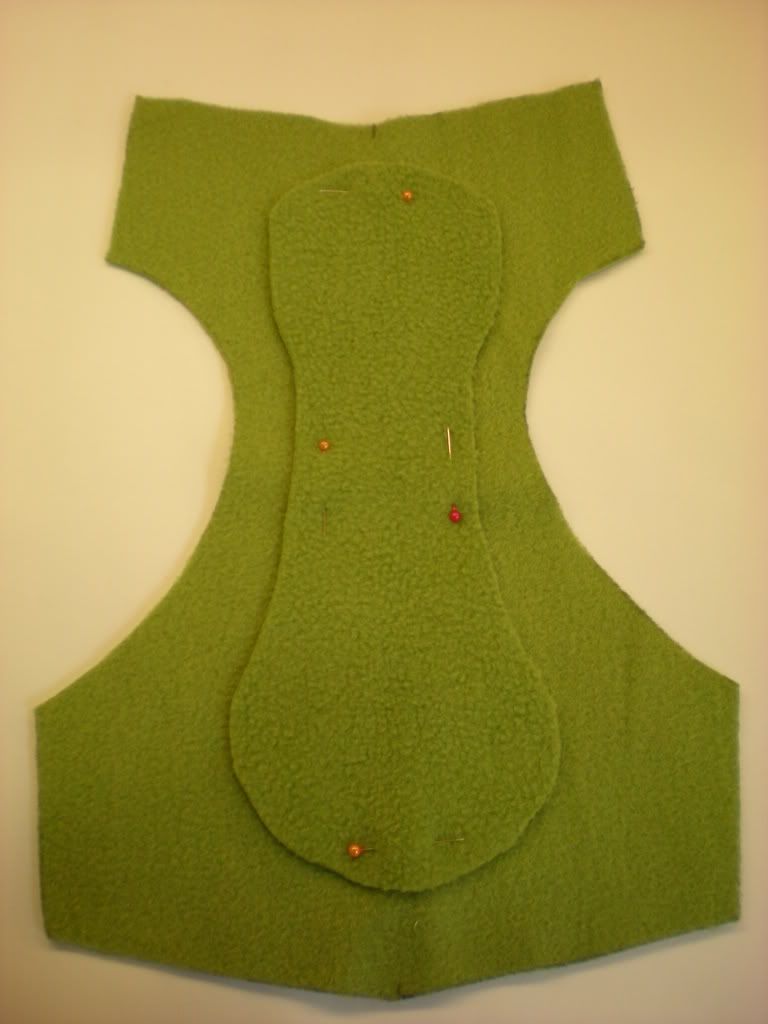
- Lay your main soaker section out in front of you with the wrong side of the fabric facing you. Lay your extra layer for the wet zone on top of the diaper soaker with the good side facing you (centered on the diaper soaker. Pin the wet zone in place.
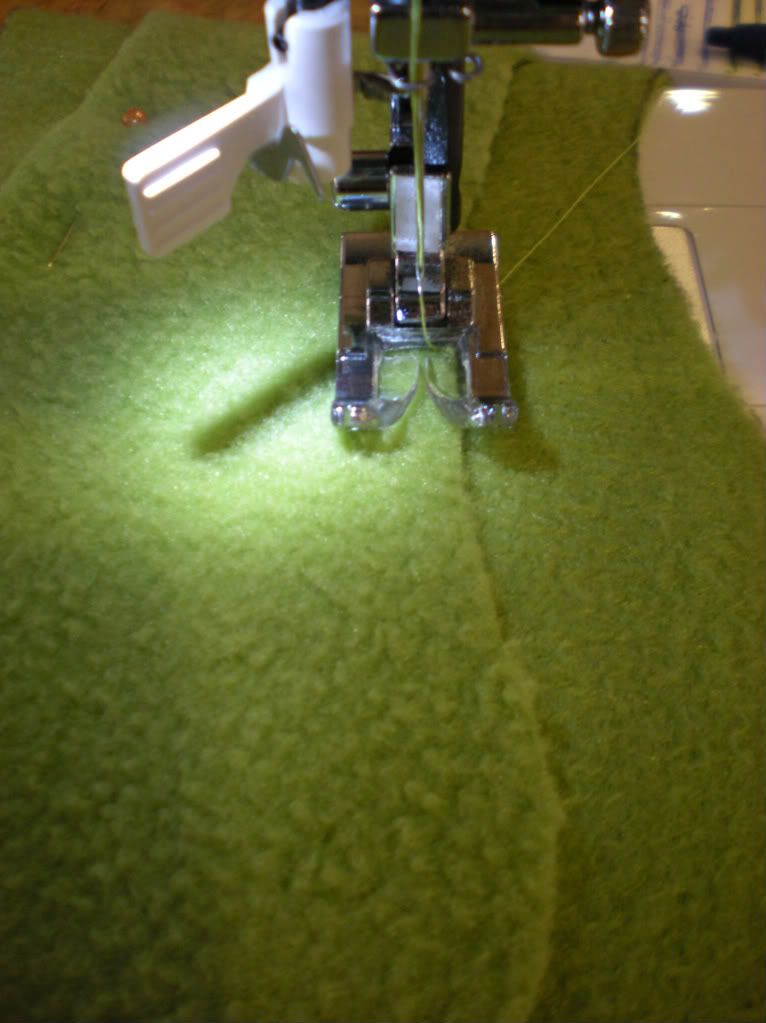
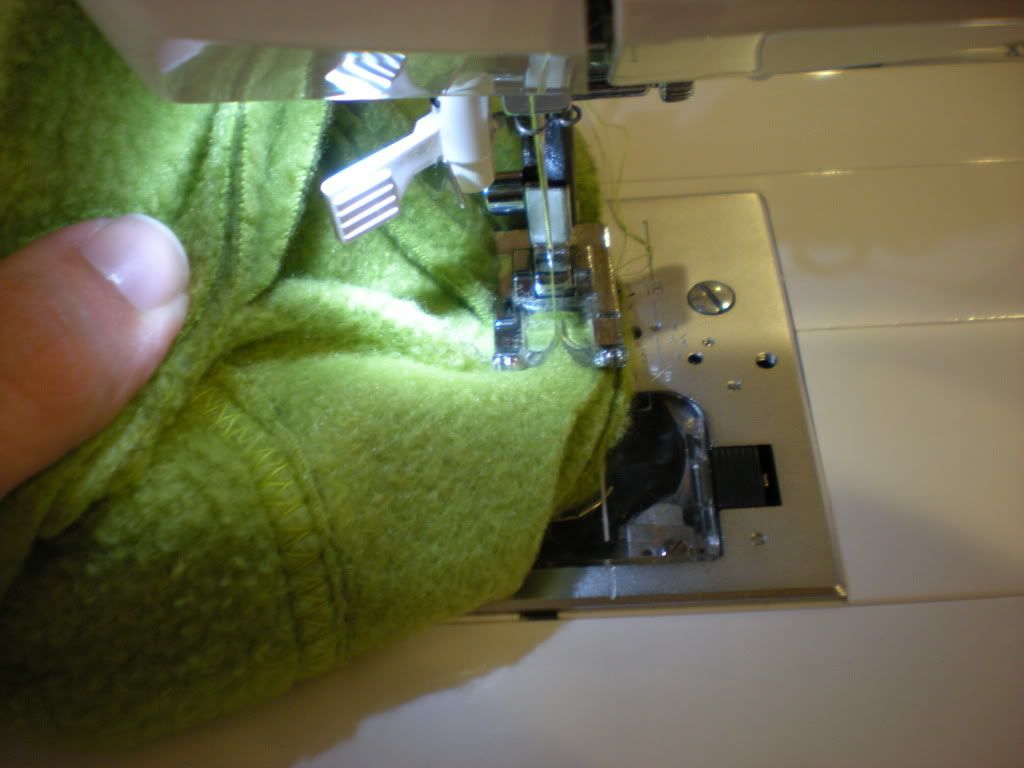
- Using a Double Overlock Stitch, sew around the entire perimeter of your wet zone removing your pins as you go. If your sewing machine does not have a double overlock stitch feel free to use a zig zag stitch or a straight stitch if you like. I just think that the double overlock stitch looks the best.
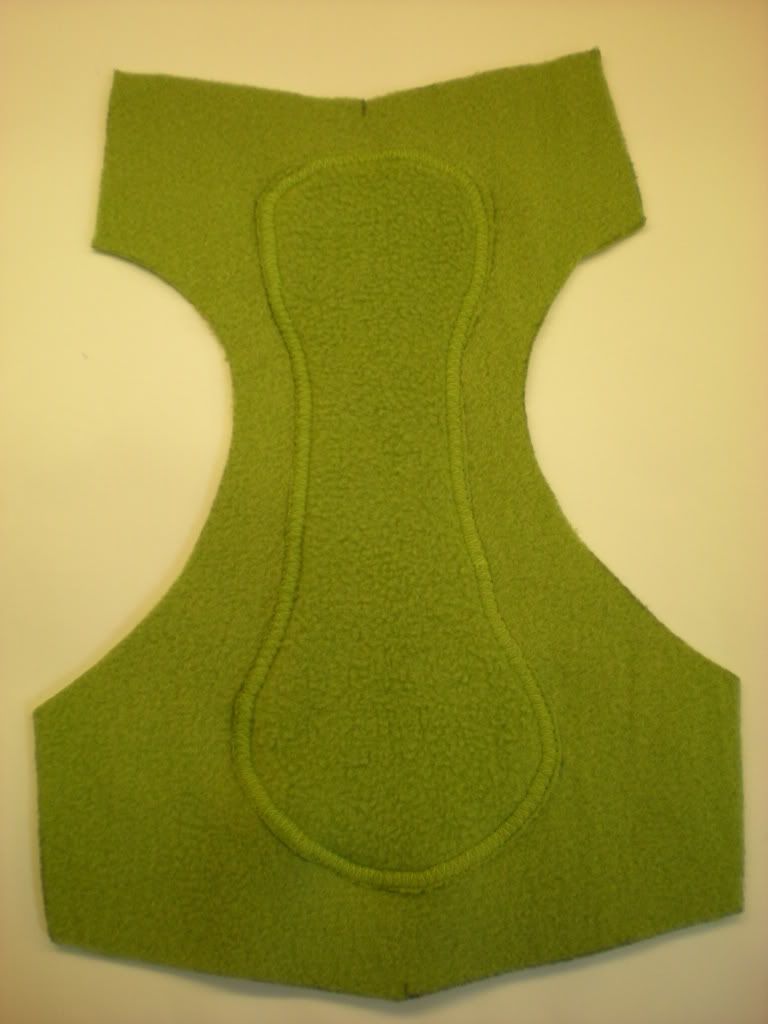
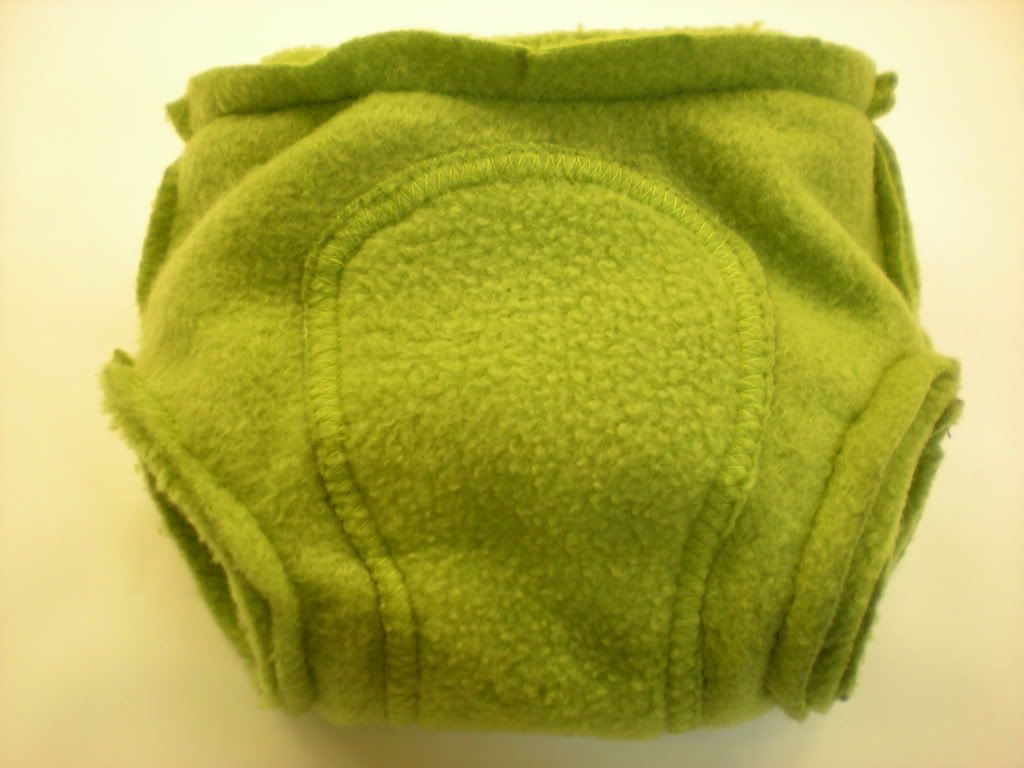
- Here is what your wet zone will look like fully stitched on.
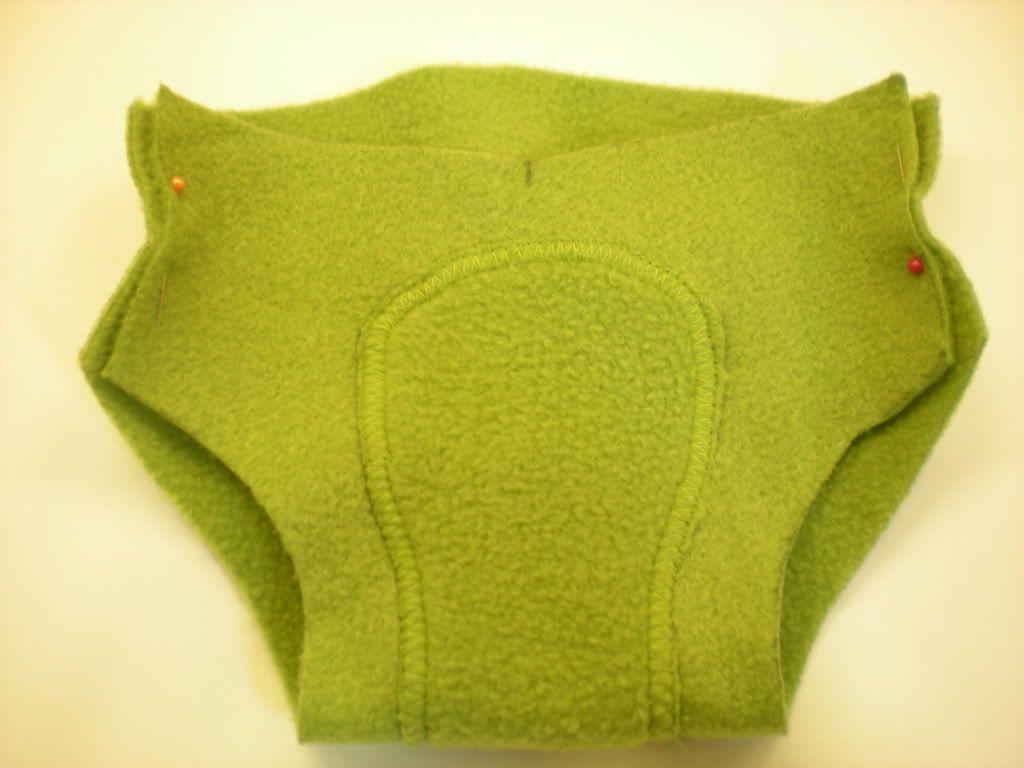
- Fold your diaper soaker up so it looks like a diaper with the good side of the fabric on the inside. Sew the sides of the soaker together (not the leg holes or waist opening) using a straight stitch 1/4" in. If you have a serger you could also use that. Turn your soaker right side out and set aside.
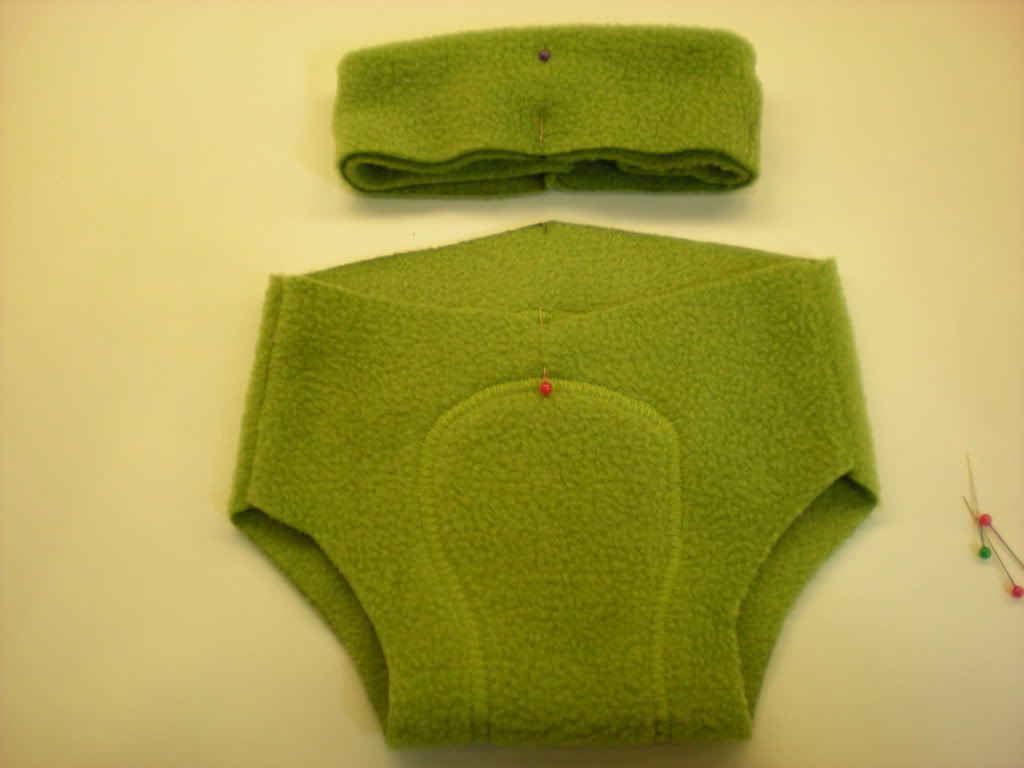
- Fold the waistband in half so that the two short sides are together. Make sure that the wrong side of the fabric is showing on both sides. Sew a straight stitch a 1/4" in along the short edge where the two sides come together. Set waistband aside.
- Repeat the last step with each of your legbands. Set legbands aside. - Take your waistband and fold it inside of itself so that the right sides are showing on both the outside and the inside. Let the seam mark the exact middle of the back of the waistband. Mark the exact middle of the front of the waistband with a pin. Mark both the exact sides of the waistband with pins.
- Holding the soaker let the angles mark the exact front and back of the pants (if you have a hard time seeing the angles then mark them with pins). Let the side seams mark the exact sides of the soaker.
- Slide the waistband over the top of the soaker. Let the raw edges of the waistband line up with the raw edges of the soaker. Pin the waistband to the soaker using your pins as guides. You want the exact front of the waistband to match up with the exact front of the soaker, the back of the soaker to the back of the waistband, and the sides of the soaker to the sides of the waistband. You can even add additional pins in between the pins you've already placed if it helps you to keep everything in place.
- Sew a straight stretch stitch around the top of the pants attaching the waistband to the pants. If your machine does not have a straight stretch stitch then feel free to use just a regular straight stitch. Make sure to stretch the waistband as you sew to evenly distribute the waistband around the pants. Do not stretch the pants fabric. Go slowly so that you can make sure that the fabrics all line up.
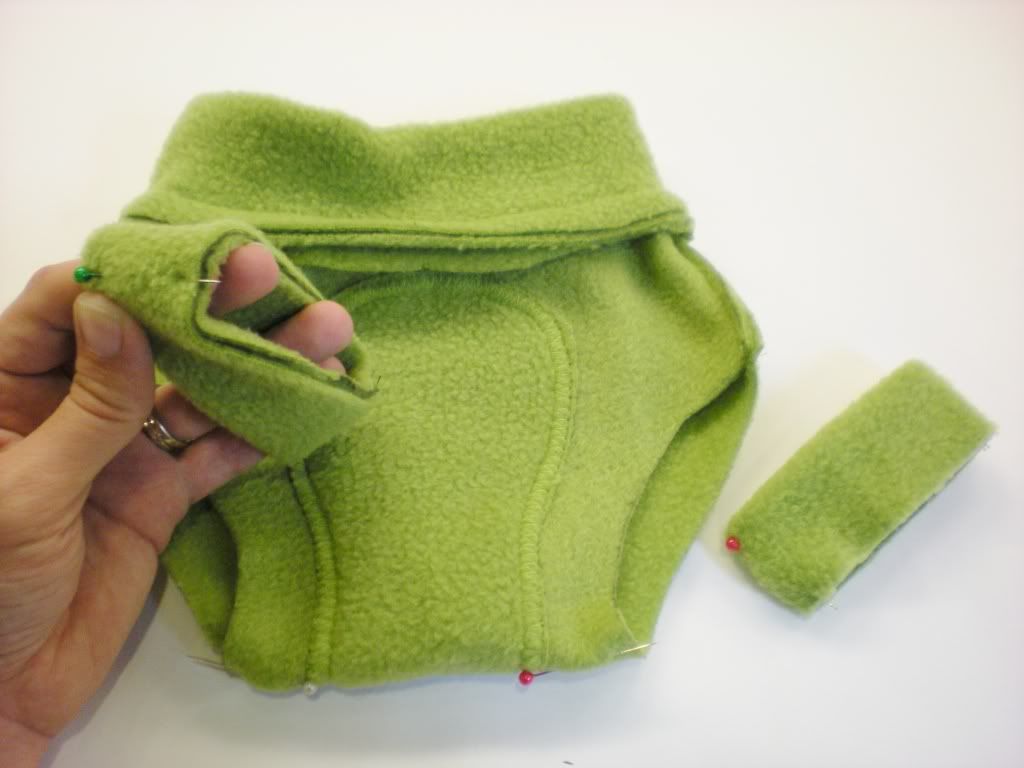
- Flip the waistband up and you are almost done. All you have to do is sew on the leg bands.
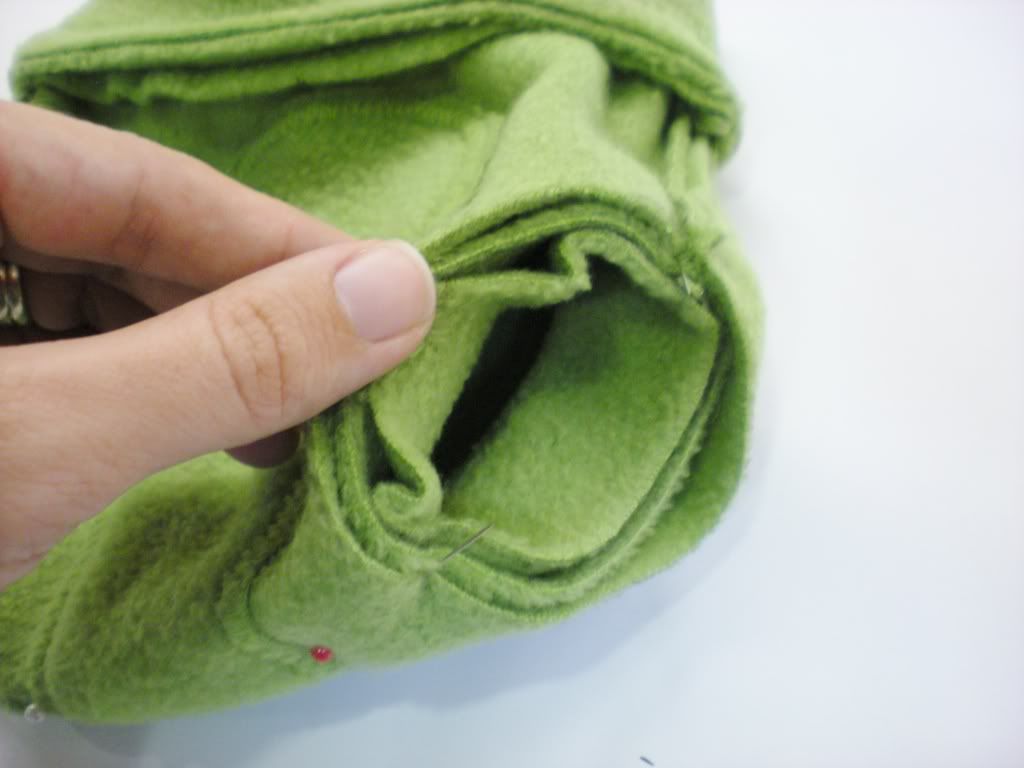
- Turn your soaker inside out. - Take one of your leg bands and fold it inside of itself so that the right sides are showing on both the outside and the inside. Use the seam to mark one side of the leg band and mark the exact opposite side with a pin.
- Slide your leg band inside one of the soaker leg holes with the cut edges of the leg band lined up with the cut edges of the soaker. - Pin the seam of the leg band to the seam of the soaker. Pin the opposite side of the leg band (that you marked with a pin) to the bottom of the soaker.
- Sew a straight stretch stitch around the edge of the leg hole attaching the leg band to the soaker. Make sure to stretch the leg band as you do this to evenly distribute the leg band around the leg hole. Do not stretch the soaker fabric. Go slowly so that you can make sure that the fabrics all line up.
- Repeat with the other leg band and leg hole.
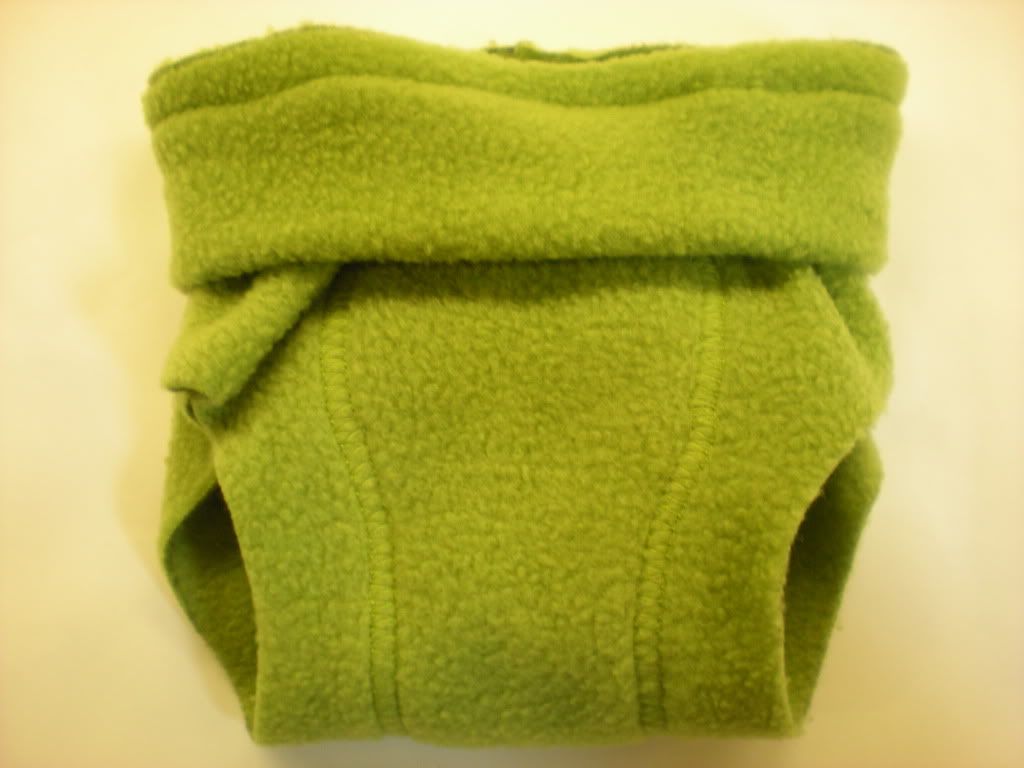
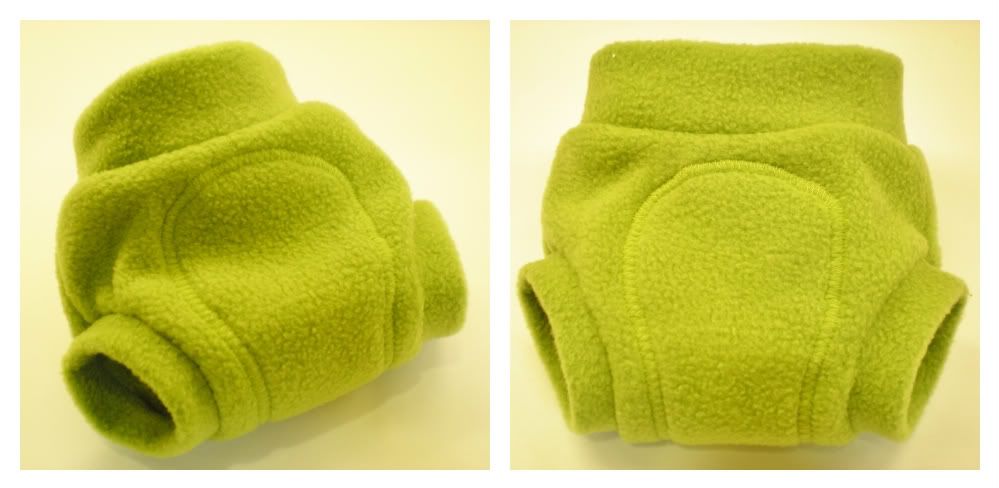
Voila!!!! You've just sewn your first fleece soaker! I've already sewn two newborn fleece soakers, three small fleece soakers, and one small wool soaker. The more I do the easier it gets. I do admit that those newborn leg holes were pretty tricky though. They're just so small.
I hope this tutorial helps you out when sewing your own fleece or wool soakers. I can't wait to try mine out very soon when Lincoln gets here. They're just so cute! Be sure to post pictures of your soaker creations on my Facebook page. I'd love to see them! Till then, keep checking back here for more great DIY projects, mommy and baby info, reviews, and giveaways as I continue on with my Adventures In Fluff ... and other mommy stuff.
Hi Chana, Thanks for posting this. I made my first newborn soaker, although I did have trouble getting the waistband and legs to stretch evenly, so they look a little bunched, and some of the layers didn't catch so I had to whipstich them down. Final effort is not quite as cute as the cover you posted.
Do these work like wool? Do you need to lanolin them?
Yeah, it takes a couple tries to get it right. If you looked closely at my newborn ones (the hardest size to make) you'd see that the leg bands are a little messed up on them (bunched or not even). After awhile you get the hang of how to stretch it evenly though.
These are sort of like wool in that you can use them as a cover, but they are not as bulletproof as wool. Most people would only use them as a daytime cover, not at night. They are a lot easier to take care of than wool though. You can just throw them in the washing machine with your diapers. If you use dryer sheets with your regular clothes I've heard that they work better if you dry them with a dryer sheet. Makes them more water resistant. I don't use dryer sheets on anything anymore though.
Oh my goodness Chana, I have been telling myself in the back of my head to find a tutorial for this and it keeps getting pushed to the back burner. I think this is a sign to get on it!! Thanks for the amazing tutorials!
This was super easy to follow! Thank you for the video! About how many do you think I will need in a NB size? I plan I using covers and flats as well as pockets, but these seem so practical for NB use. I may add a snap in the middle for the umbilical cord though.
If you do wool then you'll only need about 4 and you can just rotate using them since they are self cleaning. You only need to clean them when they start smelling like pee or get poop on them. Fleece is not the same though. You will need to clean those a lot more often. They're almost a once use cover unless you change your baby as soon as they get wet and the wetness doesn't get on the cover very much. I'd make 6-10 if they are fleece.
You could buy your own interlock wool online, but it's a lot cheaper to just head over to your local thrift store and get an old sweater. Just throw it in the washer and dryer to felt it up... if it isn't already.
I made some undies using repurposed t-shirts and that pattern. We're expecting #3 next year and I thought I'd try making some of my own cloth diapers and covers to add to my stash. Those wool covers can be really expensive! Do you know how fleece compares to the wool - does it stay as dry, etc.?
In my opinion, wool works better, but I think that the extra added bonus that you can throw fleece in the washer and dryer makes me still love it. You can always add another layer of fleece in the wet zone to make it even better.
I did this today. I really needed your video! Thanks. I didn't realize the patter needed to be taped together so that I'd just have one big piece, so I patched them together and sewed in two soakers to cover the seam at the bottom, inside of the diaper. Anyhow, this really helped me. Thanks!
I made my first one today, size medium. I used fleece scraps from a Halloween costume I just make. It is super adorable, but I question if it has enough stretch to stay on, but I guess I won't know till I try. I was thinking of making the waist and leg bands out of cotton ribbing. I was wondering though, if it would wick moisture out and up. What do you think?
I noticed there were two patterns one for fleece and another one. Do you happen to know what the difference between them is?
As long as you sew them with the stretch going sideways on the waist and legs, it should stretch pretty good. The other pattern is for wool... or they have a longies one for pants also.
Thank you for the tutorial! I want to make these with wool, but I have a question. I was hoping to use the cuffs of the sweater I'll be using, but they are not wide enough for me to fold over when making the waist and leg bands.. What did you do? just use the cuffs or use the sweater itself so you could double it over?
I also think it would work both using the main portion of the sweater and folding over or using the cuffs and not folding over. The only reason you really need to fold over is because the backside of fleece is unfinished looking and so is the edge, but the edge of the cuffs would be finished already.
Thank you for this pattern and tutorial! I have 9 beautiful newborn wool soakers *almost* finished! Just have to put leg cuffs on 7 of them. Back to work! Thank you so much!
Thank you for this tutorial!!! I was about to give up on the leg holes... But your video gave me the right direction!nAnd now my bundle of joy is sleeping soundly in his fleece cover :)
When you put your baby in a wool soaker over a prefold or fitted, can you put pants over the wool woaker? Or will the pants pull the urine out of the diaper and onto the pants?
I don't really use wool, but you should be able to put pants over them. At night I like fleece pants over my covers because they keep any moisture of leaking on the bed if it escapes. I like those fleece footies. They're by no means a cover, but more like extra protection.
This is by far the best tutorial ive seen yet! Wish i could pin it on my pinterest lol but most def saved in my browser. Going to give tgis a shot this weekend :)
Hello Chana, congratulations on the awesome tutorial! I have only one question: did you have to lanolize the wool covers, or were they ready to use just the way they are - like the fleece ones? (sorry if i doubled the post, i tried to post before but i'm not sure if it got published)
Thanks so much for taking the time to show your support with a comment! I LOVE reading all of them and will try and answer any questions that you might have. :)


 - Take your waistband and fold it inside of itself so that the right sides are showing on both the outside and the inside. Let the seam mark the exact middle of the back of the waistband. Mark the exact middle of the front of the waistband with a pin. Mark both the exact sides of the waistband with pins.
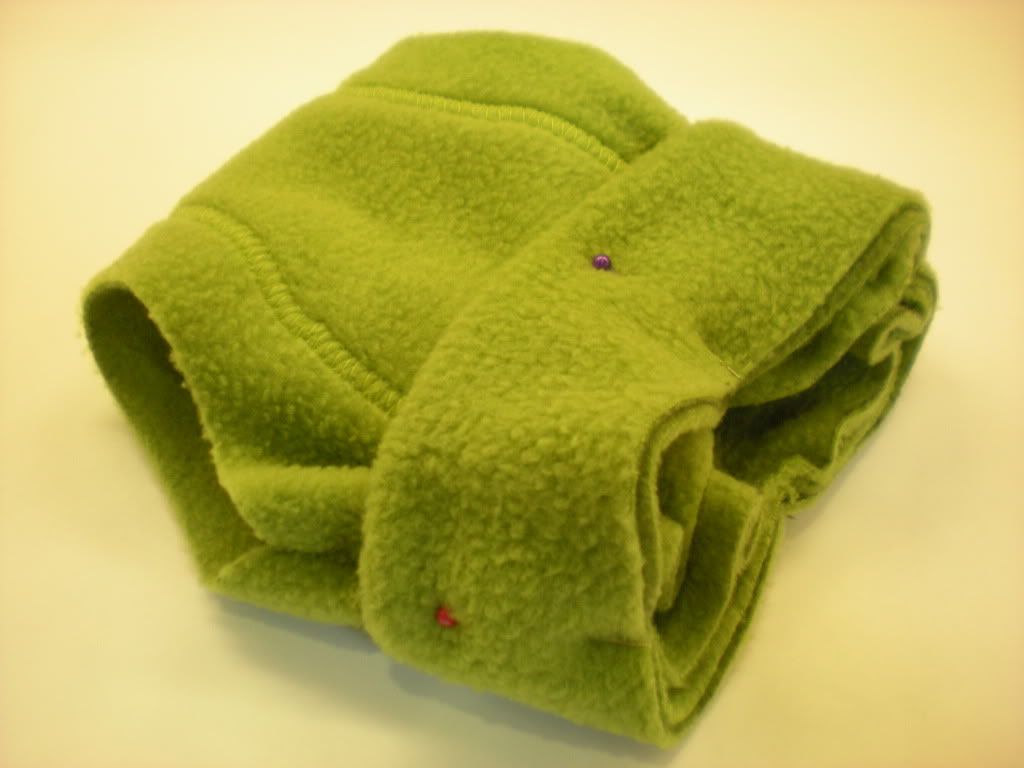


Hi Chana,
ReplyDeleteThanks for posting this. I made my first newborn soaker, although I did have trouble getting the waistband and legs to stretch evenly, so they look a little bunched, and some of the layers didn't catch so I had to whipstich them down. Final effort is not quite as cute as the cover you posted.
Do these work like wool? Do you need to lanolin them?
Thanks,
Megan (superfache FF)
Yeah, it takes a couple tries to get it right. If you looked closely at my newborn ones (the hardest size to make) you'd see that the leg bands are a little messed up on them (bunched or not even). After awhile you get the hang of how to stretch it evenly though.
ReplyDeleteThese are sort of like wool in that you can use them as a cover, but they are not as bulletproof as wool. Most people would only use them as a daytime cover, not at night. They are a lot easier to take care of than wool though. You can just throw them in the washing machine with your diapers. If you use dryer sheets with your regular clothes I've heard that they work better if you dry them with a dryer sheet. Makes them more water resistant. I don't use dryer sheets on anything anymore though.
Oh my goodness Chana, I have been telling myself in the back of my head to find a tutorial for this and it keeps getting pushed to the back burner. I think this is a sign to get on it!! Thanks for the amazing tutorials!
ReplyDeleteThis was super easy to follow! Thank you for the video! About how many do you think I will need in a NB size? I plan I using covers and flats as well as pockets, but these seem so practical for NB use. I may add a snap in the middle for the umbilical cord though.
ReplyDeleteIf you do wool then you'll only need about 4 and you can just rotate using them since they are self cleaning. You only need to clean them when they start smelling like pee or get poop on them. Fleece is not the same though. You will need to clean those a lot more often. They're almost a once use cover unless you change your baby as soon as they get wet and the wetness doesn't get on the cover very much. I'd make 6-10 if they are fleece.
DeleteThank you!!! What kind of wool should I use, I don't own sweaters to up cycle.
DeleteThank you! What type of wool should I use? I don't own any sweaters or do I have a thrift store near by. Would Joanns have anything?
DeleteYou could buy your own interlock wool online, but it's a lot cheaper to just head over to your local thrift store and get an old sweater. Just throw it in the washer and dryer to felt it up... if it isn't already.
DeleteI made some undies using repurposed t-shirts and that pattern. We're expecting #3 next year and I thought I'd try making some of my own cloth diapers and covers to add to my stash. Those wool covers can be really expensive! Do you know how fleece compares to the wool - does it stay as dry, etc.?
ReplyDeleteIn my opinion, wool works better, but I think that the extra added bonus that you can throw fleece in the washer and dryer makes me still love it. You can always add another layer of fleece in the wet zone to make it even better.
ReplyDeleteI did this today. I really needed your video! Thanks. I didn't realize the patter needed to be taped together so that I'd just have one big piece, so I patched them together and sewed in two soakers to cover the seam at the bottom, inside of the diaper.
ReplyDeleteAnyhow, this really helped me. Thanks!
I made my first one today, size medium. I used fleece scraps from a Halloween costume I just make. It is super adorable, but I question if it has enough stretch to stay on, but I guess I won't know till I try. I was thinking of making the waist and leg bands out of cotton ribbing. I was wondering though, if it would wick moisture out and up. What do you think?
ReplyDeleteI noticed there were two patterns one for fleece and another one. Do you happen to know what the difference between them is?
Thank you
As long as you sew them with the stretch going sideways on the waist and legs, it should stretch pretty good. The other pattern is for wool... or they have a longies one for pants also.
DeleteThank you for the tutorial! I want to make these with wool, but I have a question. I was hoping to use the cuffs of the sweater I'll be using, but they are not wide enough for me to fold over when making the waist and leg bands.. What did you do? just use the cuffs or use the sweater itself so you could double it over?
ReplyDeleteHope this makes sense..
Thanks!
The sweater I used had a big waistband on it. That's what I used for the waist and legs of my wool soaker.
DeleteI also think it would work both using the main portion of the sweater and folding over or using the cuffs and not folding over. The only reason you really need to fold over is because the backside of fleece is unfinished looking and so is the edge, but the edge of the cuffs would be finished already.
DeleteThank you for this pattern and tutorial! I have 9 beautiful newborn wool soakers *almost* finished! Just have to put leg cuffs on 7 of them. Back to work! Thank you so much!
ReplyDeleteThank you for this tutorial!!! I was about to give up on the leg holes... But your video gave me the right direction!nAnd now my bundle of joy is sleeping soundly in his fleece cover :)
ReplyDeleteWhen you put your baby in a wool soaker over a prefold or fitted, can you put pants over the wool woaker? Or will the pants pull the urine out of the diaper and onto the pants?
ReplyDeleteI don't really use wool, but you should be able to put pants over them. At night I like fleece pants over my covers because they keep any moisture of leaking on the bed if it escapes. I like those fleece footies. They're by no means a cover, but more like extra protection.
ReplyDeleteHow many soakers can I make from one yard of fleece?
ReplyDeleteI am really struggling with the waistband...any advice? I can't get it to stretch enough for the pant part.
ReplyDeleteHmmmmm... Do you have the fabric going in the right direction? One direction stretches while the other does not.
DeleteThis is by far the best tutorial ive seen yet! Wish i could pin it on my pinterest lol but most def saved in my browser. Going to give tgis a shot this weekend :)
ReplyDeleteCan you interlock or cotton lycra for this diaper cover?
ReplyDeleteHello Chana, congratulations on the awesome tutorial! I have only one question: did you have to lanolize the wool covers, or were they ready to use just the way they are - like the fleece ones?
ReplyDelete(sorry if i doubled the post, i tried to post before but i'm not sure if it got published)